
Blush Tips from a Makeup Artist
Beauties, I would love to share with you some blush tips I’ve learned along the way as a makeup artist that will allow you to feel more comfortable when it comes to adding a little “cheeky” pop of color from time to time!
Blush happens to be one of the most underused and misunderstood makeup products out there. In fact, I’ve known women to avoid it altogether, worried they might look foolish, merely because they are unsure about color choices and exactly how to apply it. While others simply don’t realize the power of blush and how it can transform the face instantly.
From picking the right color, and deciding on the type (formula), to figuring out the most flattering way to apply it, I know it can be a bit overwhelming. Well, all of that is about to change, as we are going to cover all of these!
Do you remember the day you picked up your first blush?
I remember being an early teenager walking down the drugstore makeup aisle, trying to decide on my very first blush. I was so excited as this was the very first makeup item my mother was permitting me to wear finally. I was like a kid in a candy shop. Even back then, I knew the value in that “cheeky” pop of color!
And to this very day, I love how blush can easily brighten up the face, giving a nice radiant, youthful, and healthy look!
So, Beauties, if you are looking for that gorgeous “cheeky” pop, look no further! I am going to break down everything you may have been wondering about blush, so it can no longer remain a mystery.
Disclosure: This post contains affiliate links, which means I may receive a small commission, at no extra cost to you, if you make a purchase using one of these links. For more info, please see our Disclosure Policy. As an Amazon Associate, I earn from qualifying purchases.
Finding Your Cheeky Shade:
What color blush should I use?
The general rule for achieving the most natural blush look is to think about the color your cheeks turn after you are flushed from a vigorous workout, after being out in the cold, or perhaps just playfully embarrassed.
Now obviously, this can be a bit hard to determine for darker skin tones, and let’s face it, who is actually holding a mirror to their face in all of those circumstances?? Right!? Which is why having some guidelines can help!
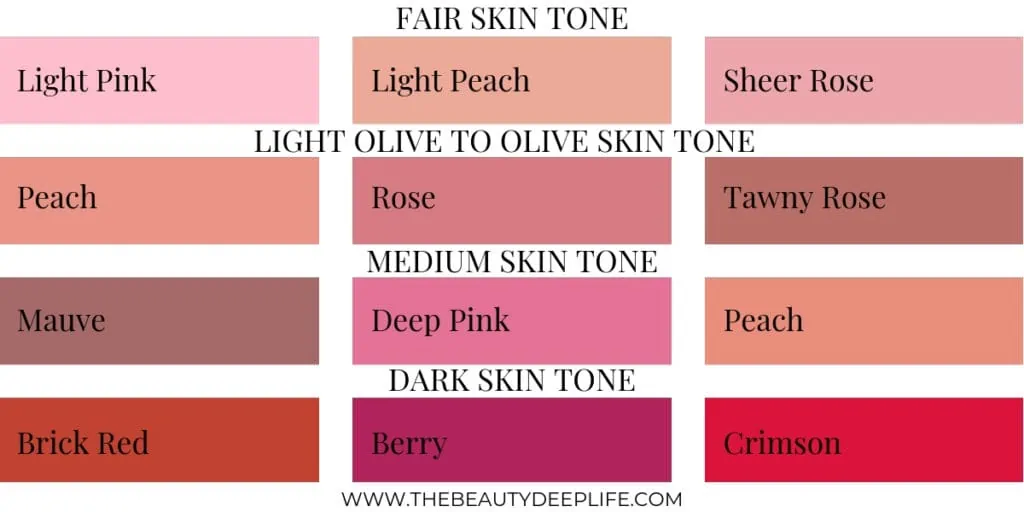
So, here are the general guidelines based on skin tone that you want to follow when picking blush. Use this guide when shopping online; it will make narrowing down on options so much easier.
Quick PRO Tip: A few of these blushes come with FREE same-day, one-day, or 2-day shipping with an Amazon Prime membership. Don’t have Amazon Prime yet? You can always grab a FREE 30-day trial here!
Related: The 17 Best Peach Blushes For Gorgeous Warmth & Healthy Radiance!
Fair Skin Tone
- Your most flattering colors are light shades of pink, light peach, and sheer rose.
Some Of Our Top Blush Picks For Fair Skin:
- L’Oréal Paris True Match Blush in Baby Blossom
- COVERGIRL Cheekers Blendable Powder Blush in Classic Pink
- Milani Baked Blush in Luminoso
- Jane Iredale PurePressed Blush in Barely Rose
- Benefit Cosmetics Dandelion Baby-Pink Brightening Blush
Light Olive to Olive Skin Tone
- The most flattering colors for you are peach, pale apricot, sheer coral, mid-range or deep rose, tawny rose (brownish rose), and some golden browns.
Some Of Our Tops Picks For Light Olive To Olive Skin:
- Too Faced Papa Don’t Peach
- L’Oreal True Match Super-Blendable Blush in Subtle Sable (Burnt Rose)
- MAC Blush in Peaches
- NARS Blush in Orgasm (Peachy Gold)
- MAC Blush in Coppertone
- MAC Blush in Desert Rose
Medium Skin Tone
- The colors that look best on you are mid-range apricot or peach, rose, mauve, and mid-range pink…Additionally, the more tanned your skin is, the more you can experiment with other colors like deep or tawny rose, deep pinks, and sheer cherry.
Some Of Our Tops Picks For Medium Skin:
- Too Faced Love Flush Blush in “How Deep is Your Love”
- Anastasia Beverly Hills – Blush Trios – Cocktail Party
- Becca Mineral Blush in Hyacinth
- Lorac Color Source Blush in Chroma
- Laura Mercier Blush Colour Infusion in Peach
Dark Skin Tone
- Your best colors are apricots,
reds like a brick, dark bronze, berry, deep pink, reddish purples, crimson, plum, and cinnamons with some shimmer.
Some Of Our Tops Picks For Dark Skin:
- MAC Blush in Raizin
- NYX HD Blush in Crimson
- BECCA Mineral Blush in Lantana Crimson
- Black Radiance Artisan Color Baked Blush in Raspberry
- BECCA Shimmering Skin Perfector Luminous Blush in Blushed Copper
- BECCA Luminous Blush in Dahlia
- NARS Blush in Taos
- NARS Blush in Seduction
Should your blush match your lipstick?
Rather than “match,” I would say it’s more that they should coordinate and complement each other. The best way to do this is to focus on their undertones.
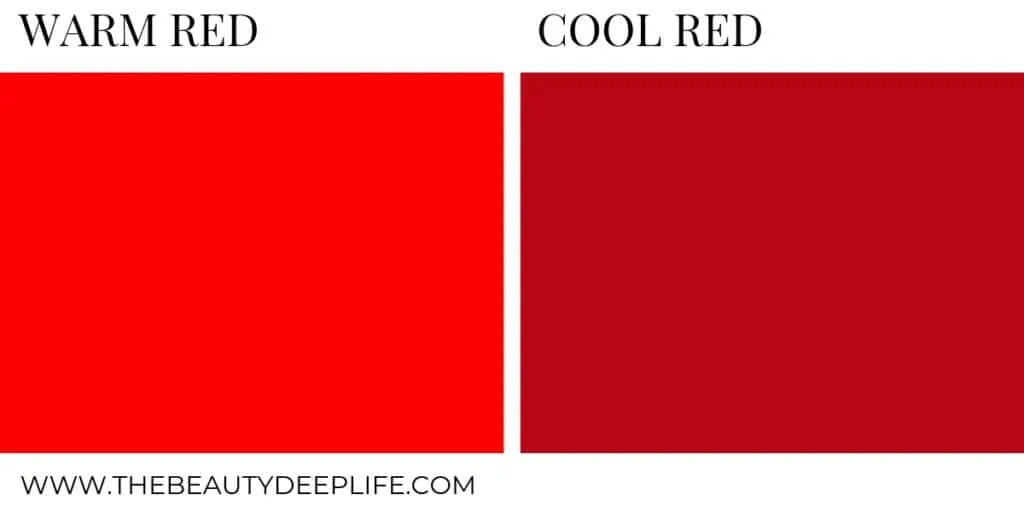
If your lipstick has a warm undertone, you need a warm blush. If it has a cool undertone, you need a blush with a cool undertone. You want to try and stay in the same color family too, as they should be related but not identical.
So you can understand undertones better, below is an example of cool vs. warm. Red is probably the easiest visible way to demonstrate this.
However, I generally tend to suggest clients use a subtle-looking blush with red lips.
Formula 101:
What type of blush should I use?
Blush can come in a variety of different formulas, but the best way to determine which you should use can be gauged by your comfort level and skin type.
Pro Tip: If you are a beginner at blush and aren’t super comfortable with it yet, go for the powder option!
Powder
Powder blush can create a natural look and is definitely the easiest to use as far as application and blending. Also, it’s more forgiving than the other formulas in that if you mess up, it’s pretty easy to correct.
It works great on every skin type except for very dry or flaky skin. Using powder blush on those skin conditions can make fine lines and flaky patches more obvious.
Those with oily or combination skin will find it works wonderfully at absorbing excess oil. Finally, it is also a great choice if you struggle with enlarged pores.
Cream
Cream blush is the second easiest option as far as application, blending, and ability to control. It can create a natural, dewy glow and finish to the skin.
This formula works the absolute best on mature and dry skin. In fact, for mature or aging skin, it creates a more youthful appearance. Unlike powder, it won’t magnify fine lines and wrinkles on the face.
By contrast, if you have oily skin, you will want to avoid cream blush. Otherwise, you could find yourself looking rather greasy as the day progresses.
In addition, if you have acne-prone skin, you will also want to avoid this option as it could lead to some unwanted breakouts.
Liquids – Stains & Gels
Liquid Blushes can be the hardest to work with. Gels are a bit easier than stains, but they are both the least forgiving of all the formulas if you make a mistake.
Unfortunately, they require you to work a bit faster, and stains are definitely the least blendable.
However, if you have oily skin or normal skin, gels and stains can work well for you. If you have normal skin, you may just need to be certain to use a good moisturizer before applying. Both tend to be water-based.
Blush Tips for Application:
How to apply blush on cheeks for beginners?
With beginners, I always suggest starting with powder blush instead of a cream, gel, or stain. Simple blush application tips using powder can be found in the beginner’s makeup guide.
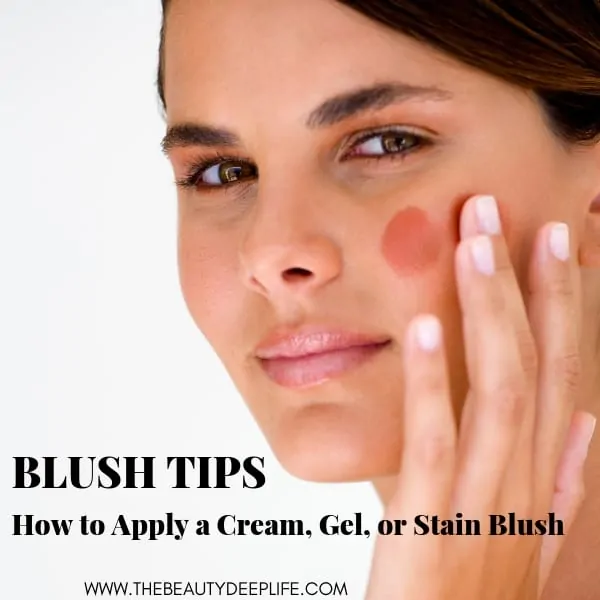
How do I apply creams, gels, and stains?
- For each of these formulas, you want to start on moist skin. Therefore, you want to apply it to your face after having applied your concealer and foundation. If, however, you forgo foundation coverage, you want to apply it to the skin following your moisturizer.
- Cream, stains, and gels can all be applied with your fingertips. With each of these formulas, always start light and then build or add as needed. Take a dab of the product on your middle finger and apply it to the face starting at the apples of the cheek. Another option is after applying there; you can also apply two more much smaller dots going up along your cheekbones.
- You want to go upwards and outwards, blending along the cheekbones. Blend in circular motions. You can blend using your middle and ring fingers combined, or you can use a blush brush. Be sure to blend out any harsh edges. If you decided to try applying the other two smaller dots option, focus on connecting the dots as you’re blending from the apple to the 2nd dot and then 3rd.
Pro Tips: If you decide to use a brush for gel blush, a synthetic bristled, stippling brush will work best. For cream blush, slightly angled brushes work really well.
To blend our harsh edges, if you don’t want to use your fingers, another helpful tool is a wedged sponge or beauty blender.
Where should blush be applied?
This is when blush becomes fun, exciting, and can allow you to apply like Pro! You see, playing around with blush placement can do a variety of different things for the face.
- For mature women, blush can give a youthful glow and lift the face.
- If your skin is a bit dull or pale, it can brighten the face and give you a healthier appearance.
- It can also work to bring the whole face together in more harmony.
- Lastly, you can play with your facial dimensions a bit based on the shape of your face.
Pro Tip: If you have dark undereye circles, you can use blush to draw attention away from them. Just apply a bright blush right under your orbital bones to the apples of your cheeks. Be sure to blend out along your cheekbones. Pinks and roses work great as they can make you look less tired and appear to radiate good health.
Now to fully answer the question, “where should blush be applied?”
Well, this depends on the look you are going for and your level of expertise. But here are some options to experiment with beauties!
Blush tips for mature women
Women in their 30s, apply blush to the high part of the apples of your cheeks. Then sweep and blend backward along the cheekbone and towards the hairline. This can give a nice subtle lift to the face.
Women 40’s and up, don’t smile to find the apples of your cheeks. In fact, forget about the apples of your cheeks altogether.
Sadly ladies, being in my 40s myself, I have to tell you that our apples are not quite what they used to be. Like everything else, the apples head south!
So, what do we do instead??
- Focus on the upper part of your cheekbones.
- Your cheekbones roughly start around 3/4 to 1 inch below your eye. Sweep blush back and upwards along the cheekbones towards the hairline.
- Be careful not to apply blush below the cheekbones, as this will pull or draw the face down.
- You want to also keep your blush from going too far inwards towards the center of your face. My general rule for this is to start from the cheekbone but avoid going any further than the outer edge of my iris.
Blush tips for creating a healthy appearance and harmony of the face
Assuming age is not a factor, start at the apples of the cheeks, and blend upwards towards the temples. Then apply a very light sweeping of blush to the temples, chin, and forehead. This sort of warms the face up a bit for a healthy look.
Blush tips for different face shapes
First, let me say that none of these
I suggest you play around with these ideas and see what works for you. If you ever need help, shoot me an email.
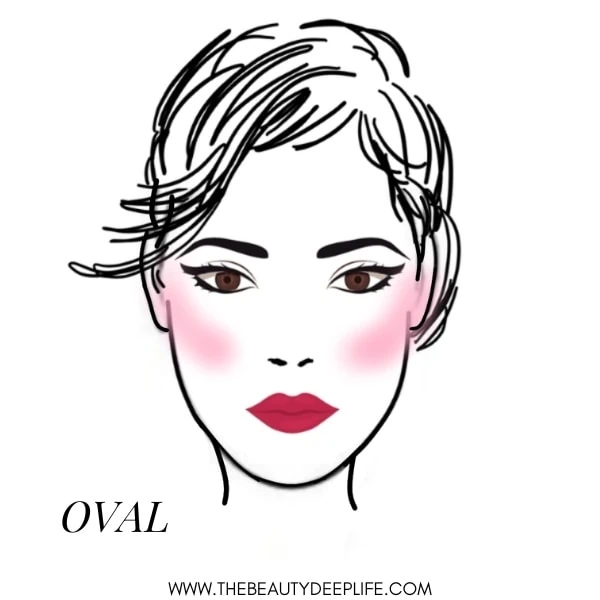
How to apply blush on an oval face
If your face is oval, there really isn’t much you need to do as far as changing your face shape. You have quite a few options to play with.
- 1st METHOD: Try the “Nike” swoosh method…Apply to the apples and sweep upwards towards your temples.
- 2nd METHOD: Apply on your cheekbones and blend out towards your temples.
- 3rd METHOD: Apply and sweep along the upper part of the cheekbones back towards the hairline.
How to apply blush to a round face
For a round face, the goal is to slim it down a bit and create the illusion of more angles. So, first and foremost, we want to avoid the apples of the cheeks. Applying color there will just draw more attention to the roundness of the face.
Instead, you want to apply it along the cheekbones in an upward fashion. This comes down to a sharp-angled application. Your cheekbones should rest at a 45-degree angle on your face. So, as you apply the blush, just follow along that 45-degree angle.
I find this method to be quite effective, but it is not the only method to diminish the appearance of roundness of the face.
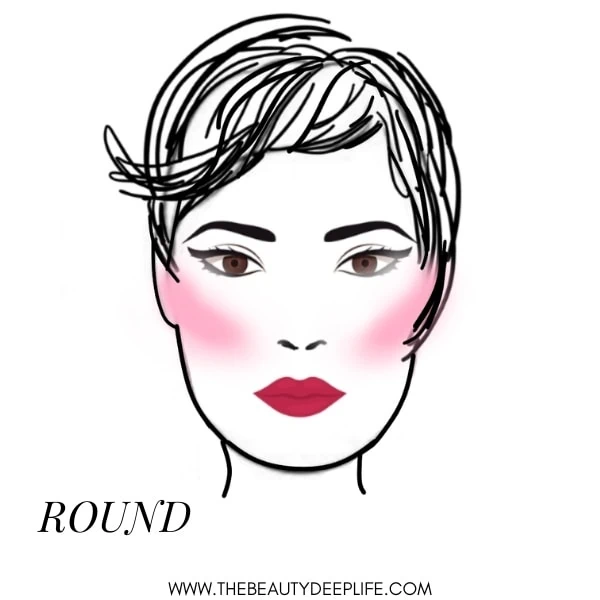
Other Methods You Can Try For A Round Face Instead:
- METHOD 2: Try applying your blush like a sideways “V” on your cheekbones. Again, focus on cheekbones and avoid apples of the cheeks.
- METHOD 3: Avoid applying right on the apples of the cheeks and instead apply blush slightly lower and on the outer side of your cheeks. You do not actually go under the cheekbones; however, you should get close. Then sweep it backward in the direction of the hairline.
Related: How To Wear Makeup For A Round Face: A Quick & Simplified Guide
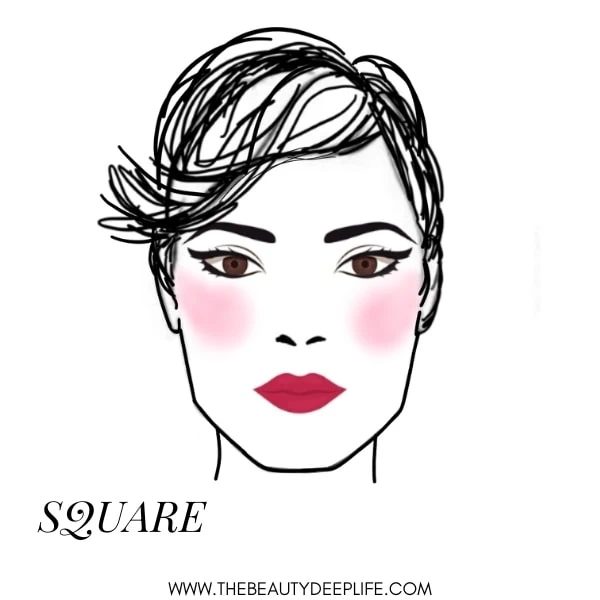
How to apply blush to a square face
With a square-shaped face, the goal is to soften some of the angles, like the jawline. You want to draw attention away from them.
To do this, the apples of the cheeks need to be focused upon. So, apply the most powerful punch of color directly to the apples, like 2 circles, one on each apple.
You can then blend a little bit softly outward at an angle but be sure not to go horizontally. Too much horizontal, and you wind up making a face look wider again.
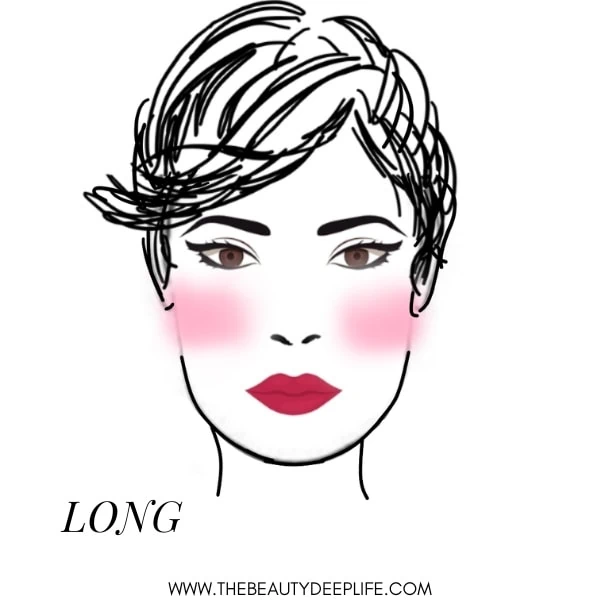
How to apply blush to a long face
The goal for a long face is that we want to draw attention away from the length and enhance the width. To do this, we want to apply blush from the apples in a horizontal fashion, blending back towards the hairline and ear.
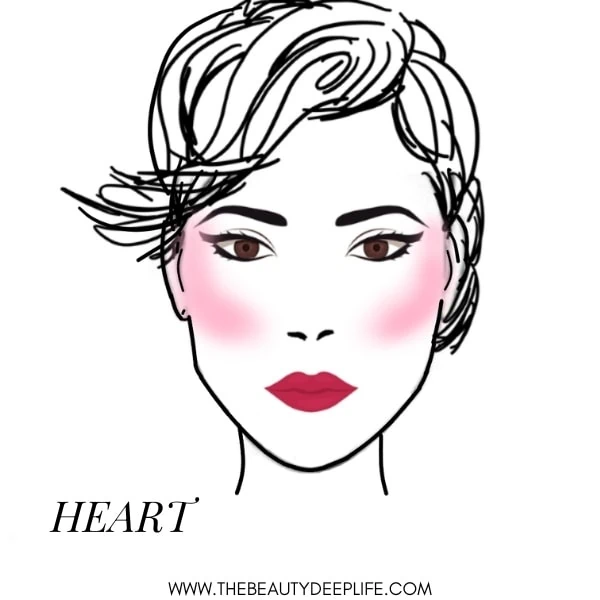
How to apply blush on a heart-shaped face
For a heart-shaped face, we want to draw attention away from sharp, pointed angles to the face and soften things up a bit.
To do this, we want to draw attention away from a sharply pointed chin and instead towards the cheek area.
Softly apply blush from the bottom part of your cheekbones up towards the temples. It should look a bit like a parenthesis or a partial letter “C.”
Extra Blush Tips & Tricks:
How to make blush last longer?
One blush tip to making blush last longer is to try using a cream, gel, or stain blush with a powder blush. Make sure the two blushes match in color. For the powder blush, look for something sheer.
First, apply your foundation, then apply the cream, gel, or stain blush and blend it out. Next, you will layer your powder blush on top of the cream to set it. Take the powder brush and tap off any excess powder before applying. Do not sweep the powder blush on. Instead, you want to tap or press it on lightly.
How do I tone down my blush?
Powder
If you overapply your powder blush and need to tone it down, simply try taking a clean brush and buffing it out a bit. If this doesn’t work, next take some translucent powder and dust it over the area. This should tone take the intensity down a few notches.
If you find this happens often and it goes on too concentrated, always make sure you are tapping off excess blush powder from your blush brush before applying it to your face.
Cream
For cream blush, if you accidentally applied too much, you can use a tissue to blot the color off a bit.
Gels & Stains
Gels and stains get a little more complicated as far as making mistakes or overapplying products. If you need to tone it down a bit, try applying a little bit of foundation back over the area again.
But if this doesn’t work, you can try a makeup wipe over the area and then reapply foundation and blush again.
Lastly, if that doesn’t improve things, then you will have to wash your face, apply moisturizer, and start over.
Do you apply cream blush before your face powder?
Always apply your cream blush before applying your face powder. If face powder is applied over cream blush, it will be hard to blend. So, you want to apply the cream blush first, blend it, and then apply the powder to set the look.
ARE YOU AGE 40 & UP??
The Newest Makeup Guide, “How To Look Younger Makeup Secrets,” Is Now Officially Available!! Learn How To Defy Your Age And Look 10 Years Younger In Minutes!! Click here to find out all about it!

Disclosure: Please Note- Chapter 4 cover page of this makeup guide contains images that were AI-generated.
Final Thoughts
Blush is that one unique and special product that can make you look younger, healthier, and even less tired. Not to mention you can use it to play around with the dimensions of your face and create some illusions, which can be fun!
It certainly does not need to remain a makeup mystery, from color choices to the formula to application and technique; I sincerely hope this post has simplified things a bit for you. However, please know you can always reach out to me for help and more blush tips. I’d love to share all that I can! I hope you enjoyed these blush tips and tricks!!
What is your favorite go-to daily blush color? Are you more of a powder, gel, cream, or stain kind of woman? Leave a comment, ladies; I would love to hear your thoughts on blush.
Related Makeup & Beauty Articles:
- How To Contour Your Face The Right Way: Get The Inside Scoop!
- Eyeshadow Tips For Beginners
- How To Apply Eyeshadow Like A Pro
- Makeup Tips To Look Younger Using Brows & Lips
- 30 Exceptional Beauty Tips for Eyebrows!!
We are a participant in the Amazon Services LLC Associates Program, an affiliate advertising program designed to provide a means for us to earn fees by linking to Amazon.com and affiliated sites. For more info, see Disclosure Policy.
Thanks for sharing the informative information. Already I have visited many times and benefited this content. I have a beauty tips and health care related blog or company where your will get best products for men and women. Thanks again.