
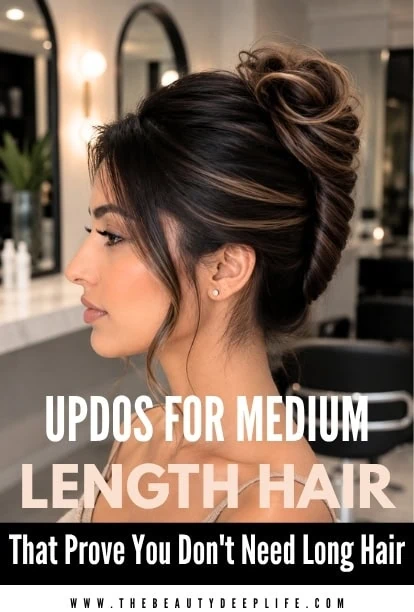
There’s a persistent myth in the styling world that updos are reserved for people with floor-grazing manes. If you’ve ever dismissed a beautiful pinned look because you thought your cut was “too short,” it’s time to rethink that. Updos for medium-length hair are not just possible—they’re often easier to pull off than versions attempted on very long hair.
Mid-length hair gives you enough to work with, without the overwhelming bulk that can make longer styles difficult to pin and keep in place. It sits in a sweet spot that works especially well for buns, twists, braids, and sculpted hairstyles alike.
23 Updos For Medium Length Hair
From low buns and French twists to braided options and voluminous high updos, these 23 ideas prove just how much you can do with your hair, gals!
1. Voluminous French Twist
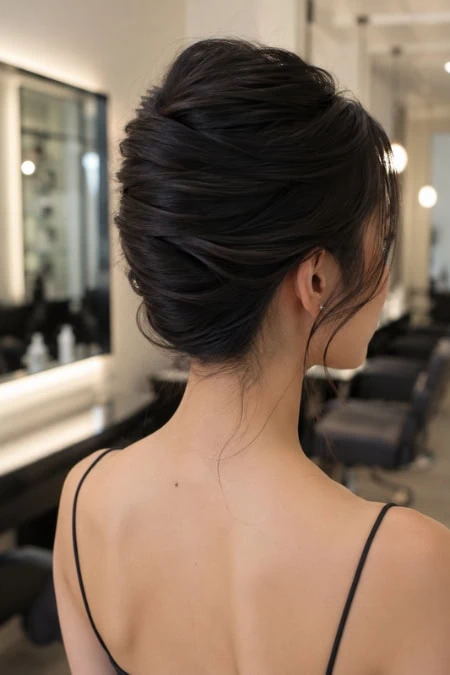
This is the French twist, but make it bold. Rather than a sleek, flat roll, the hair sweeps broadly across the back before disappearing into a vertical roll. Added height through the top and a few wispy front strands keep it from looking too severe. It’s polished without feeling stiff.
How to achieve it:
- Add lift at the roots with a volumizing mousse or spray.
- Sweep the hair toward one side and fasten the center with bobby pins.
- Roll the remaining hair inward over the anchored center to form the twist, then secure it vertically.
- Lift the hair at the crown and adjust the overlapping layers to create more depth.
Medium hair note: You can leave shorter layers around the face free or style them into soft tendrils for a softer finish.
2. Romantic Chignon
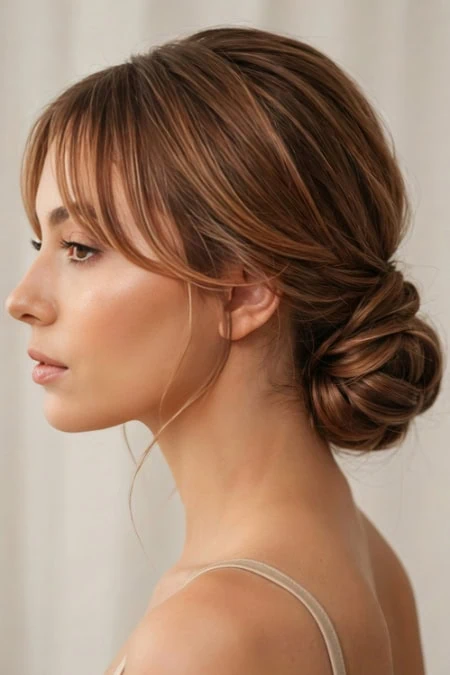
Soft, structured, and effortlessly elegant, this chignon places the hair into a low, lightly constructed bun at the neckline, with overlapping layers giving it plenty of dimension. Long curtain bangs and fine tendrils frame the face for a relaxed, romantic effect.
How to achieve it:
- Leave the front free and collect the remaining hair into a low ponytail.
- Divide the ponytail into several portions, then twist and fold each one around the base.
- Pin each individually to build the chignon’s rounded shape.
- Carefully adjust the folds for added dimension before setting everything with light-hold hairspray.
Medium hair note: This is one of the most flattering wedding updos for medium hair. The lower placement works ideally with your locks and provides a reliable hold without requiring additional reinforcement.
3. Dutch Braid Low Bun
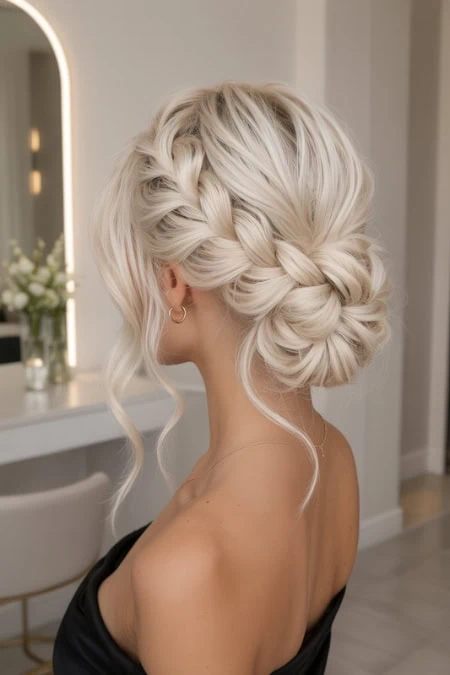
This one’s got personality. A wide Dutch braid travels diagonally across the back of the head before flowing into a bun at the neck. The pulled-apart braid and free-flowing front strands give it plenty of density and visual interest.
How to achieve it:
- Begin a Dutch braid near the upper side of the head, adding hair as you work diagonally toward the opposite side.
- Lightly pull apart the braid panels for extra width and texture.
- Take the remaining hair low behind the head, then twist it into a bun.
- Adjust the bun as needed for symmetry and hold
Medium hair note: The diagonal braid direction works with—not against—medium lengths, helping the finished updo appear balanced rather than sparse.
4. Voluminous Messy Updo
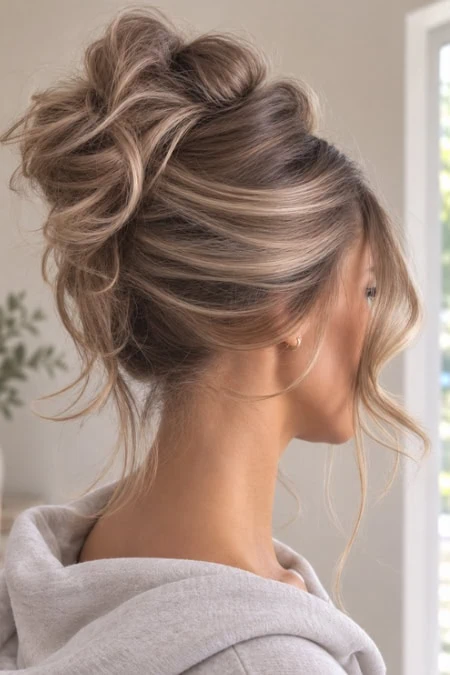
This is the updo for anyone who’s ever said, “I can’t do an updo.” Big volume and deliberately relaxed shaping define the look. The hair is swept upward and arranged into a high cluster of folds and curls, with wisps left free around the sides and base of the neck.
How to achieve it:
- Add body from the roots to the ends before you start.
- Sweep the hair toward the top of the head, then divide it into portions.
- Twist and fold each one, arranging them into a high, irregular cluster rather than forming a traditional bun.
- Softly tug at the pinned areas and top to increase width, then release a few fine strands for that slightly undone result.
Medium hair note: The less structured construction is well suited for those with medium-length hair because each portion can be incorporated separately rather than stretched to reach a single bun.
5. Double Space Buns
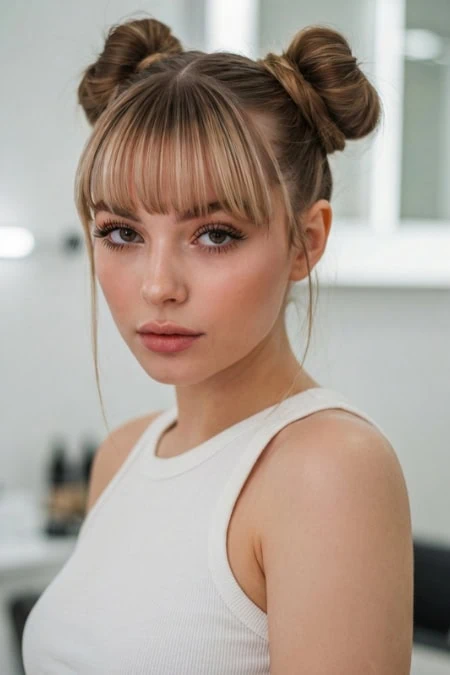
Playful, bold, and endlessly fun. Two rounded knots positioned high on either side of the crown give this one its instantly recognizable shape, with bangs and long side strands framing the face.
How to achieve it:
- Divide the hair into two even segments and tie each into a high ponytail.
- Twist each around its base to form a bun, then fasten discreetly.
- Softly tug the buns outward to increase their size.
- Make sure they sit at roughly the same height and distance from the center part.
Medium hair note: Medium-length hair is particularly well suited to space buns, providing enough hair to build rounded shapes without so much weight that they begin to droop.
6. Low Braided Bun
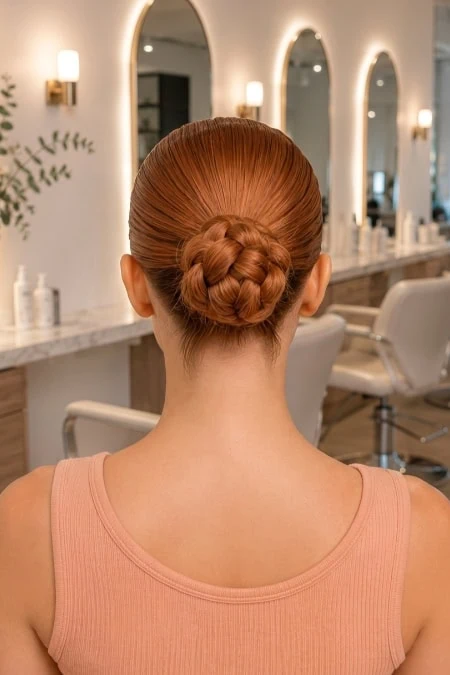
This isn’t your standard braided bun. The hair is kept slick on the top and sides before being arranged into a compact, finely woven bun at the nape. Unlike styles made from a single braid, this one gives a more dimensional, textured pattern.
How to achieve it:
- Guide the hair into a low ponytail and then separate the tail into several portions.
- Braid each section, keeping the plaits fairly tight and defined.
- Coil and overlap the braids around the base, securing each.
Medium hair note: Working in smaller areas is key here—it keeps the braided detail visible and well-defined even with shorter hair.
7. Multi-Twist Bun
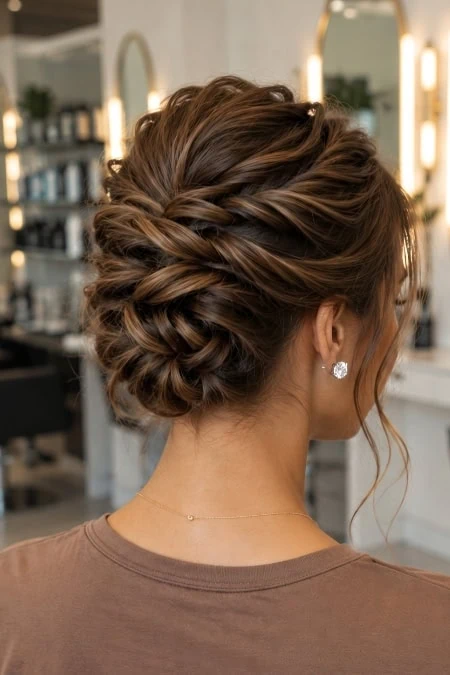
Multiple twists cross and overlap across the back before being tucked into a low, lightly arranged bun—giving a woven appearance without actually using braids. It may come off as intricate, but the technique is more forgiving than it seems.
How to achieve it:
- Divide the hair into several portions, beginning with the upper sides.
- Twist each portion toward the center, crossing and pinning them diagonally as you work downward.
- Turn the remaining hair into a loosely arranged bun and tuck the ends beneath the crossed twists.
Medium hair note: The individual twists mean you’re working in smaller amounts of hair at a time, which actually makes this style easier to manage on hair that falls around the shoulders.
8. Sleek Low Bun With Middle Part
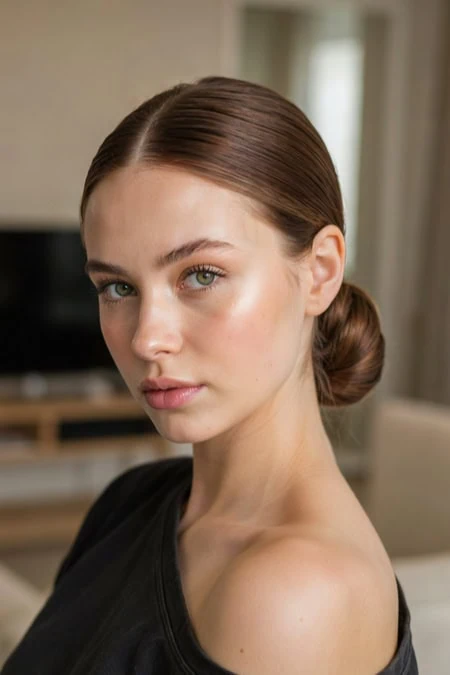
Clean, sharp, and unmistakably chic. A precise center part and closely controlled roots give this low bun its streamlined silhouette—no wisps, no flyaways, just a smooth, polished result.
How to achieve it:
- Create a straight middle part and apply styling gel or cream through the roots.
- Comb both sides back into a low ponytail.
- Twist the ponytail around its base, tuck the ends underneath, and secure.
- Use a fine-toothed comb to smooth any surface flyaways.
Medium hair note: The sleek base means shorter or uneven layers stay hidden underneath, making this one of the most reliable simple updos for medium hair.
9. Low Chignon Twist
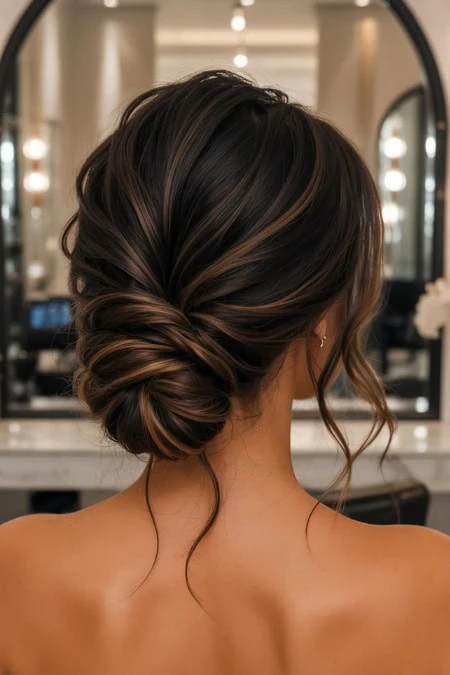
This low chignon gets its shape from wide ribbons of hair that sweep inward and overlap in thick layers before forming an elongated bun. Gentle volume through the roots prevents the result from appearing flat, while a few curled tendrils add a touch of contrast.
How to achieve it:
- Leave a little hair free around the face and lightly loosen the top for body.
- Bring the hair from each side toward the center, cross it over, and fasten it in place.
- Bring the remaining hair together, then fold and tuck it horizontally into a low chignon.
- Curl the hair near the face for a softer effect.
Medium hair note: The ribbon-like arrangement works beautifully with your hair and adds visual dimension that shorter styles commonly lack.
10. Low Bun With Face-Framing Curls
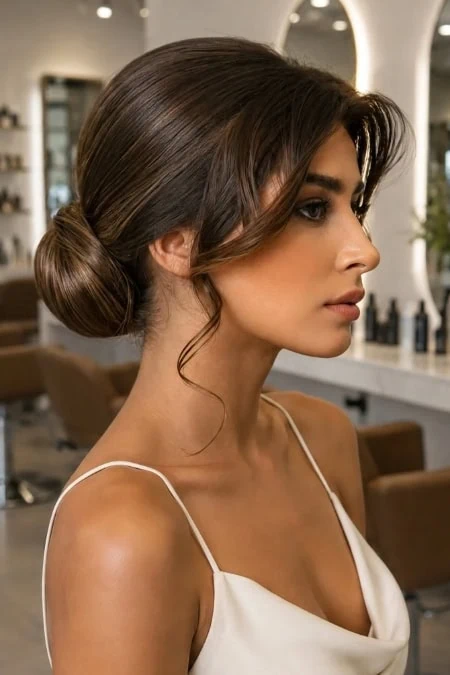
Sometimes the cleanest styles make the biggest impression. This one features hair swept back into a smooth, rounded low bun, with curls left around the face for contrast. Unlike the more detailed chignons on this list, the bun itself has an uncomplicated shape—the curls at the front are the real star.
How to achieve it:
- Separate a few front pieces before placing the rest of the hair in a low ponytail.
- Twist the ponytail into a compact bun, then tuck the ends underneath.
- Use a curling iron to add a gentle bend to the free hair around the face.
Medium hair note: This is one of the easiest updos for medium hair that still appears intentional and put-together.
11. High Curly Updo
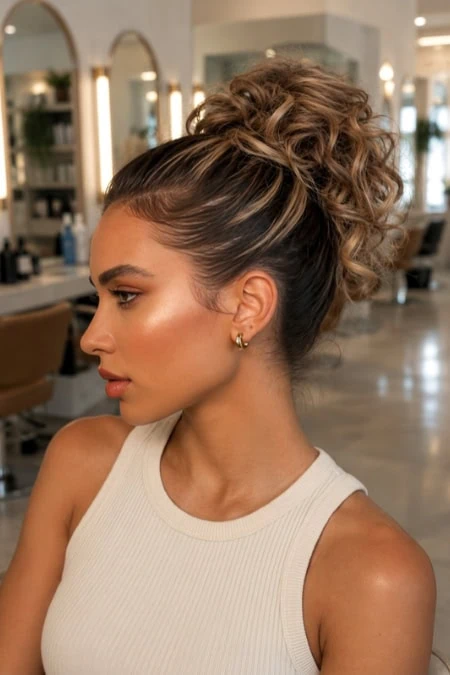
Here, the texture is the main event. Pull the hair tightly upward, then pile the curls high into a large cluster of ringlets for plenty of height and substance.
How to achieve it:
- Curl from midshaft to the ends first, then put the hair in a high ponytail.
- Arrange and pin individual curls around the base rather than twisting them into a traditional bun.
- Keep the sides more controlled to maintain height through the top.
Medium hair note: If you have naturally curly or wavy hair, this one practically does itself. For straight hair, curling smaller portions at a time helps each ringlet maintain its form once arranged.
12. Looped Knot Low Bun
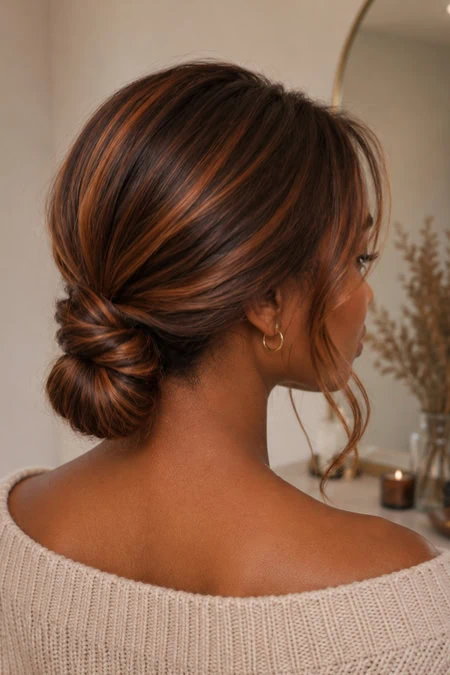
This one has a graceful, architectural quality. Rather than a simple coil, this low bun is built from folding the hair and then creating a knot-like shape at the nape.
How to achieve it:
- Bring the hair together toward the back into a ponytail, then divide it into two sections, making one slightly larger than the other.
- Fold the larger section into a loop and pin it. Layer the smaller section over it, then wrap the ends around the ponytail base.
- Pin the ends underneath, leaving a few curled tendrils free around the face.
Medium hair note: The construction doesn’t depend on having longer hair. The fold adds to the overall design, which works particularly well with shoulder-grazing hair.
13. Braid-Wrapped High Bun
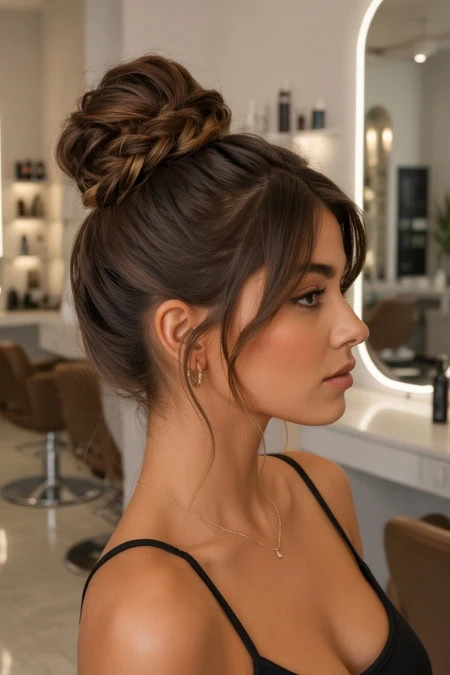
A large, rounded high bun encircled by a thick braid—the braided border is the defining feature here, rather than the bun itself. It’s the kind of style that seems like it took twice as long as it actually did.
How to achieve it:
- Put your hair in a high ponytail and reserve a bit of hair for the braid.
- Shape the ponytail into a bun.
- Braid the reserved hair, then bring the braid around the outside of the bun.
- Conceal the end underneath.
Medium hair note: Reserving the braid section before styling guarantees you have enough hair to wrap the full circumference of the bun, which can be especially helpful when you have less hair to work with.
14. Slicked-Back High Bun
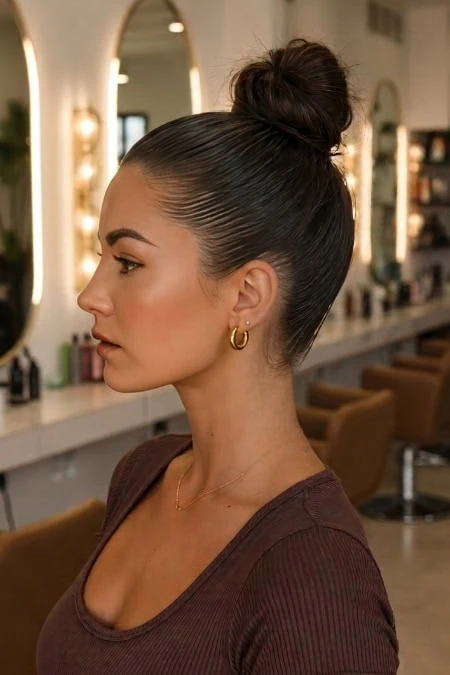
Effortlessly cool with a slight editorial edge. A tight, controlled base keeps the roots close to the head before you draw everything firmly upward into a compact bun on top.
How to achieve it:
- Work gel or styling cream through the roots before bringing everything into a high ponytail
- Twist your ponytail around its base and pin.
- Use a fine-toothed comb to keep the surface smooth and flyaways under control.
Medium hair note: A light layer of edge control along the hairline keeps the sleek, structured look intact throughout the day.
15. Retro-Inspired Bouffant Updo
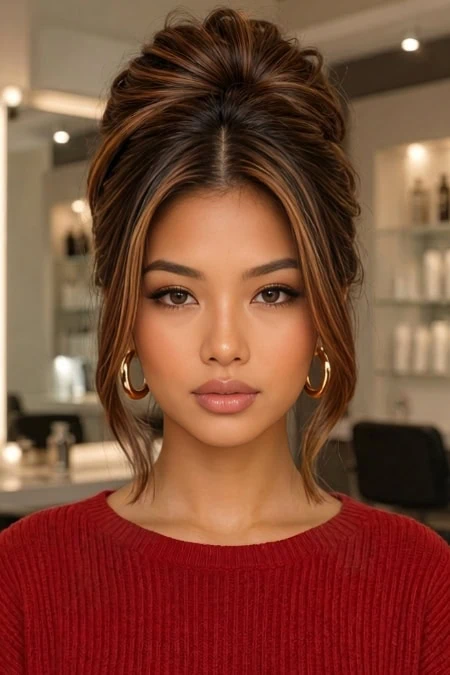
Channeling serious vintage energy. The rounded height through the crown gives this updo its subtle bouffant shape, with a nod to retro hairstyles for medium-length hair and beyond. Rather than being pulled tightly upward, the top is left noticeably denser, and the rest is placed into a loose updo.
How to achieve it:
- Lightly backcomb for lift, then arrange the surface hair smoothly over the teased area.
- Next, twist and pin the rest of the hair at the back.
- Leave longer sections around the face to balance the extra height.
Medium hair note: Medium lengths hit an ideal balance for this hairdo—there’s enough hair to secure the back, but not so much that the bouffant gets weighed down.
16. Top Knot With Face-Framing Pieces
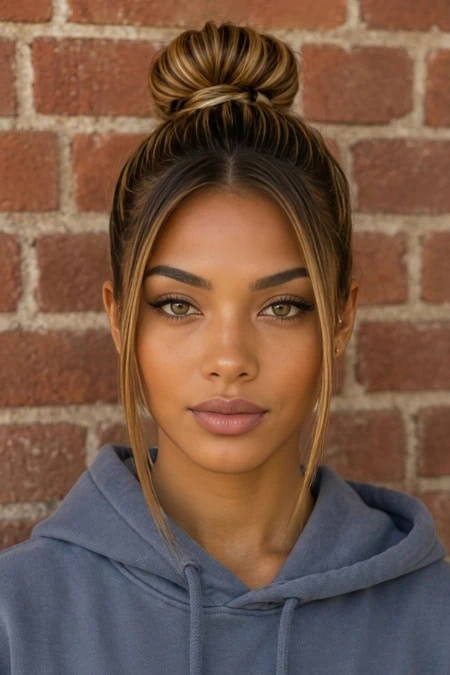
Classic, clean, and reliably stylish. This top knot features a tall, rounded bun positioned directly on top of the head, with two long, straight strands falling on either side of the face for contrast against the pulled-back sides. The bun is more compact and structured than the curly or messy high updos on this list.
How to achieve it:
- Set aside two sections near the hairline before sweeping the rest into a very high ponytail.
- Twist the hair into a top knot and hold it with pins.
- Straighten the reserved strands and let them fall naturally on either side of the face.
Medium hair note: Keeping those longer strands out of the updo helps balance the height of the knot and prevents the overall shape from appearing sparse.
17. Scarf-Wrapped Low Bun
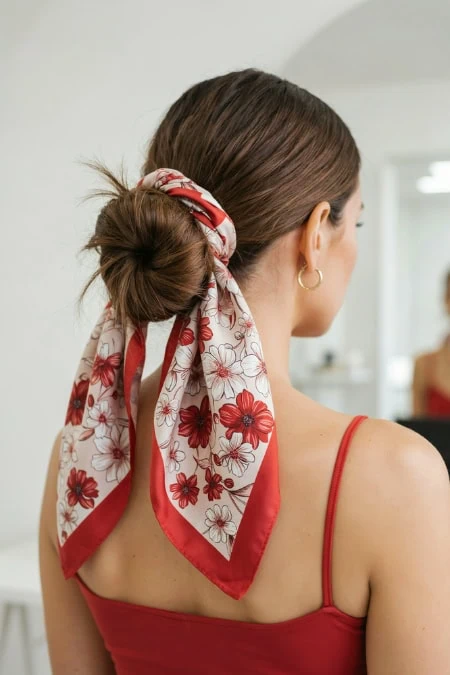
A simple low bun gets an instant upgrade with one accessory: a patterned scarf. The scarf is tied around the base of the bun, with the long ends becoming part of the hairstyle itself—adding color, movement, and spirit.
How to achieve it:
- Bring the hair into a low ponytail and twist it into a bun, then pin it in place.
- Wrap a narrow scarf around the base, knot it above or beside the bun, and leave the ends hanging freely.
- A few flyaways left in place keep the bun from looking overly precise.
Medium hair note: This is one of the most straightforward, easy updos for medium hair in the entire list—if your bun holds, the scarf handles the rest of the styling.
18. Double Low Buns
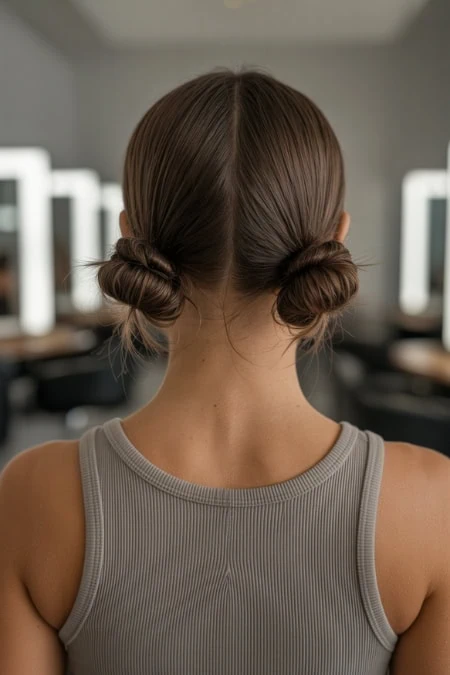
A more wearable, grown-up take on the space bun concept. The hair is divided evenly down the center, with two small rounded buns positioned low behind each ear—symmetrical placement is what gives this updo its distinctive shape.
How to achieve it:
- Part the hair straight down the middle and place each half into a low ponytail.
- Twist each ponytail around its base, tuck the ends underneath, and form two compact buns.
- Fan out the buns if you want them to appear slightly thicker.
Medium hair note: The lower positioning is ideal for medium lengths—the buns sit where there’s the most hair density, making them easier to form and more secure.
19. Low Loop Bun
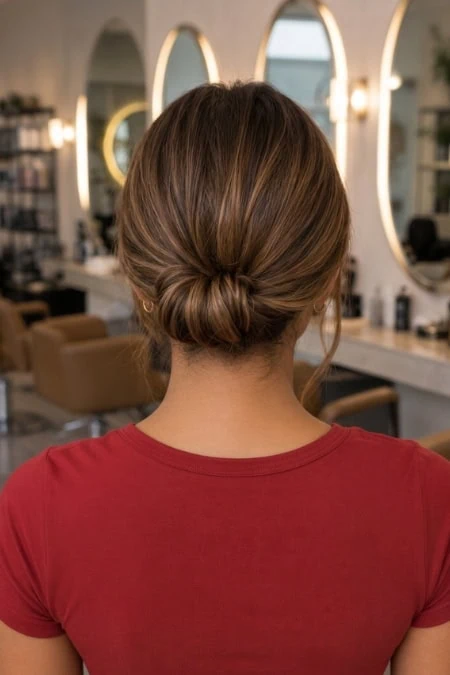
Clever in its simplicity. Instead of wrapping the hair into a circular bun, it’s folded into a single rounded loop. The hair above the bun is gently swept toward the center, giving the back a streamlined line that leads directly into it.
How to achieve it:
- Pull the hair into a low ponytail and draw it only partially through the elastic on the final pass, leaving the hair folded back on itself.
- Wrap the remaining ends around the base, then tuck and pin them underneath.
Medium hair note: The loop technique doesn’t require much length, just enough hair to fold back on itself, rendering it especially useful at this hair length.
20. Modern French Twist Bun Updo
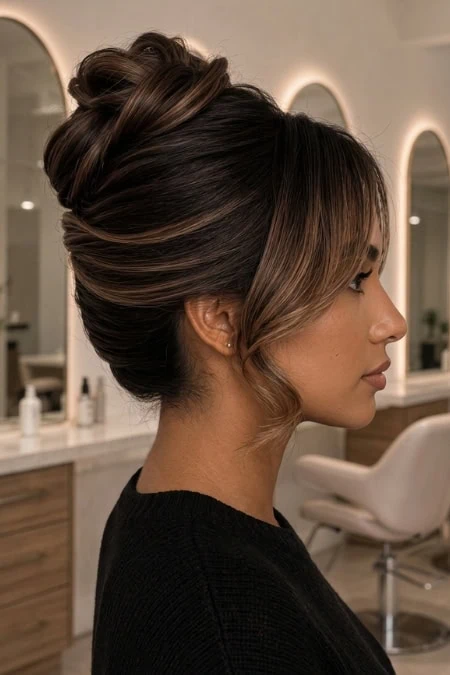
This style takes the classic vertical roll and gives it considerably more volume and dimension. Hair sweeps upward in broad layers before feeding into a large, folded bun high at the back of the head. Long curtain bangs and a curled tendril frame the face for a polished but not-too-formal finish.
How to achieve it:
- Set aside the front tresses and add some height through the upper section.
- Sweep the sides toward the center back, overlapping them to form the characteristic French-twist line.
- Tuck the lower ends upward and inward, then arrange the upper portion into loose folds at the top.
- Curl the tresses left around the face.
Medium hair note: This is a great option when you want the impact of an updo designed for long hair without actually needing that much length.
21. Textured High Bun Updo
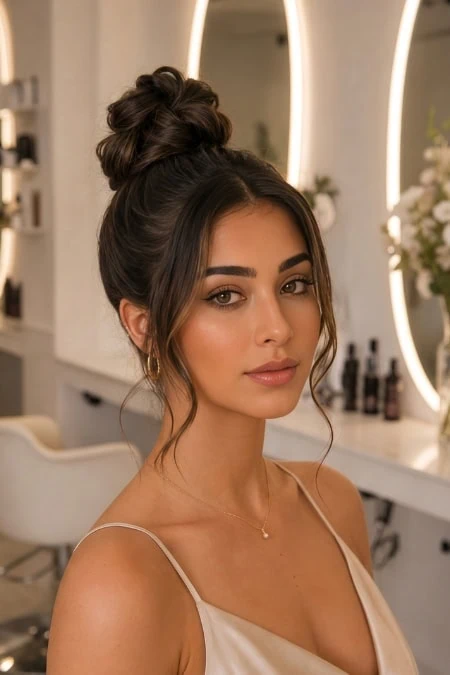
Built from separate folds rather than a compact coil, this high bun has visible fullness and separation that gives it more detail than a standard bun. Long curled tendrils around the face add a relaxed, effortless quality.
How to achieve it:
- Collect the hair into a high ponytail and divide the tail into several parts.
- Twist and fold each one into position, pinning as you go to build the bun.
- Adjust a few of the folds to make the bun appear larger, then curl the hair left free around the face.
Medium hair note: Building the bun in separate folds makes the finished updo appear larger without needing longer hair.
22. Petal-Like Bun Updo
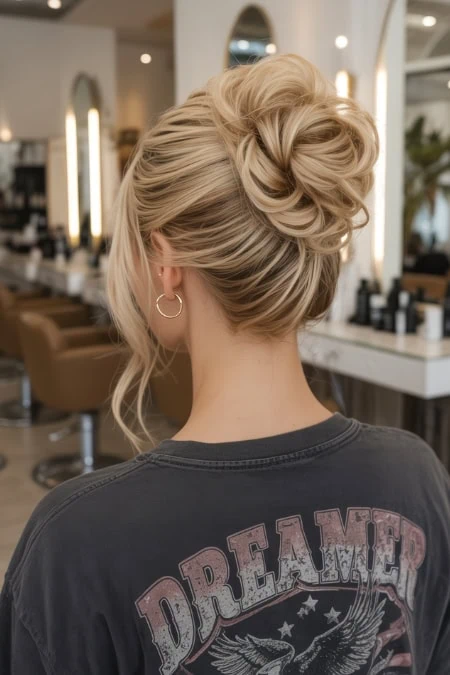
This is one of those updos for medium-length hair that stops people in their tracks. The most notable feature is a large flower-like bun made from overlapping loops that genuinely resemble petals, with the hair sweeping upward and inward in defined ridges that lead into the bun.
How to achieve it:
- Take the hair high at the back of the head and divide it into several equal parts.
- Fold each one into a broad petal-like curve and arrange them around the center, overlapping slightly to build the floral design.
- Keep each fold wide and distinct so the individual “petals” remain visible.
Medium hair note: Medium hair works particularly well here because each petal remains clearly defined, whereas very long hair can make the details harder to distinguish.
23. Side Updo
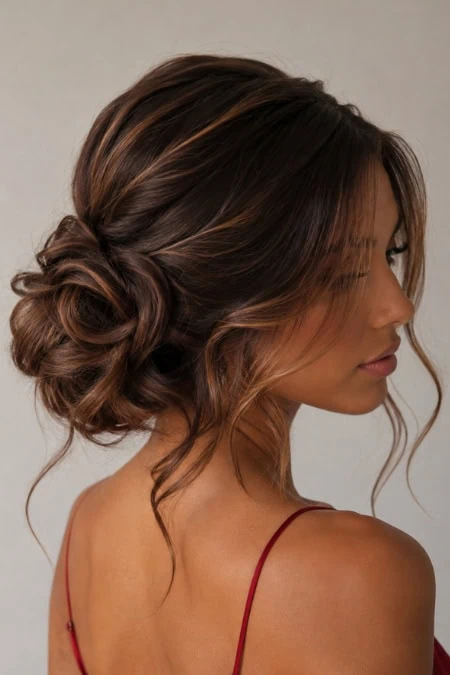
An asymmetrical option that adds instant intrigue. This updo draws the hair into a freeform bun positioned off-center to one side. The hair sweeps diagonally across the back before feeding into the bun, creating its distinctive side-heavy shape.
How to achieve it:
- Release a few strands around the face, then sweep the remaining hair toward one side.
- Tie it into a low, off-center ponytail, divide the hair, then twist and fold each portion.
- Pin each individually around the base to build the irregular bun.
- Curl the strands along the face for a lighter, undone effect.
Medium hair note: The off-center placement makes the hair appear longer and gives it a more substantial shape.
What Updos Work Best For Medium-Length Hair?
Not every style on this list will suit every medium cut equally—but that’s actually the beauty of working with this hair range. You have options across the whole spectrum of updo styles.
These styles tend to be the most reliable for medium-length hair:
- Low buns and chignons — the lower placement means you’re not fighting gravity, and the bun forms naturally with the hair’s weight.
- French twists — the rolling technique is a natural fit for those with medium lengths, and it hides ends neatly
- Looped buns — structure comes from the fold, not the length, making them especially well suited to medium hair.
- Braided buns — braids add texture and grip that help the style hold
- Messy and pinned updos — loose styles are forgiving and work well even when shorter layers don’t reach every part of the updo.
High buns are absolutely possible on medium-length hair, but shorter layers may need a little more support or a light layer of styling product to stay put throughout the day.
How To Make An Updo Work With Medium-Length Hair
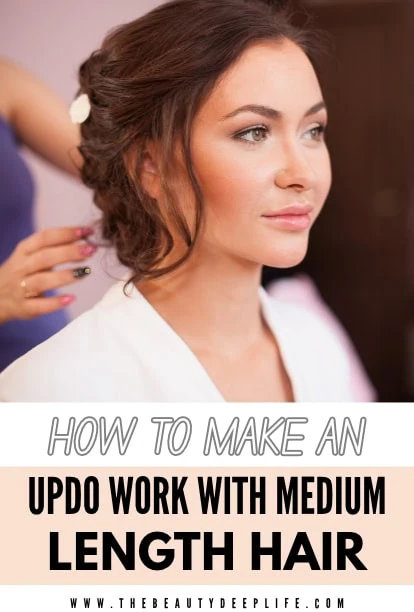
The biggest mistake people make with medium-length updos is trying to force their hair into techniques designed for much longer hair. Work with your mane, not against it.
Practical tips that make a real difference:
- Leave some pieces out. Curled or wispy tendrils aren’t just decorative. They take the pressure off trying to control every last strand.
- Work in smaller sections. Medium hair is easier to control in stages than when gathered all at once.
- Use texture for grip. Second-day hair or hair with a light texturizing spray actually holds updo hairstyles better than freshly washed, slippery strands.
- Place bobby pins strategically. Cross them in an X formation over each other for a stronger hold rather than inserting them individually.
- Choose your bun height based on your actual length. Low and mid-height buns are generally the most stable, while high buns are achievable but may require more reinforcement.
- Use a small elastic before you pin. Sweeping the hair into a ponytail first gives you a stable base to build any updo from.
- Use hairspray selectively. Spray once everything is in place, not before. This sets without making the hair too slippery to work with mid-process.
Easy Updos vs. More Detailed Updos
Not everyone has the time—or the patience—for a multi-step style on a Tuesday morning. Here’s a quick breakdown to help you choose based on your skill level and how much time you have.
Easier, great for DIY:
- Low Loop Bun (#19)
- Top Knot with Face-Framing Pieces (#16)
- Scarf-Wrapped Low Bun (#17)
- Double Low Buns (#18)
- Sleek Low Bun with Middle Part (#8)
More detailed, but worth the effort:
- Multi-Twist Bun (#7)
- Petal-Like Bun Updo (#22)
- Dutch Braid Low Bun (#3)
- Modern French Twist Bun Updo (#20)
- Braid-Wrapped High Bun (#13)
The more detailed updos are especially worth attempting for special occasions—many of them are standout hairstyles for medium-length hair that look far more complex than they actually are once you’ve practiced them once or twice.
FAQS: Updos For Medium Length Hair
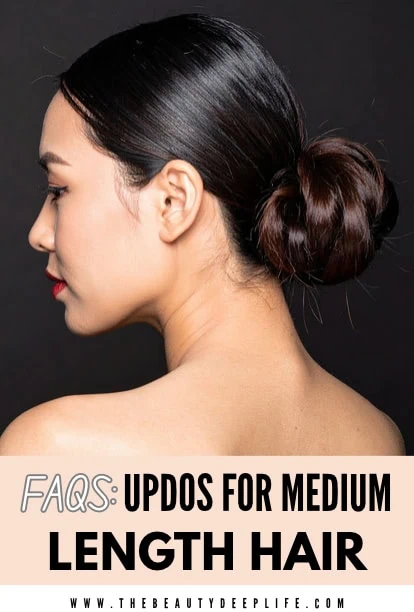
What is the easiest updo for medium-length hair?
The Low Loop Bun and the Scarf-Wrapped Low Bun are two of the most beginner-friendly options on this list. Both require minimal pinning and are very forgiving if the hair isn’t perfectly positioned. The Top Knot with Face-Framing Pieces is another quick go-to that can be done in under five minutes.
Can shoulder-length hair be put into an updo?
Yes—and many of the styles on this list were specifically designed with shoulder-length hair in mind. Low buns, chignons, French twists, and looped buns all work reliably on shoulder-length hair. High updos are possible with the right techniques and products, though they may require a little extra reinforcement.
How do I keep shorter layers from falling out of an updo?
Cross bobby pins in an X formation to create a stronger hold. Alternatively, use a small amount of edge control or styling cream along shorter layers beforehand, giving them enough grip to stay put. For the smallest pieces around the hairline, a light pass of hairspray targeted specifically at those areas can prevent them from escaping without affecting the rest of the style.
Do updos work better on freshly washed or second-day hair?
Second-day hair, almost always. Freshly washed hair tends to be smooth and slippery, which makes it harder to control and arrange. Hair that’s a day or two old has natural texture and oils that give bobby pins and elastics something to hold onto. If you need to style on wash day, apply a dry shampoo or texturizing spray before you begin.
Final Thoughts: Updos For Medium-Length Hair
If there’s one thing this list makes clear, it’s that medium hair is anything but limiting. Updos for medium-length hair range from polished and sleek to deliberately undone, from quick five-minute fixes to intricate braided statements. The right style is out there for the hair you have, your texture, and the occasion you’re dressing for. You just need to know where to look.
Whether you’re building an everyday bun routine or searching for something special for a big occasion, medium-length hair gives you far more creative freedom with updos than most people assume. The key is making sure you work with your hair’s natural behavior rather than trying to replicate techniques built for much longer hair.
Now go try one. Your hair is ready—and so are you.
Related Articles:
- 25 Homecoming Hairstyles For A Picture-Perfect Hoco Look
- Hairstyles For Medium Length Hair: Ultimate Guide To Elevate Your Look
- 40 Prom Hairstyles: Find Your Perfect Look For The Big Night
- 39 Trending Wavy Hairstyles For Short, Medium & Long Hair
- 42 Slick Back Hairstyles You’ll Want To Try Immediately
- 39 Trending Wavy Hairstyles For Short, Medium & Long Hair
- 35 Curly Hairstyles That’ll Make You The Mane Attraction
- Straight Hairstyles: The Ultimate Guide For Every Length & Style