

30 Beauty Tips For Perfect Eyebrows You’ll Wish You Had Known Sooner!!
Nothing has the power to dramatically and quite magically alter your appearance like a perfect set of eyebrows. Simply put, the way you shape and fill your brows can do a myriad of flattering things to enhance your beauty: create more balance to your face, help your features look more defined, make you appear younger, more sophisticated, or even like you just stepped off the editorial runway!!!
Yassss, you better work those arches!! Now, just as easily as the perfect brow can enhance your looks, a case of brows gone wrong can leave you looking, well, almost frightful! However, there’s nothing a few beauty tips can’t fix…ultimately leading you on your way to your best eyebrows yet!
Disclosure: This post contains affiliate links, which means I receive a small commission, at no extra cost to you, if you make a purchase using one of these links. For more info, please see our Disclosure Policy. As an Amazon Associate, I earn from qualifying purchases.
The Road To Achieving Brow Perfection
First, before jumping into top beauty tips & tricks for your eyebrows, let me give you a little of my “brow” history, if you will. I inherited my eyebrows from my father’s genes. Thick, curly, and wild!! I’ve grown to love them, but in my teens, I was determined to pluck them to oblivion!
I look back at old photos shaking my head. Talk about a brow mishap! I really needed to step away from the tweezers, but I just didn’t know any better.
In my 20s, I became rather particular about them. Wanting to keep them on the thicker side, I wouldn’t just let anyone touch them. Having seen several rather wax-happy estheticians, I learned the rather hard way that I needed to stick to shaping my brows myself.
You see, for my face, the most flattering look is a thick, defined brow. One or two hairs plucked too thin can seriously throw a monkey wrench in my brow game!!!!!!
In my 30s, as a makeup artist, I learned quite a bit about shaping other people’s eyebrows: how to fix brows gone wrong and, most importantly, how to use them to naturally enhance a woman’s features.
With every makeup client, before applying a drop of makeup, the first area I always examined was their brows. My initial thought was always…what do they need, and how can I get them closer to perfection?
And now in my 40s, I’m going to share with you what I learned along the way. Here are 30 expert beauty tips for getting perfect eyebrows easily from home. How to shape, groom, fill, and keep them up!!!
How To Get Perfect Eyebrows: Top Beauty Tips For Shaping
Tip 1: Assess Your Brow Situation
Let’s start with one of the most important beauty tips for your eyebrows! First, figure out what you’re working with!! It’s time to get real with yourself about the current state of your brows…grab a mirror!
- Are you guilty of years of over-plucking? Are they too thin? Sparse in certain areas?
- Or are they thick? Unruly? Are there stray hairs that fall outside of your brow line?
- What about length? Are they a bit short? Where does the tail fall? Has the tail disappeared with age?
- Do they have a strong arch, or are they more rounded?
Once you determine your eyebrows’ current state, you can then better decide what needs changing; how much tweezing and trimming vs. how much filling they need. You can also then decide which next steps to take using the tips in this article, plus determine what products you may need for those steps.
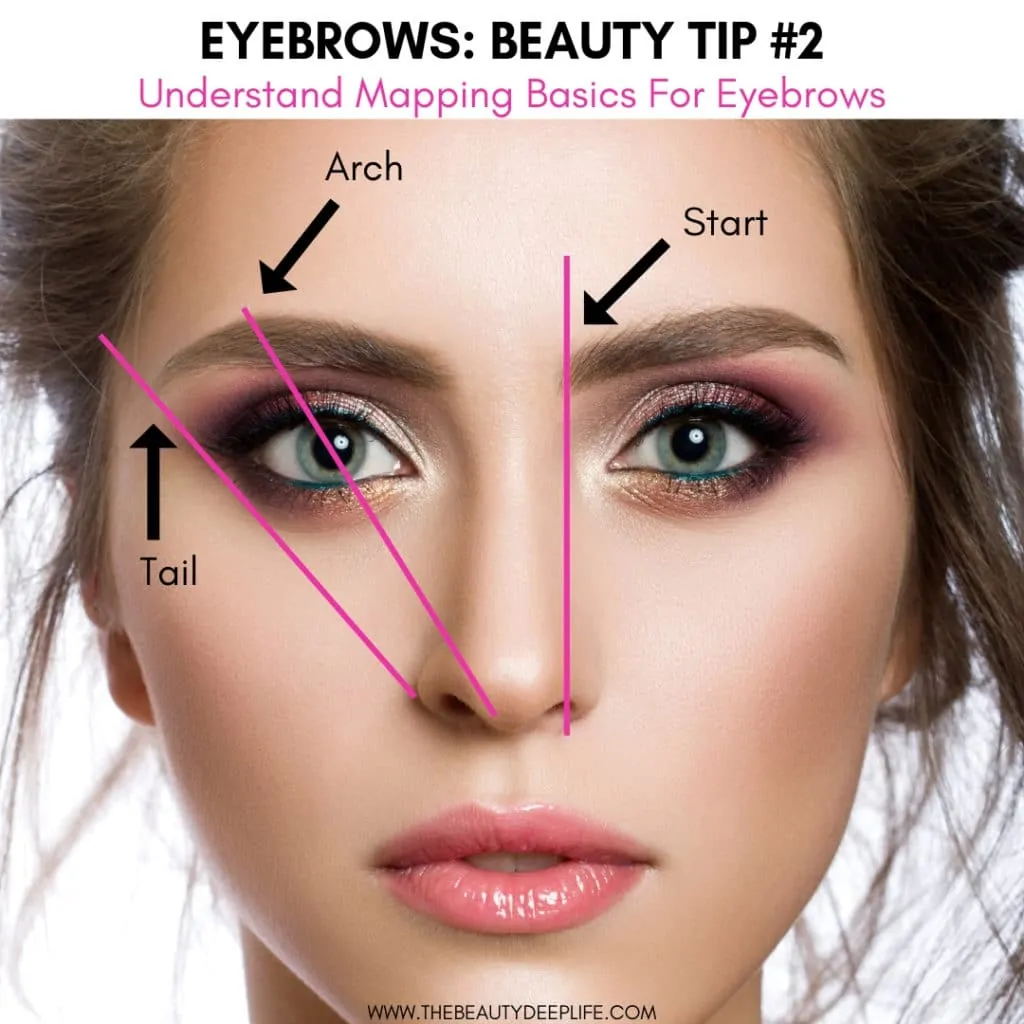
Tip 2: Understand Mapping Basics For Eyebrows
Before you start shaping your brows, you want to understand some mapping basics and keep a few general guidelines in mind.
These are not 100% solid, set-in-stone rules, as other factors can come into play, like your face shape and eye positions, but knowing them can help to give you an idea of where your eyebrows, for the most part, should begin and end.
- Your eyebrows should be analyzed in two sections, beginning to arch and then the arch to the tail.
- Generally, the first section (beginning to arch) should be longer than the second section (arch to tail). This keeps you from having an arch that starts too soon, resulting in brows that look like tadpoles. Yikes! (smile)
- Pro Tip: Your arch is usually roughly 2/3 out from the beginning of your brow.
Steps For Mapping Your Brows
1. Using a thin eye makeup brush or eyeliner pencil, line it up vertically with the center of your nostril (from the nostril upward towards the brow). It should fall just right outside of the inner corner of the eye (slightly outside the tear duct). This is roughly the point where you want your eyebrows to begin.
2. Next, with the same brush or pencil, angle it from the tip of your nose diagonally going upwards towards the brow. Place it so that it goes from the tip, then crosses right through the middle of your iris, and lastly rests on the brow.
Look at where the brush/pencil rests on your eyebrow. Generally, this is the spot where the highest point of your arch should be. Mostly, just keep in mind your arch should be where your browbone stands out. (See the photo below with the diagram to help you with this)
3. Now, move the pencil/ brush again, this time so that it falls diagonally from the outer part of the nose to the outer edge of your eye. This is where you generally want your brow to end (the tail). Pro Tip: It can be extended slightly further than this on some people and can be a flattering look for some.
Tip 3: Determine If You Have Wide-Set Or Close-Set Eyes
Let’s determine if your eyes are wide-set or close-set. Take a look at your eyes in the mirror. You want to do three things…
- First, look at one of your eyes, and notice the size, specifically the distance from the inner corner to the outer corner.
- Second, notice the space that falls between your eyes and the distance between them. Focus on this space from your right eye’s tear duct to your left eye’s tear duct.
- Third, imagine, for a moment, trying to fit another eye right smack dab in between them.
Could you fit another eye perfectly between them in that space? If the answer is yes, then your eyes are perfectly spaced apart, and you can skip on to Tip #4.
Was your answer NO?? If so, these next steps will help you.
Now, looking at the distance between them, if that space (tear duct to tear duct) is greater than the length of an eye, then you have wide-set eyes.
And, if you cannot fit an eye fully in that space between each tear duct, then you have close-set eyes.
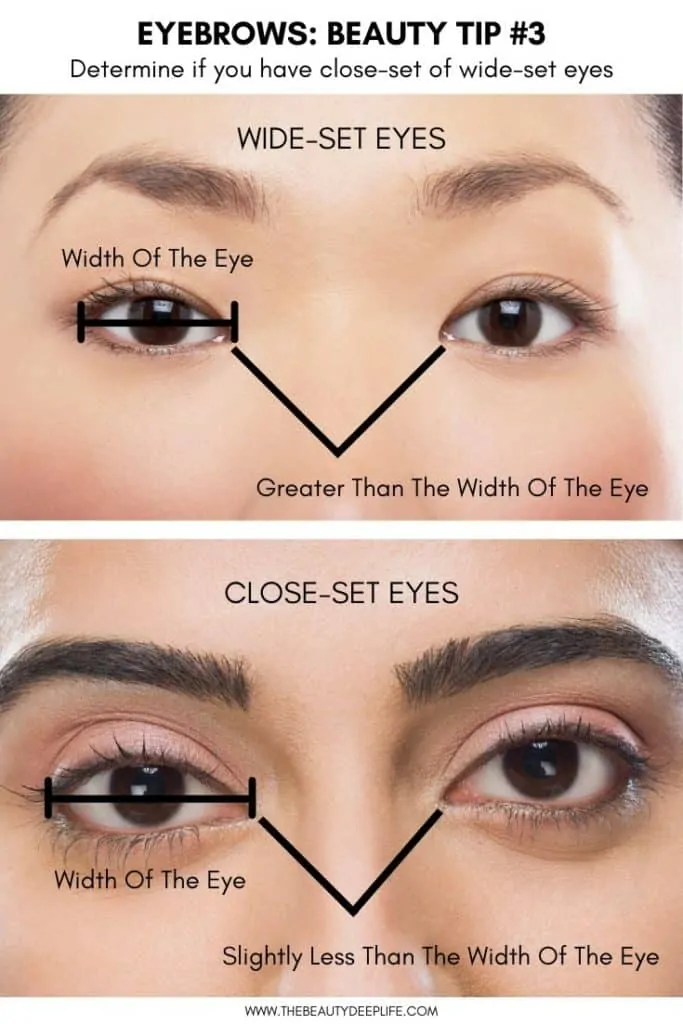
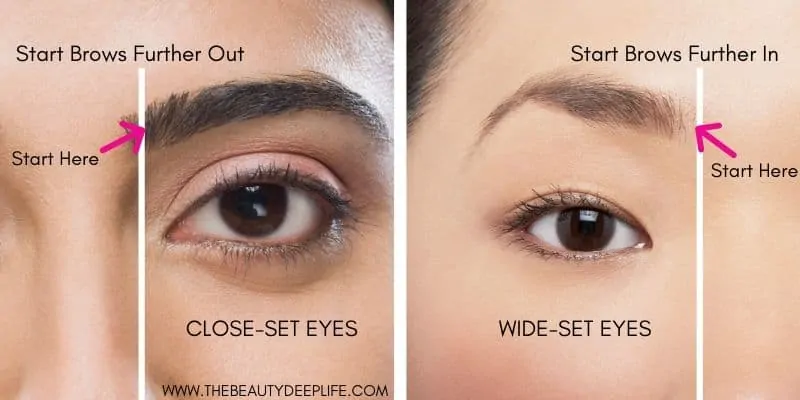
Wide-Set Eyes
For wide-set eyes, your eyebrows will need to start a bit further in. This will make them appear closer together and reduce the width between them, making it appear less obvious.
- To do this, as you fill your brows in, allow them to begin closer to the bridge of your nose rather than just outside your tear duct. This requires faking the funk a bit when you draw them in.
- What you want to do is to draw in some new brow hairs a bit. See Tip #17 for some help with this.
- Also, use the photo below as a guide for where they should begin.
Close-Set Eyes
For close-set eyes, we want to make it appear as though your eyes are wider apart than they actually are in order to balance out your face.
- Therefore, your eyebrows need to begin a bit further out. They need to start further out than was suggested for Tip #2. <–Click here for a refresher on Tip #2.
- Use the below photo for a guide.
- Also, to continue to create more balance for your face, you can try extending the tail of your eyebrows further than where they naturally fall.
Tip 4: Shape Your Eyebrows For Your Face Shape
Knowing your face shape can help you to determine a perfect eyebrow shape to compliment it. Here are a few beauty tips for shaping eyebrows based on different face shapes.
Round Face
- To minimize the roundness of the face, you want sharp, high-arched, angled brows. High arches will draw attention upwards and make a face look slimmer. Brows that are sharp and angled add more definition to the face, thereby taking attention away from the softness of a round face.
- Avoid round, curved, or flat brows, and be sure that, while you want to make your arch a high arch, you keep it natural looking.
Additional Pro Beauty Tips:
- The first place you should apply makeup products when filling in your brows should be your arch. We tend to be heavy-handed on the areas where we apply product first, which is totally fine in this case since we want to create more depth in the arch of your brow to emphasize it.
- Or, if you prefer, you can opt for a darker shade for your arch and tail while using a lighter shade at the front of your brows.
- To make the arch appear higher, you can continue to emphasize it by using a highlighter on the brow bone.
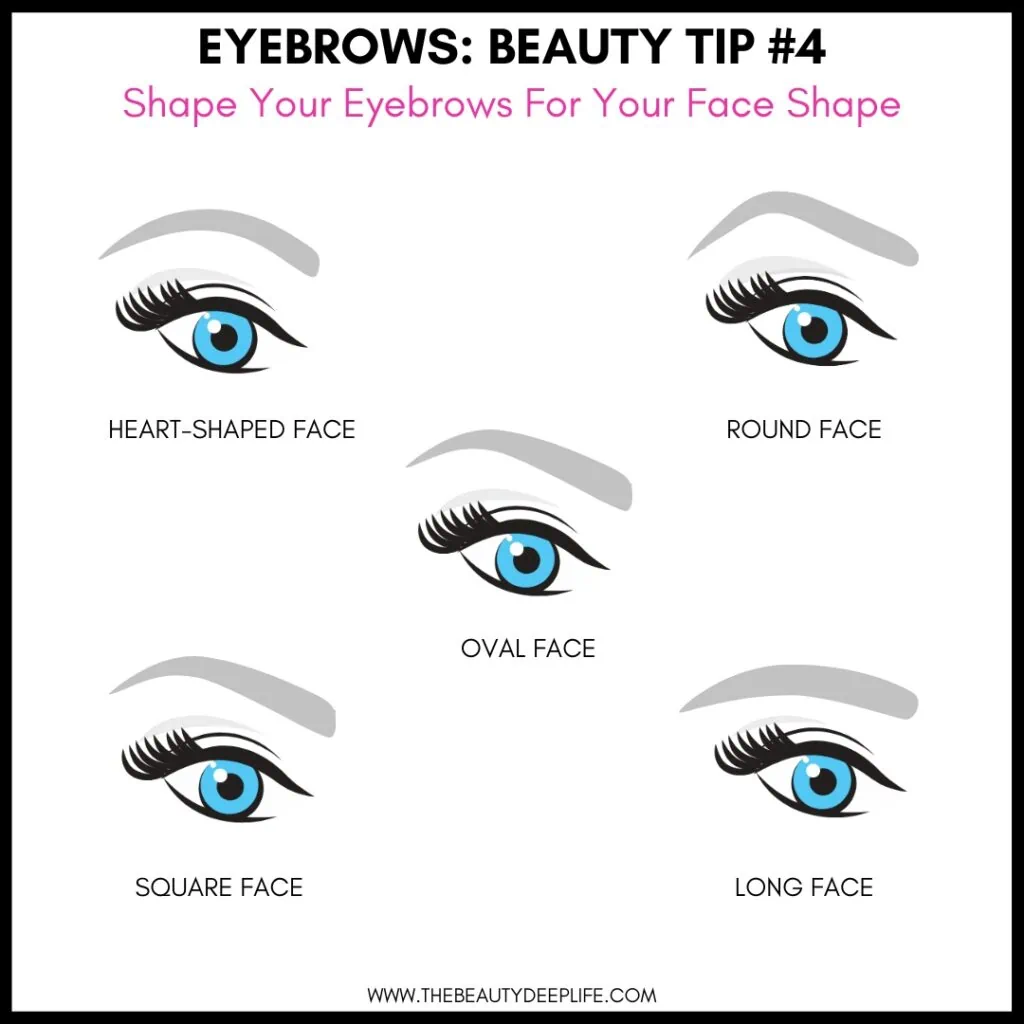
Heart-Shaped Face
- To counter the sharp features of a heart-shaped face, you want to go softer with a rounded (only very slightly angled) brow. Make sure you keep the arch low and avoid a high one.
Square-Shaped Face
- If you have a square-shaped face, you naturally have some pretty strong angles to your face, especially your jawline. So, we want to counter that with a soft brow that’s softly angled with a soft arch. Avoid hard angles and keep them more rounded.
Long Face
- With a long face, the goal is to draw attention horizontally rather than vertically to counter the length of the face. A flat, straighter, elongated brow shape works best.
- Opt for a very low arch…steer clear of high arches!
Additional Pro Beauty Tip: When brushing your brows, rather than brushing so much in an upward direction, go more so in a horizontal direction. For drawing and filling in the brow, you may want to add a bit more length to the tail of your brow.
Oval Face
- There are no hard rules for those with oval-shaped faces. But, the most flattering option is a soft, angled, softly arched brow.
How To Get Perfect Eyebrows: Beauty Tips For Grooming, Tweezing, & Trimming
Tip 5: Location, Location, Location!
Always shape your brows in a well-lit room. I also prefer a magnified mirror with a light, as this will really help you to see all those stray hairs that are in less-than-ideal places. This is the one I use!!!
Tip 6: Have The Right Tools Ready
When it comes time to shape your eyebrows, you want to have all your tools ready. Suggested tools are tweezers, a spoolie brush, eyebrow scissors, and an eyebrow pencil.
For precise tweezing, you want to use a pointed-tip tweezer as opposed to an angled one. This way, you ensure you don’t accidentally over-pluck since the pointy tweezers allow you to grab individual hairs rather than groups of hair. Angled tweezers tend to pull several hairs at once.
Be sure to sanitize your tweezers and scissors before using them. To sanitize, spray with rubbing alcohol or use a cotton ball dipped in alcohol.
Beauty Hack for Eyebrows: If you don’t have a spoolie, you can always just buy a toothbrush to use solely for your brows. This works well if you have brows on the thicker side too!
Best Eyebrow Shaping Tool Picks:
Get almost everything you could need all at once with these sets and combos: Tweezerman’s Brow Shaping Scissors w/ Spoolie Brush Set with Tweezerman’s Slanted and Pointed Tip Tweezer Combo.
Tip 7: Cleanse Before You Groom
Cleanse the skin… make sure your face has been washed. Additionally, you can use some witch hazel or toner to wipe the brow area with a cotton swab or ball.
This way, you remove any bacteria, dirt, oil, dead skin cells, etc., from the skin, reducing the chances of infection or a breakout.
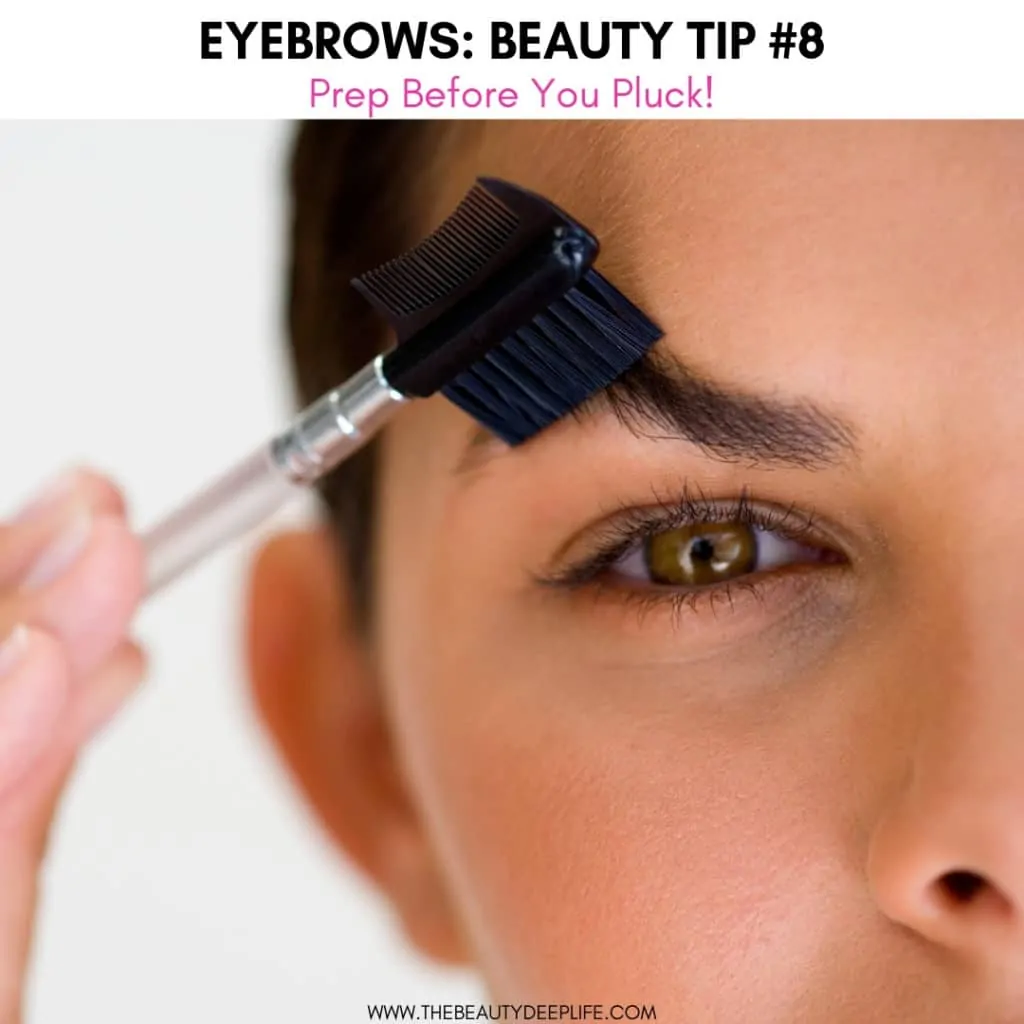
Tip 8: Prep Before You Pluck
Always brush through your brows before shaping them!! First, brush the brows upwards to see if trimming is necessary. While they’re brushed upwards, look and see where the hairs fall along the top browline…Do any seem to stick up above the line?
If so, you can use some small scissors like these to trim them in line. Just be sure to go slow when trimming so you don’t cut too much. For unruly brows, in particular, you will definitely want to trim any hairs that are too long.
Next, you want to prep the hairs by once again brushing up and through them in order to smooth them out before beginning the plucking process.
Tip 9: Dull The Pain
If plucking your brows is painful for you, you can numb the area before tweezing by dabbing on some baby Orajel or a numbing cream/spray.
Try tweezing after a warm shower! The steam left in the air softens the hair follicles, whi
Tip 10: Define Your Soon-To-Be Brow Shape
Option 1:
- You can fill them in, using a dark eyebrow pencil into the shape that you want first before tweezing. This way, you have an idea of where you will need to pluck or not. Only pluck the hairs that fall below, above, and outside of the shape you have drawn in with this dark-colored pencil.
Option 2:
- You can use a nude or white colored pencil like this or this one as a guide. Taking a light-colored pencil, outline the outer shape of the brow. Draw in under and above the brow, only in the locations where you think you should tweeze, making sure to cover all hairs you think you should pluck and the strays as well.
- This will give you an estimate as to how your new brow shape and arch will look once you have tweezed. If satisfied with how it looks, you will then only pluck the hairs that you covered with the white/nude pencil.
Tip 11: Step Back & Get Perspective
When shaping your eyebrows, remember to always stand back from the mirror every now and then to really see your full face and what you’re working with. My basic rule is after every 1-2 hairs are plucked, step back, and take a look.
This allows you to make sure you don’t get too pluck or tweezer-happy! You want to check and see how your brows are coming along as you’re shaping them.
Notice how they look in relation to your face and eyes before proceeding. You also want to make sure they frame your eyes nicely.
Tip 12: Proceed With Caution & Take It Slow
Always save grooming your brows for a time when you are not rushed and have no distractions. Set aside a significant chunk of time.
You don’t want to try and groom them a few minutes before you are due somewhere. Guaranteed, if you rush, you are more likely to make mistakes (mess the shape up or overpluck, to name a few).
I always reserve my tweezing for an evening when I don’t have too much going on so I can give it my full attention.
Pro Tip: When tweezing, try to avoid over-plucking underneath the beginning section of the brow (from where it starts to the arch). This is a common mistake many women make, so proceed with caution always when plucking.
Tip 13: Say Goodbye To The Strays!
No matter whether you have thin, patchy, thick, or unruly brows, it’s important to remove any stray hairs that fall in the temple area, between the brows, or under the brow bone.
If you have thick or unruly brows, the goal is to do some cleaning up of the areas surrounding the brow as well. You may have some stray hairs that fall a bit out of the natural browline, like the forehead area (right above the brow ), or that fall outside of the tail area.
An eyebrow razor or hair trimmer and tweezers will be needed to clean things up a bit.
Tip 14: Cleanse, Treat, & Calm
After plucking and trimming, you want to be sure to sanitize your tools again to keep them clean. I use some rubbing alcohol in a spray bottle for this.
For more info on this, check out this post on acne. But honestly, cleaning your brow tools applies to everyone, whether you have acne or not, to reduce the chances of a skin infection.
You will also want to treat the skin to prevent infection and irritation. If you are prone to getting bumps or breakouts after tweezing, you can treat the area by applying a cotton ball with some witch hazel or astringent.
For any nicks, use a little cream like this on the area to help. If you sometimes get redness, to calm the skin, apply a cool compress on the area post-tweezing. You can also try some aloe vera or cortisone cream to help.
How To Get Perfect Eyebrows: Beauty Tips For Filling Them In
Tip 15: Are You Using The Right Brow Colors?
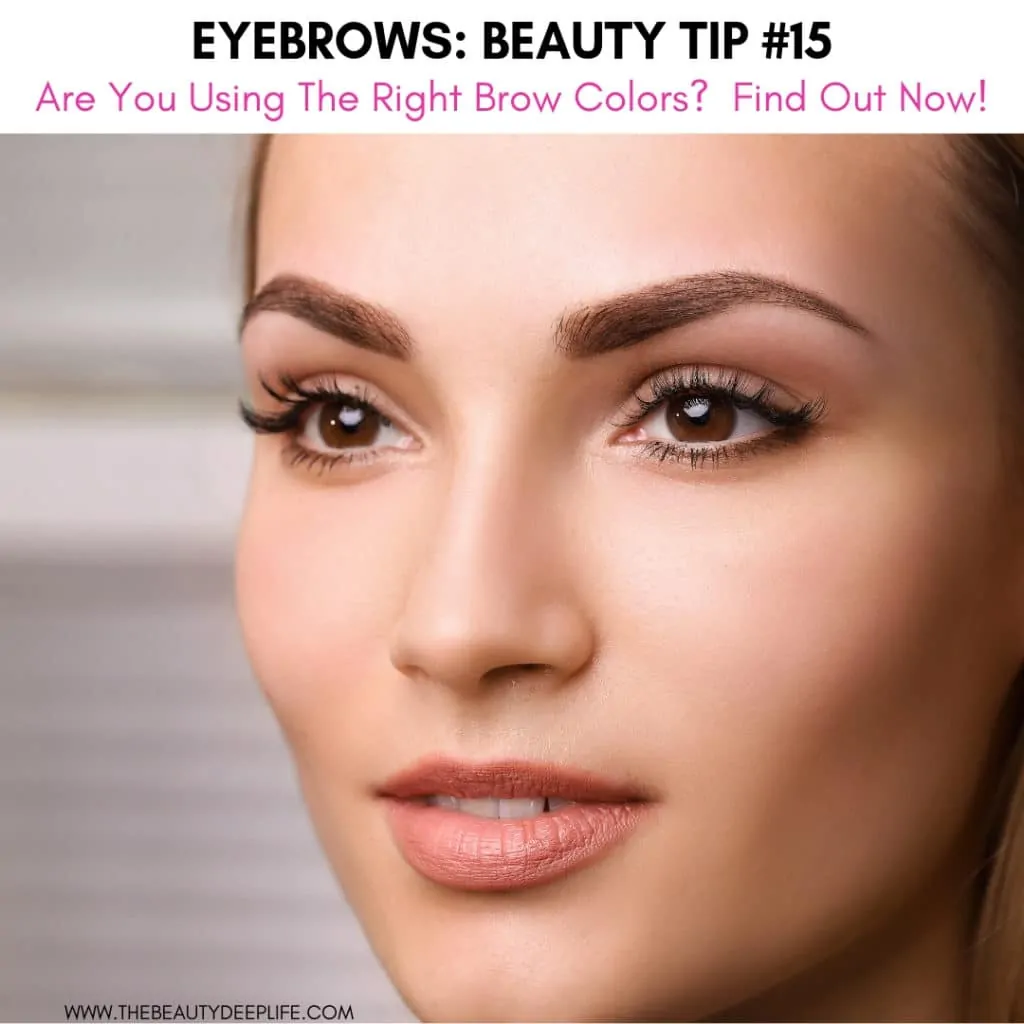
- For a natural look, it’s best not to go too dark when selecting a brow color, as this can look rather harsh. Generally, if your hair is on the darker side, you want something that is lighter than your natural hair color. For example, if your hair is black, you don’t want to use black on your brows (this looks unnatural); instead, opt for a cool dark or dark to medium brown color instead. If your hair is a warm medium brown, try warm brown that’s a shade lighter. If your hair has highlights and lowlights, you can pick something matching the lightest part of your hair rather than the base color.
- However, there are a few exceptions to consider, especially for light-haired people. Generally, if you have light hair, you want to go for a shade that is a bit darker than your hair. Example: If you have light blonde hair, it’s best to choose a color that is one shade darker or matches the darkest part of your hair.
- If you have natural light red hair try taupe, ashy blonde, yellows, golden brown, or a very light brown with a touch of auburn in it. Those individuals with darker red hair should try auburn or warm medium brown.
Additional Pro Tips For Color Selection:
- Another option is if the hair on your head and your natural brow color are different, you can go for a color that falls in between them. For example, if you have blonde hair on your head, but your brows are naturally brown, shoot for a color that falls in between them.
- If you want to add more depth to your brows, you can do so by using two different shades. The first can be close to your hair color, while the second can be a bit darker. In this case, you want to use the lightest shade through the full brow and use the dark color more so on the middle and brow tail.
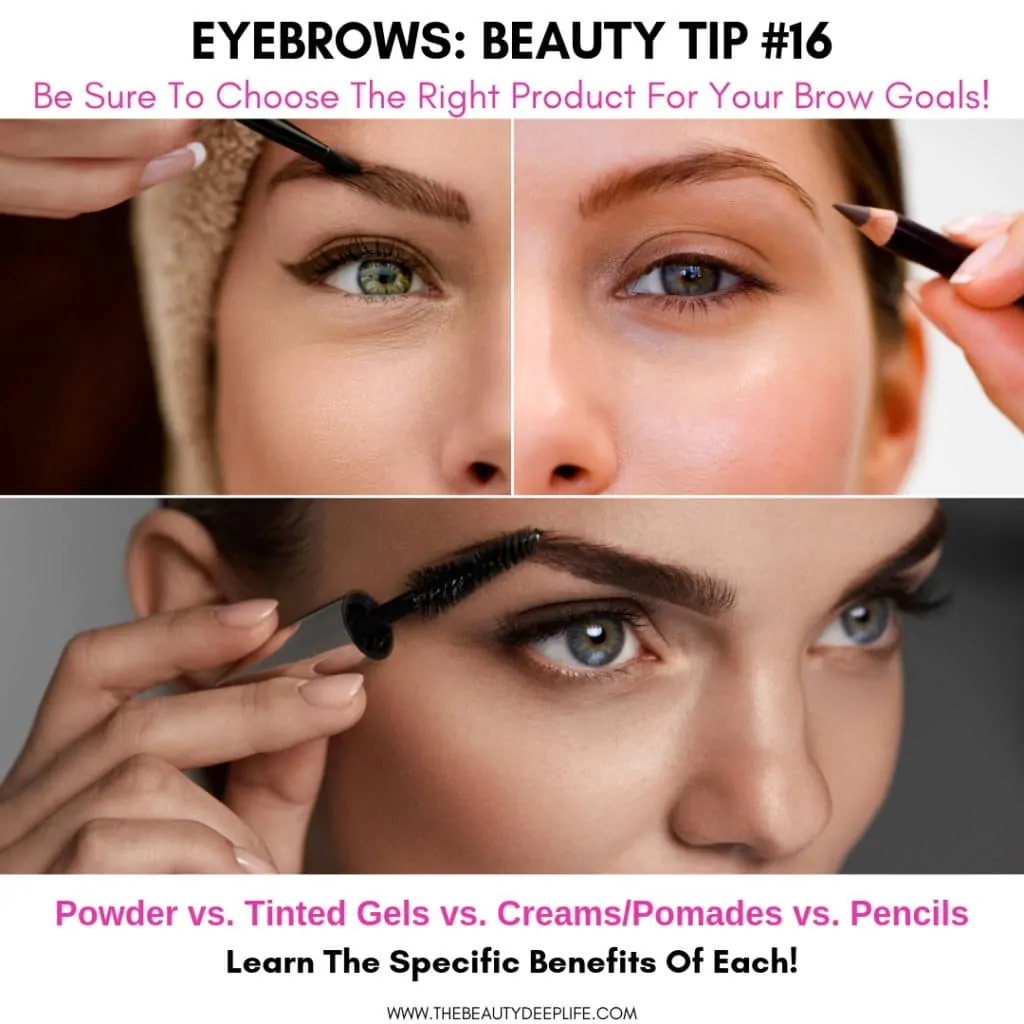
Tip 16: Be Sure To Choose The Right Product For Your Brow Goals!
When picking out your makeup products, knowing how each specific formula works best is an absolute must if you want to achieve perfect eyebrows! Learning the benefits of each can help you decide what you need vs. what you don’t need. Here is a quick breakdown of each!
Powder
A powder formula is best if you want to create a natural, softer-looking brow. It’s also a great go-to for people with sparse brows, as powders can make them appear fuller and denser!
Additionally, if you’re a newbie to brow filling and tend to be heavy-handed with pencils, you may find it’s a safer option, as you have a bit more control over the amount of product applied. Plus, it’s a bit easier to fix if you make a mistake.
You need a small angled synthetic brush for powder application. When applying, it’s best to apply powder mainly to the middle and front portion of the brow, leaving the end section for a pencil. Using a pencil for the end of the brow allows you to create a more defined tail.
- Pro Tip: You can also use powders to set your eyebrows and prevent smudging or fading. To do so, you would apply after using a pencil or cream.
Best Eyebrow Powder Pick:
- I recommend Anastasia’s Brow Powder Duo (Available in 11 color sets). Since these come with two colors, you can use one, both, or mix the two! It’s easy to work with and has long-staying power! I recently suggested this product to my mom, and she LOVES it!
Colored/Tinted Gels
Colored gels are perfect for covering greys or if you want to add more dimension and definition to your eyebrows.
They can be used if you wish to try the last suggestion from Beauty Tip #15. You would use the tinted gel for the lightest color in that case.
You can also use them if you happen to dye the hair on your head a color that is lighter than your natural eyebrows. I’ve done this often since I like to lighten my hair to a med/light auburn from time to time. My natural brow color is dark brown, so I use an auburn or warm brown colored gel sometimes.
Best Eyebrow Tinted Gel Picks:
- Anastasia’s Tinted Gel – This is the one I sometimes use after I’ve lightened my hair!! 7 colors to pick from, easy to use, not too heavy, and very natural looking!
- Grande Cosmetics BROW-FILL Volumizing Brow Gel – Need some brow oomph?? Have thin brows? This will give your brows Va-Va-Va-Vooom volume! It comes in several great shades too!
Creams/Pomades
Creams/Pomades are perfect for filling in gaps and sparse eyebrows…They also work well if you are looking to darken your brows.
These can go on heavy, so if you are a newbie, you may want to steer clear until you have perfected your skills a bit more. You need a small angled synthetic brush for cream or pomade application.
Best Eyebrow Cream or Pomade Picks:
- Anastasia’s Dip Brow – Comes in 11 shades! I love the texture of this product and find it easy to apply with an angled brush as well as blend with a spoolie. Great for outlining and filling your brows! Depending on how heavy you apply it, you can opt for a natural look or something bolder.
- POWmade Waterproof Brow Pomade – As far as budge-worthy picks, this one takes the cake, giving you up to 36 hours of staying power! It’s available in 8 highly pigmented shades with a waterproof formula!
Pencils
Pencils are necessary for defining the tail of the brow and work great at filling in gaps! When used correctly, they can work well for creating a very natural look and defining the arch.
What I love about pencils is they are the easiest product for creating the most realistic-looking hair-like strokes. They are also ideal if you need your brows to last longer and stay put.
Best Eyebrow Pencil Picks:
- Anastasia’s Brow Wiz – With many shades (about 12) to choose from, this retractable pencil and spoolie combo offers hair-like precision strokes! It has a natural-looking texture and is ideal for creating a fuller brow look!
- Anastasia’s Perfect Brow Pencil – Comes in 8 colors to choose from, with a spoolie on the other end perfect for blending! This one is best if you prefer a typical pencil as opposed to a retractable pencil.
- IT Cosmetics Brow Power Micro Pencil – Ideal for very fine, realistic hair-like strokes, plus a spoolie brush on the other end for blending and brushing through your brows!
- IT Cosmetics Brow Power Eyebrow Pencil – This one has a larger tip than the previous one they carry, but you can easily self-adjust the color based on the amount of pressure you apply. It even covers gray hairs!
- Kevyn Aucoin’s Precision Brow – It’s also great for filling and defining brows with thin hair-like strokes and smooth application.
WAIT… BEFORE YOU KEEP SCROLLING…
Would You Like To Become A PRO At Eyeshadow & Upgrade Your Eye Makeup Skills?
EYE MAKEUP MADE EASY!!!! Take Your Makeup Skills To The Next Level With The Essential Master Your Eyeshadow Guide!! 75+ Pages Packed with Exclusive Professional Makeup Tips, Tricks, Secrets & More!! Click Here To Learn More…
How To Get Perfect Eyebrows: Beauty Tips On Application & Technique
Tip 17: Practice Makes Perfect!
Practice on paper! One great way to learn how to create natural-looking, perfect eyebrows is to practice on paper with your brown pencil.
On the paper only, imagine you are starting at the beginning of the brow. Draw each individual brow hair using short, fine hair-like strokes as though you are going in the direction of the hair growth.
Doing this trick on paper will allow you to see how the pencil feels in your hand when doing short, small, thin strokes and to see how much pressure you should and shouldn’t apply. For a natural look, you will notice that a lighter pressure is always best!
Tip 18: Brush-Baby Brush!
First things first, before applying your eyebrow filling products (pencil, cream, powder, or gel), grab your spoolie and/or brow brush and brush through them. Brush your eyebrows upwards and outwards in the direction of the hair growth. This cleans things up, so you know where to apply your products.
Tip 19: Light As A Feather!
You must use a light hand and pressure when filling in your brows. Otherwise, you risk applying too much product (and having to remove it to start over) or creating rather harsh lines that are very unflattering. A little bit of product can go a very long way, so always keep it super light!
Tip 20: Short, Fine Hair-like Strokes
Both pencils and creams/pomades using a thin synthetic angled brush should be applied using short, fine hair-like strokes swept along the brow in the direction of your hair growth ending at the tail. Imagine you are drawing in each individual hair. All other brow products should also be applied in a sweeping movement in the direction of hair growth as well.
Best Eyebrow Angled Brush Picks:
- Benefit’s Angled Brush & Spoolie – This brush is perfect for all formulas (powder, cream, pomade, gels, and waxes) and all skill levels. The firm, thin tip makes mimicking natural hair super easy with short, fine strokes! Spoolie on the other side you can use for effortless blending!
- Anastasia’s Duo Brush #12 – Great for precise hair-like strokes due to its firm bristles! It provides a nice even, and smooth application for creams, pomades, and powder.
- Duo Eyebrow Brush by Keshima – Good option if pricing is a factor…Precise, firm tip, and highly rated on Amazon!
Tip 21: Fill In The Gaps Pronto
When filling your brows, always start with gaps and sparse areas first, if you have any. Once again, remember to use short, fine hair-like strokes.
Best Eyebrow Fill In The Gap Picks:
- Anastasia’s Tapered Brush – This brush is ideal for filling in sparse brows! The tapered tip helps with precision for powder, cream, or pomades!
- The PRO Pointed Brow Brush – Great for precision and control with product application!
Tip 22: Begin Filling Here, Not There…
When it’s time to fill in your brows, rather than beginning at the front of your brow, start on the middle bottom section of the brow…just under the arch. Fill in the middle and the arch area, moving upward and outward, going in the direction of the tail.
Once the tail is filled in, using any leftover product on your brush, go back to the front of the brow and lightly fill. This way, you avoid applying too much product to the front section of your brows.
Think of it as though you are creating a gradient effect. So, the front section of your brow should get your lightest product application. Your brow from middle to tail needs to be darker than the front to middle.
Tip 23: Try This Trick For Overpowering Brows
Do your brows ever seem overpowering after you fill them in? I know this can lead some women to feel intimidated about filling their brows.
But here is a trick to achieving perfect eyebrows that will undoubtedly help you…instead of applying eyebrow product to your full brow, focus on only applying light hair-like strokes to the sparse sections. Then using your spoolie or brow brush, comb through the brow to blend it a tad bit. This only works well if you choose a color very close to your natural eyebrow color.
Tip 24: Blend, Blend, Blend!
To perfect your eyebrows, always brush through them after filling them in to blend, soften, and create a more natural look. This allows you to remove hard lines and prevent a harsh look. I prefer to use a spoolie brush for this, but you can use a brow brush or even a clean toothbrush! You can also try blending gently with a Q-tip.
Tip 25: Set Them Up For Success!
To help keep your brows in place, you can set them after you have fully filled them in using a clear brow gel. For thick or unruly brows, in particular, you want to be sure to set your eyebrows with a clear gel brushing upward. This is my personal favorite gel for setting brows!
Tip 26: Try Using Concealer To Hide & Define
If you are due for a brow waxing, threading, or shaping session, want to define your eyebrows even more, or simply need to fix a few errors, here’s one of my favorite insider beauty tips!
After fully filling in your brows, take a cream concealer with a small flat-tipped brush and outline right outside your brow shape (below and above). Go in very close & tight, using a concealer that’s just a shade lighter than your skin.
As you outline them, apply going in the direction of your brows. You can use this trick to cover up a few teeny-tiny hairs that have started to grow in under your brow line. Just don’t forget to blend it out! Pro Tip: These two E.l.f brushes work well for this concealer technique…E.l.f. Flat Synthetic Brush & Precise Dual-Sided Eyebrow Brush.

Tip 27: How About A Little Heavy Lifting?
To enhance your brows and give them a lift, try using a highlighter pencil (like this one from Benefit). Using this pencil go below the brow, right outside the browline. Trace a line under the full brow. Or to really kick things up a notch, you can go right under the arch and the tail.
Next, smudge it out a tad with your finger or a makeup brush to blend it. For a few more shade options, try Anastasia’s in shell/lace or
ARE YOU AGE 40 & UP??
The New Makeup Guide, “How To Look Younger Makeup Secrets,” Is Now Available!! Learn How To Defy Your Age And Turn The Clock Back 10 Years In A Matter Of Minutes!! Master The Art Of Younger-Looking Perfect Eyebrows & So Much More…TODAY! Click here to find out all about it!

Disclosure: Please Note- Chapter 4 cover page of this makeup guide contains images that were AI-generated.
Tip 28: Watch That Tail!
Avoid extending your brow tails downward…doing so can make you look a bit sad and draw the face down. For a more lifted look, draw your tail outward and slightly across.
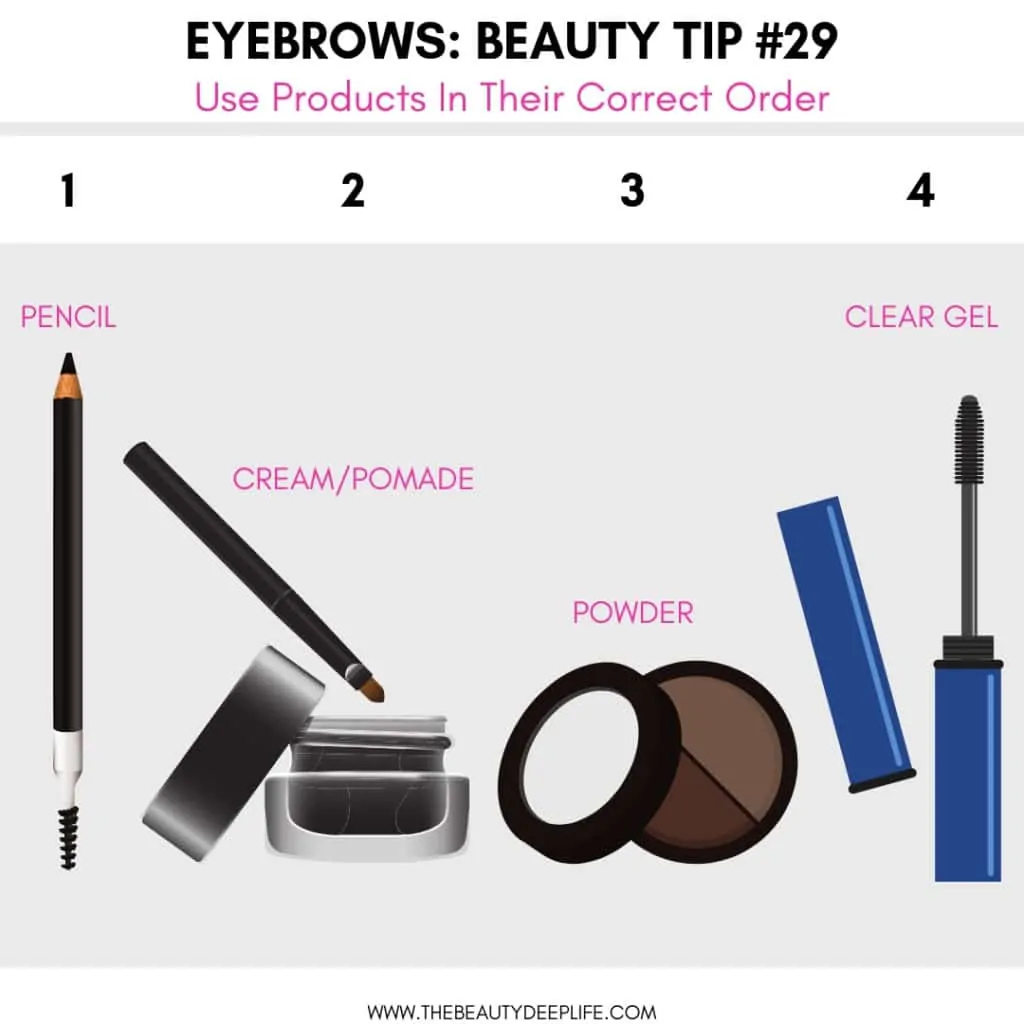
Tip 29: Use Products In Their Correct Order
If you opt to use more than one brow product at a time, make sure you apply them in the best order. Generally, the ideal order is a pencil, cream/pomade, powder, and lastly, clear gel.
Tip 30: Keep Them UP!
Now for the last and final of our 30 top beauty tips, keeping your eyebrows up is all about maintaining the lovely shape you achieve from grooming or getting them professionally done.
- Depending on how fast your brows grow, I would suggest picking one or two days each week for a little brow upkeep! During this time, tweeze any strays you see, or if you need to trim, do so as well.
- Make sure you’re just cleaning up and not doing anything drastic. The goal is to focus on cleaning around the brow and not touching or changing the overall brow shape.
Perfect Eyebrows, The Beauty Tips Wrap-Up!
Ladies, your eyebrows can be powerful! From shaping to grooming to filling in, there are many ways to enhance your natural beauty with them! And achieving perfect eyebrows really does come down to shape, color, products, tools, application, and technique.
Just remember that practice makes perfect, and particularly with grooming, steer on the side of LESS is MORE, as in LESS TWEEZING…Don’t Overpluck!
If you are hesitant, I suggest you get them professionally done first. Then following, you can simply focus on upkeep and other tips in this article related to filling, color choices, brushes/tools, and applying.
I hope you enjoyed these expert beauty tips for achieving perfect eyebrows! Do you prefer to use a pencil, powder, cream/pomade, or tinted gel for your brows?
More makeup and beauty tips & tricks related to eyebrows…
- How to look younger starting with your brows & lips!
- If you are a beginner to makeup, check out this post with beauty tips for full-face makeup application (eyebrows included)!
We are a participant in the Amazon Services LLC Associates Program, an affiliate advertising program designed to provide a means for us to earn fees by linking to Amazon.com and affiliated sites. For more info, see Disclosure Policy.
How do you start if you have no eyebrow hair?
Hi Gerry, send me an email with a photo so I can see what you are working with…Then I can send you back some tips and suggestions… Send the email to [email protected] 🙂
What about some advice for those of us with literally no eyebrows left?
Shoot me an email, and we can discuss options…
I’m with you there
Great with your tips, I feel like a queen. On fleek eyebrows plus eyshadow and mascara. Thanks for the tips! I feel powerful.
congratulations for the content, I really liked it
thanks! glad you enjoyed it!
I use got2b spiking glue to make my eyebrows say in place but beware a little + I mean little goes a longggg way! Stays on all day though ??
Haha yes, I’ve used hair spray myself on my own 😉
These eyebrow tips are amazing and I loved them a lot.
Yay!! Happy you liked them!! 🙂
Oh yes! This is an awesome post for Eyebrows care!! I have read all of the post carefully. These are fantastic tips!
Glad you like everything!! Thank you for the comment 🙂
Wow! Great post sir, that’s amazing. These are really great tips and suggestions for beauty lovers. Everybody will be benefited from that post.
Courtney,
Really nice to go through your beauty tips . They are informative and has helped me a lot .
Thanks !
yay!! glad they have helped 🙂
This has been very informative. I have platinum grey eyebrows. I used to be a bright redhead. In your color suggestions you don’t mention what to choose for very light, almost invisable eyebrows. What color should a platinum gray haired wear? Under the top layer of my white hair are traced of my prior red which is yellow/orange tinged. I have no idea how to handle the color!
Christine, you can always send me a photo to [email protected] and I can give better suggestions…but have you tried using a powder brow product with an ash tone or perhaps a taupe before?
I just love all your tips for the brows. I was just in search of something like this and found it here. Thanks so much for sharing!
glad it has helped! 🙂
Awesome!