
Eye Makeup For Beginners: 4 Simple & Stunning Eyeshadow Looks To Try This Week!!
Eye makeup application can be intimidating for most women, especially for makeup beginners. However, with the right tools, products, techniques, and knowledge… Good news, ladies… Yes, it can be mastered!!
In fact, if you find yourself lacking in confidence, this is where having a few step-by-step eyeshadow looks to play around with can really pay off!! With every makeup look that you attempt and learn to do… guaranteed you’ll find a new sense of accomplishment, Beauties!
To get your feet wet, I’m breaking down some simple looks for all you beginner gals to experiment with. And for those of you who aren’t beginners, well, it never hurts to try something new or brush up on one’s eye makeup skills, right??
As an on-set makeup artist & hairstylist, before production began, I’d sometimes have to brainstorm looks for characters in the script. I’d come up with ideas for how an actor’s makeup or hair needed to be for each scene.
To do this, I’d pull images from magazines or online and put them in my book for inspiration (in the industry, this book is called a morgue book).
I learned how to observe an image and figure out ways to recreate that look (or something similar), sometimes using special effects makeup and other times with beauty makeup.
Well, today, using that skillset, I want to share with you step-by-step beginners’ eye makeup application tips for replicating four beautiful looks!
I’ll go over the basic terminology for eye makeup, explain the kinds of brushes, tools, and products you can use to pull off each look and let you know precisely where to apply your makeup to recreate these four featured looks!!
Sound like your cup of tea? Great!! Let’s get you over those beginner hurdles and have your eyes reaching new levels of beauty and captivation, ladies!!
Disclosure: This post contains affiliate links, which means I receive a small commission at no extra cost to you if you make a purchase using one of these links. For more info, see Disclosure Policy. Additionally, as an Amazon Associate, I earn from qualifying purchases.
Beginner Eye Makeup: The Anatomy Of The Eye
When it comes to following eye makeup steps and tutorials, one essential we must not overlook is the terminology (terms used for the different parts of your eye).
Once you become familiar with the terms and their locations, you’ll have a better sense of exactly where to apply each of your makeup products.
Check out the sections of the eye in the images below. You can use these images to help with the terms listed in the steps under our four featured looks!
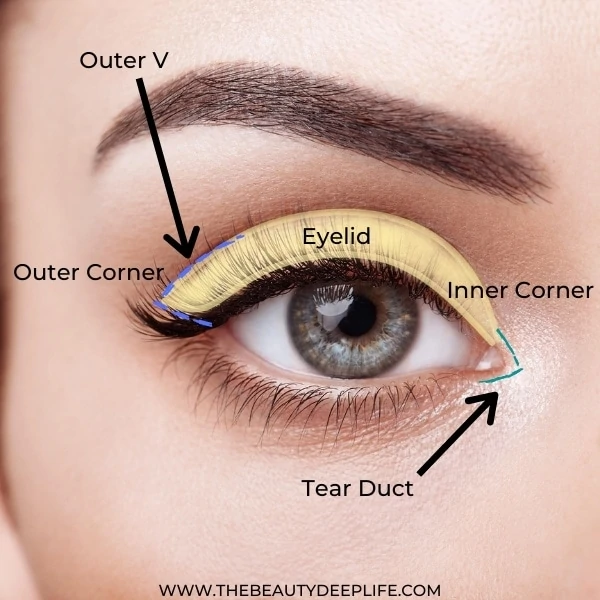
- Outer “V” – Picture an imaginary line going from the edge of your upper lash line to the crease. Then imagine it connecting to another line in the crease as it forms a shape that looks like a sideways “V.”
- Inner Corner – Inner section of the eye near the tear duct.
- Outer Corner – Outer section of the eye.
- Waterline – Inner rim between the eye and your lashes.
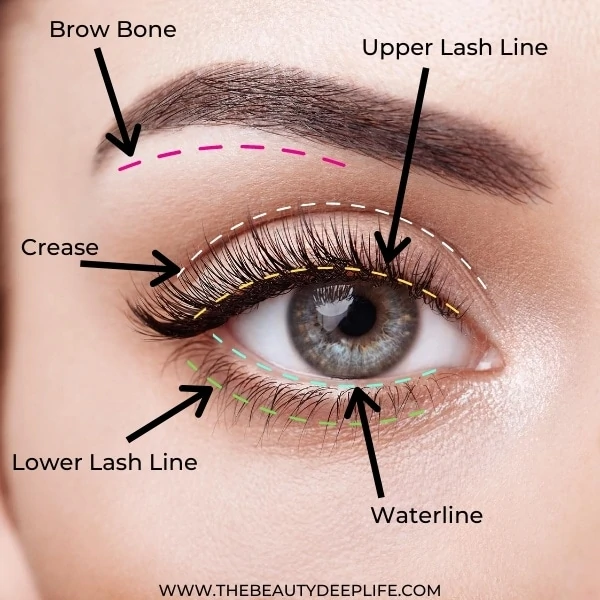
- Lower Lash Line – Area right below and under your lower lashes.
- Upper Lash Line – Area on your upper eyelid where your lashes grow.
- Crease – The natural indentation or slightly sunken-in section above your eyelid. To find your crease, use your finger to touch the area just above your eyelid and right at your eye socket. The bone you feel above your eyeball is generally where your crease should fall (horizontally along that bone).
- Brow Bone – The prominent bone area right below your eyebrow (between your brow and eye crease).
Ready To Experiment With Colorful Eyeshadows And Move Beyond Neutrals?
Grab Our FREE Cheat Sheet Of The Most Flattering Eyeshadow Colors For Your Specific Eye Color!! Get Instant Access Below!!

Getting Started: Essential Tools & Brushes
Before jumping headfirst into doing any eye makeup look, the first order of business is to be certain you have what you need to apply and blend with ease.
Here’s a brief rundown of what you’ll likely need for these next four eye makeup techniques…*These are essential for beginners, especially when putting together your own eye makeup application kit.
- Lash Curler – Keep those lashes poppin’ gals!!
- Q-Tips – These will come in handy when you make mistakes with your eye makeup, especially cleaning up eyeliner.
- Translucent Powder (As Needed) – If you don’t use a primer, you can always apply your concealer and foundation to your eye area, then follow with a translucent powder.
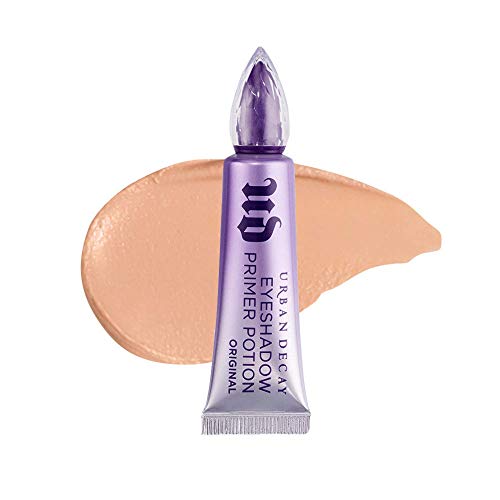
- Primer (Optional) –For unbeatable eyeshadow with all-day staying power, a primer is a must!! Keep in mind, ladies; a primer can also make your eyeshadow color more vibrant for that extra pop!
Now, whether it’s a hot, humid day or you tend to get smudges, my #1 all-time favorite is Urban Decay’s Eyeshadow Primer Potion.
- Brushes – Sure, you could probably get away with your basic eyeshadow brush, blending brush, & angled liner brush. But having more brush options will make it so much easier for you when you start experimenting with different techniques and looks.
- Not to mention, owning a variety of eye brushes certainly comes in handy when you lack the time to clean them as frequently as you’d like or when you use more than one color on your eyelids.
As described in “Eyeshadow Tips For Beginners,” there are a few brushes that are most important when you start dabbling in eye makeup. These brushes include a basic eyeshadow brush, a small eyeshadow brush, an eyeshadow blending brush (possibly 2), a smudger brush, and an angled brush.
PRO MAKEUP TIP: Investing in good brushes & tools ensures you get the most even, consistent, and detailed makeup application process.
Not sure which brushes work best?? Check out our top picks!
Top Products, Tools, & Eye Makeup Brush Picks:
- Basic Eyeshadow Brush – For eyelid application…Sigma Eye Shading Brush E55

- Lash Curler – Try this Shiseido Eyelash Curler that’s voted #1 in the US!!
- Small Eyeshadow Brush / Smudger Brushes – For application to under the lash line (fits right up under the lashes), to small, difficult-to-reach areas, & to smudge out your liner. For smudging out pencil eyeliner, gently sweep the bristle tips over the line that you applied. And for eyeshadow under the lash line, dip the brush into your shade and use it against your lower lash line right at the roots of the hairs.
- Eyeshadow Blending Brushes – Ideal for buffing out harsh lines and creating a smooth transition from shade to shade.
- Angled Brush – For eyeliner application…Sigma Small Angled Brush E65, the E68 – Line Perfector, or try the E06 Eye Liner Brush
Optional Add-On Brushes
- Large Eyeshadow Brush – For full lid application…Sigma Large Shader Brush E60
- Flat Eyeliner Brush – For eyeliner application…Sigma E15 – Flat Definer Brush
- Pencil Brush – For applying eyeshadow under the eyes at the lash line and often for inner eye work…Sigma Pencil Brush E30
- Small Tapered Blending Brush – For more definition or depth in the crease and eye’s outer corner…Sigma Small Tapered Blending Brush E45
- Rounded Blending Brush – Another brush that works great for blending the crease area…Sigma Diffused Crease Brush E38
4 Beautiful Eyeshadow Looks To Define Your Eyes With Step-By-Step Instructions
Disclaimer: The makeup products suggested in this article were not used in these photos, and therefore the shades may vary from those in the images. These are my recommendations as a professional makeup artist of products beginners should use to recreate these eye makeup looks or something very similar.
Eye Makeup Look 1: Au Natural Eyeshadow & Liner
Whether you need a simple natural eye makeup look for work, you’re a makeup minimalist wanting to keep things more subtle, or you’re seeking beginners’ tips, a look like this is a great place to start!
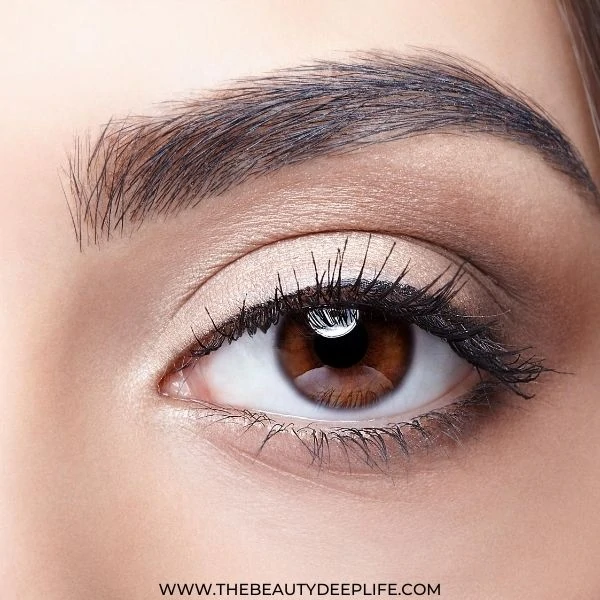
You can pull something like this off with a basic neutral palette. In fact, for makeup beginners, I usually suggest starting with a neutral eyeshadow palette anyway. This very natural makeup look can work whether you have blue, green, brown, or hazel eyes because it uses earthy browns.
Related: How To Achieve A Natural Makeup Look (Tutorial & Best Products)
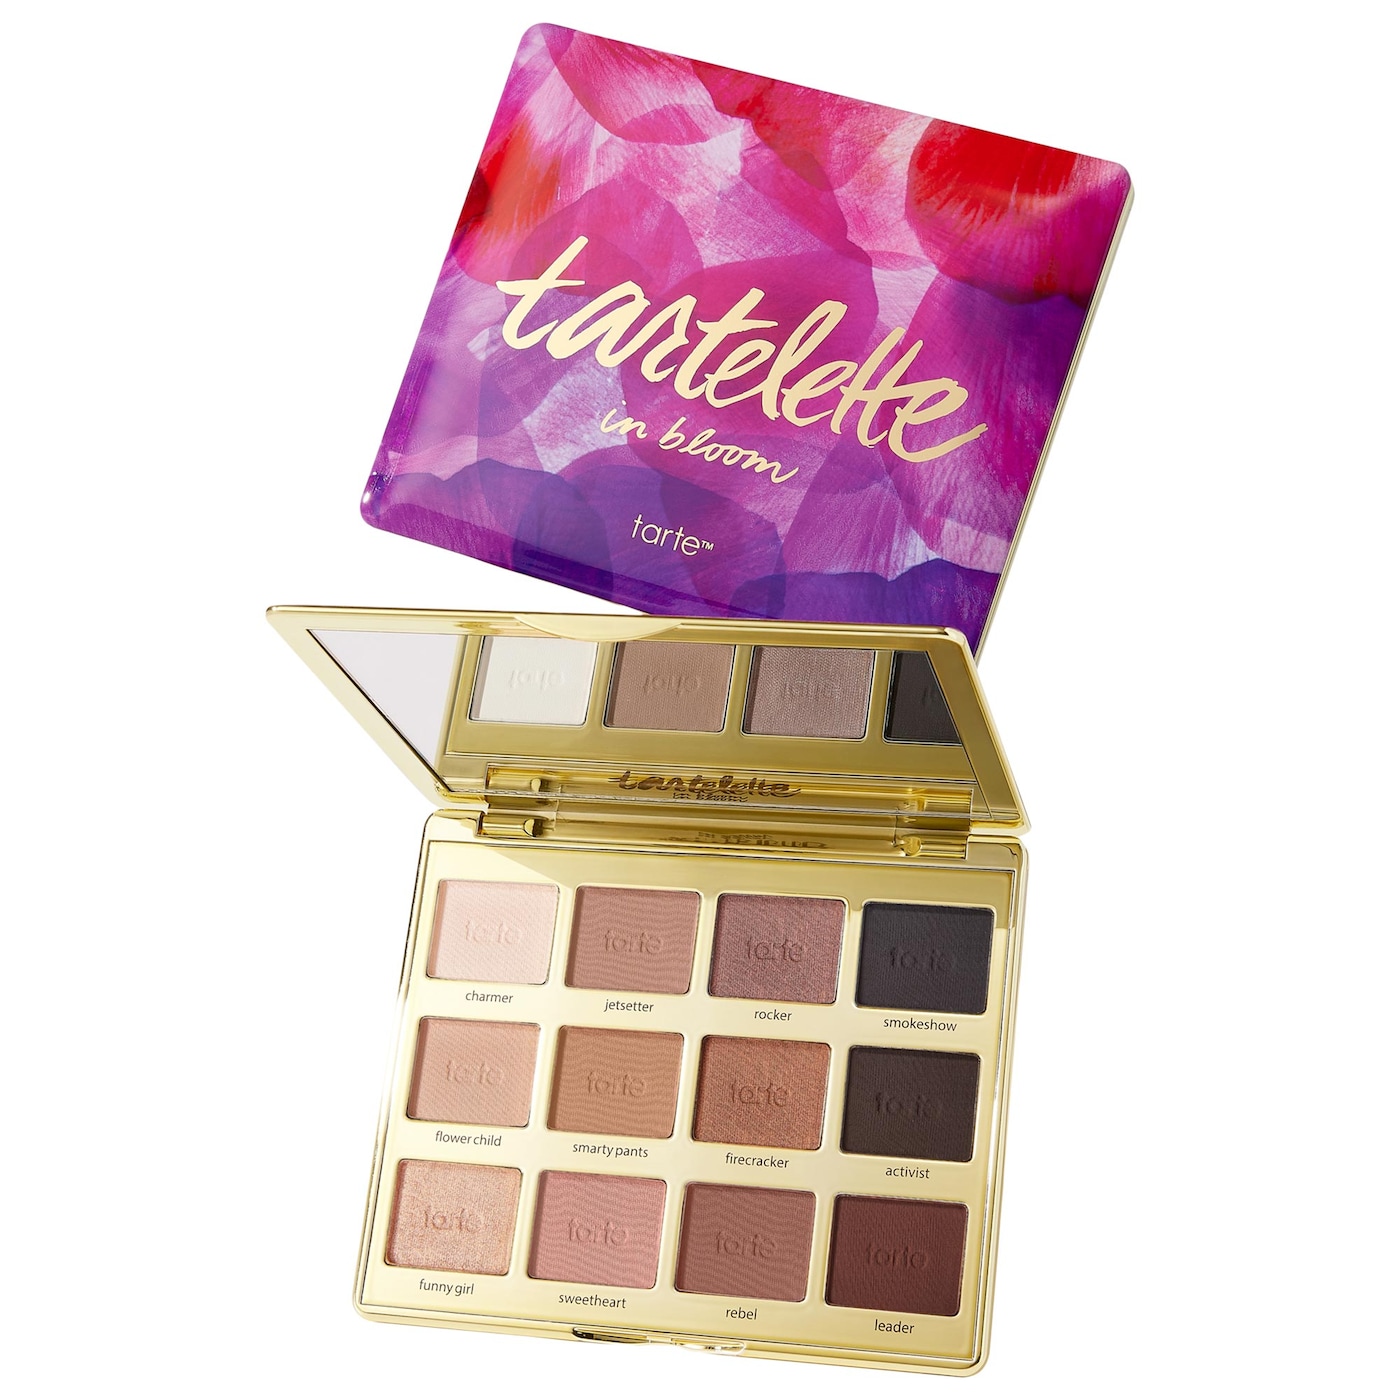
The Best Neutral Eyeshadow Palettes For Beginners:
Tarte Neutral In Bloom Clay Eyeshadow Palette

FENTY BEAUTY BY RIHANNA Snap Shadows Mix & Match Eyeshadow Palette – TYPE: 1 True Neutrals


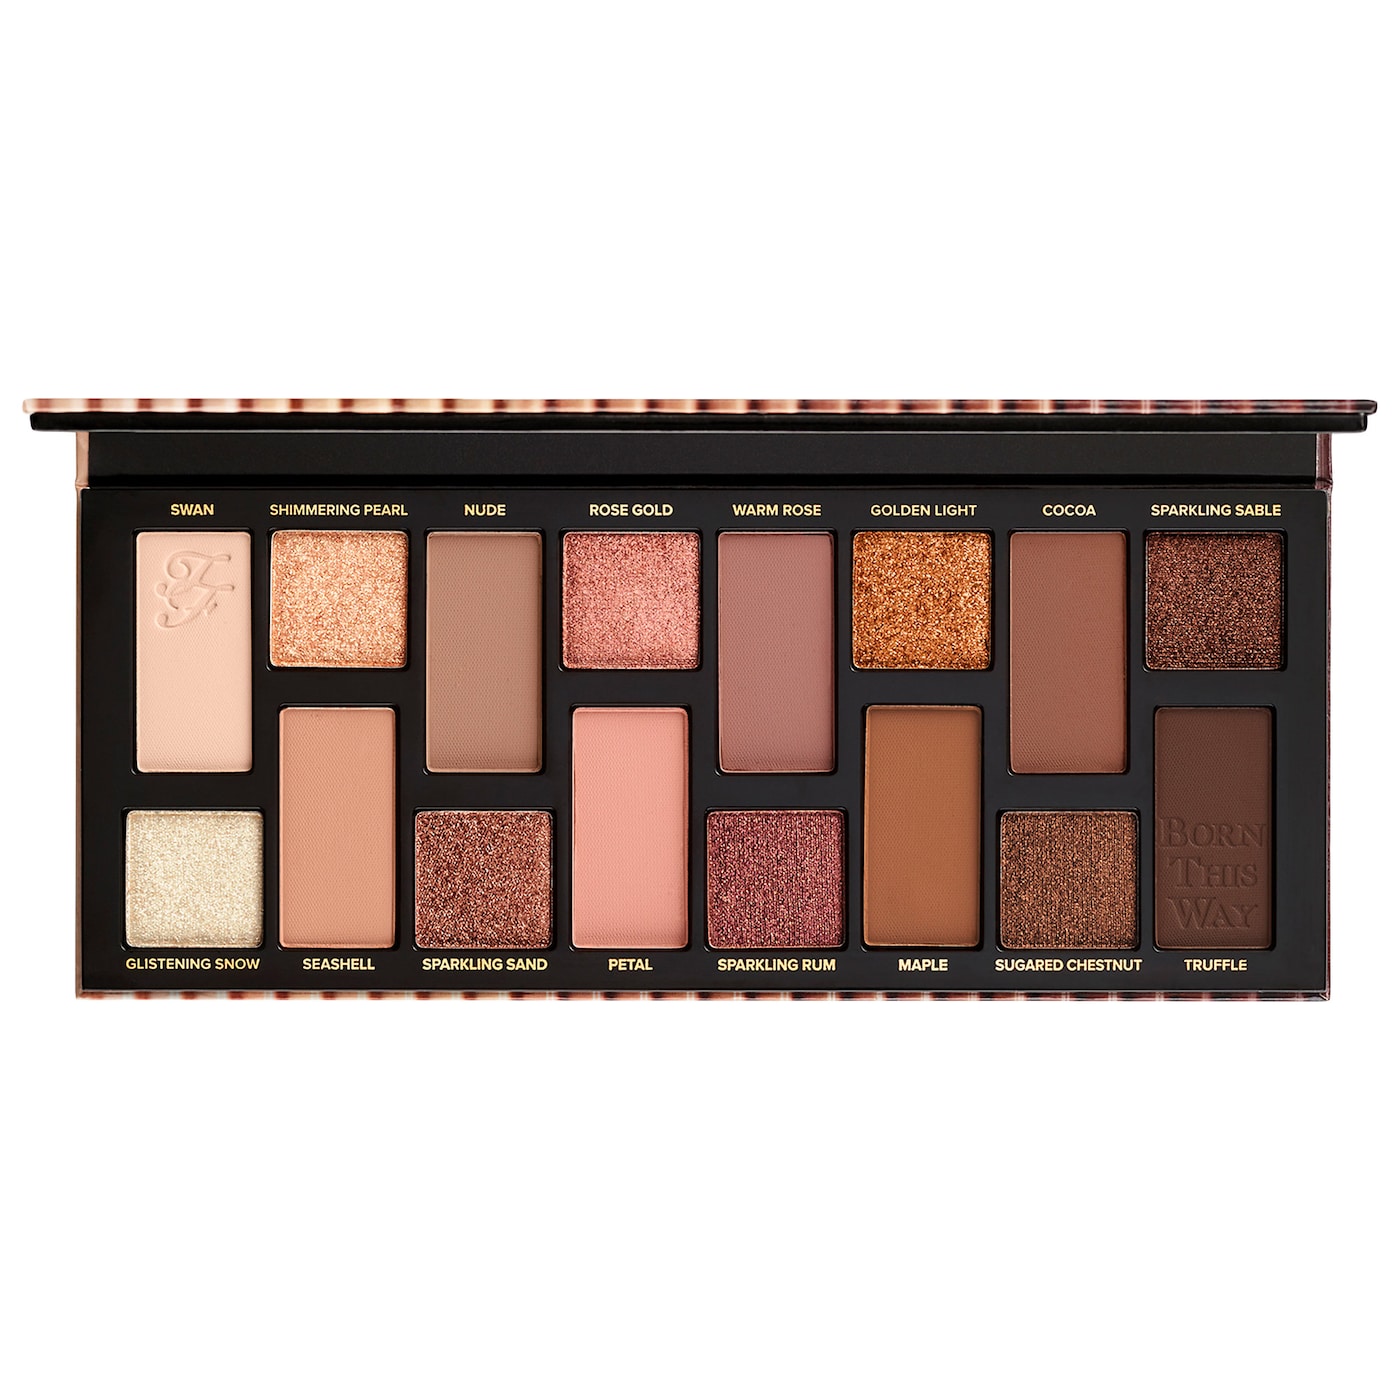
TOO FACED The Natural Nudes Eyeshadow Palette

To Achieve A Look Like This You Will Need:
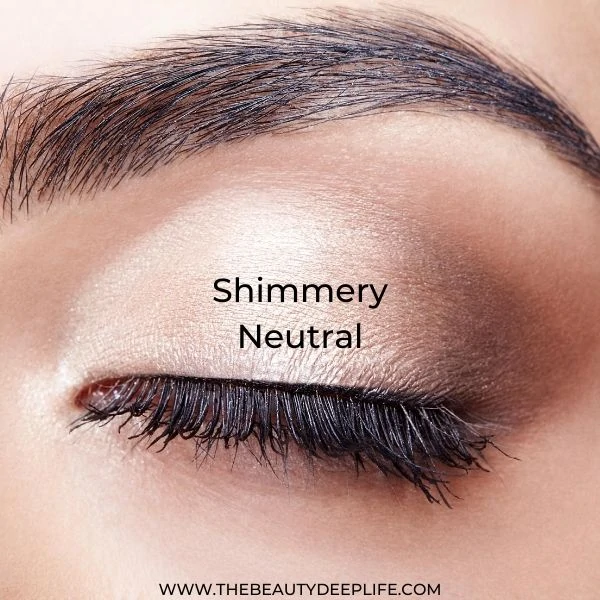
- A Shimmery Neutral Eyeshadow Shade – To look most natural, pick a color that is close to your natural skin tone but lighter. For example, lighter skin tones may want to try a champagne color, while medium to dark skin tones may want to opt for shimmery beige, deep pinky browns, or gold.
- Light Matte Eyeshadow Shade – This is usually one of the lightest colors in an eyeshadow palette, like ivory, bisque, or light beige, etc.
- Warm Brown Eyeshadow Shade – This is often one of the darkest shades in a palette.
- Eyeliner
- Mascara
Au Natural Eyeshadow & Liner Look Steps:
Step 1
- Prime your lids. No primer? You can apply foundation and concealer to the area, then set with translucent powder.
- If you do have primer, apply it to your eyelid blending upwards towards the brow bone with your finger or a concealer brush. If you plan to apply eyeshadow under the lash line, you may also use your primer there.
- Let it dry before the next steps.
Step 2
- With your basic eyeshadow brush, you’ll want to apply a shimmery neutral shade (like a champagne color) across your lid.
Step 3
- Using a darker shade (brown), you’ll add some depth.
- Close the eye you’re working on and imagine dividing your lid into three sections.
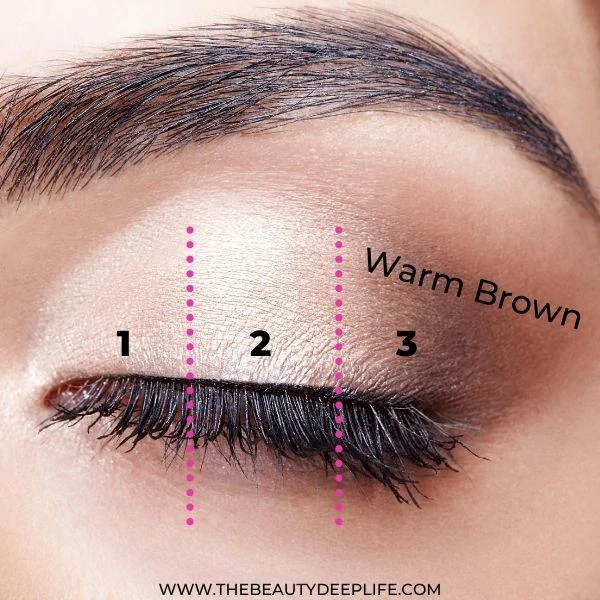
- Using a brush like this Sigma one, apply the brown with a gentle tapping motion to the outer corner of your eye, so it falls in the outer 3rd section of your lid.
- This specific brush works well for applying eyeshadow if you use light tapping, but it’s primary function is blending.
Step 4
- Using the same brush, wipe it on a clean, dry towel to remove the eyeshadow pigment on the bristles. Or if you prefer, just use a different blending brush that is clean.
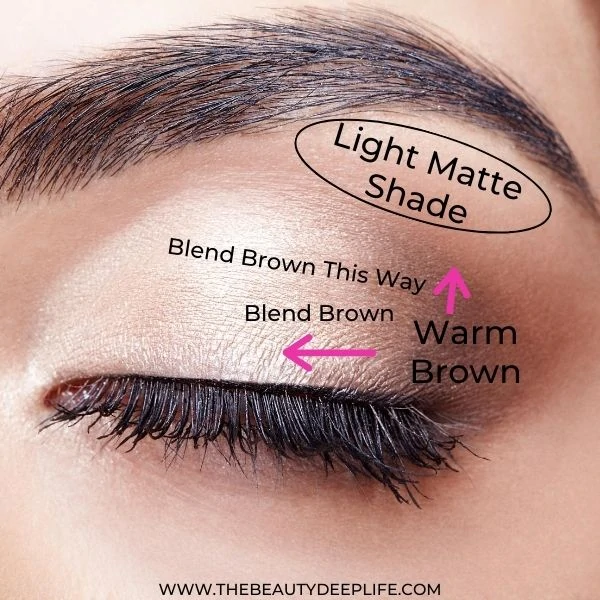
- Now you’ll blend this brown inward, moving towards section 2 of your lid. Try this by blending with circular motions. Start at the outer corner and move in small circles as you go inward. You’ll also want to blend upwards slightly beyond the crease.
Step 5
- Using a brush like the E40, you can softly apply (just use the tip for application) a light matte shade right above your crease and below your brow. For example, opt for matte ivory, bisque, or light beige eyeshadow. Wipe the pigment off on a clean, dry towel. Then go back & blend it into the other shadows to soften the shape.
Step 6
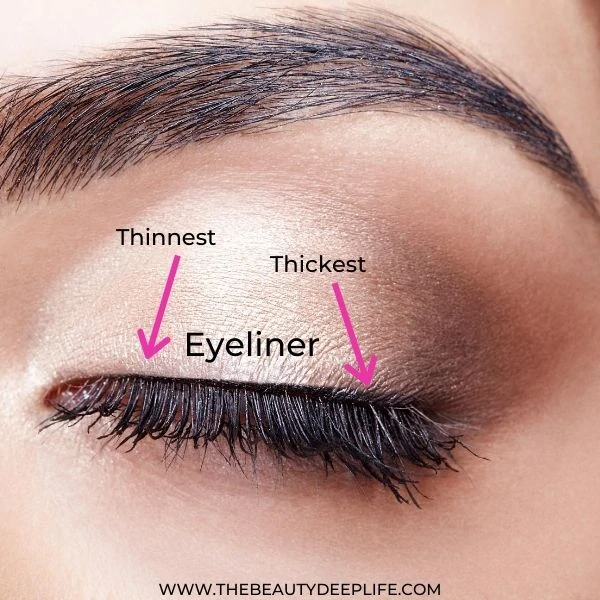
- Apply a super thin black liner to the upper lash line. If you feel more comfortable with an eyeliner pencil, use that. Or you can experiment with a cream and liner brush (either angled or a flat one like this). Start right smack dab as close as possible to the roots of your lashes. This line should be thin, yet become slightly thicker towards the outer section.
Step 7
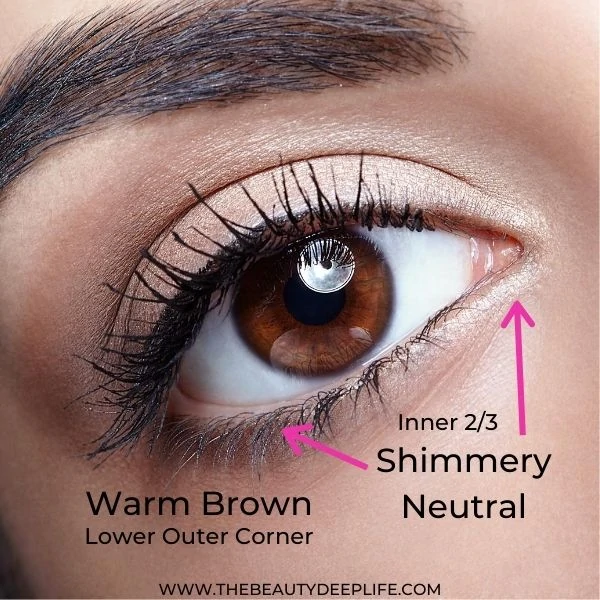
- Now, you want to do some under-the-eye makeup application. You can either use a small shader brush, a smudger brush, and/or a pencil brush. Apply the neutral shimmer shade used in Step 2 along your lower lash line (right below the lashes) roughly to the inner 2/3 or 3/4.
- Using the eyeshadow from Step 3, apply it ever so slightly to the lower outer corner of the eye. Then using a clean smudger brush, you want to diffuse the brown along that outer edge using a back-and-forth windshield wiper-like motion.
Step 8
- Lastly, curl your lashes and apply mascara!!
Related: How To Apply Mascara Properly: 23 Insider Tips & Tricks
HOLD ON! BEFORE YOU KEEP SCROLLING
Do You Want To Become A PRO At Eyeshadow & Skyrocket Your Eye Makeup Skills?
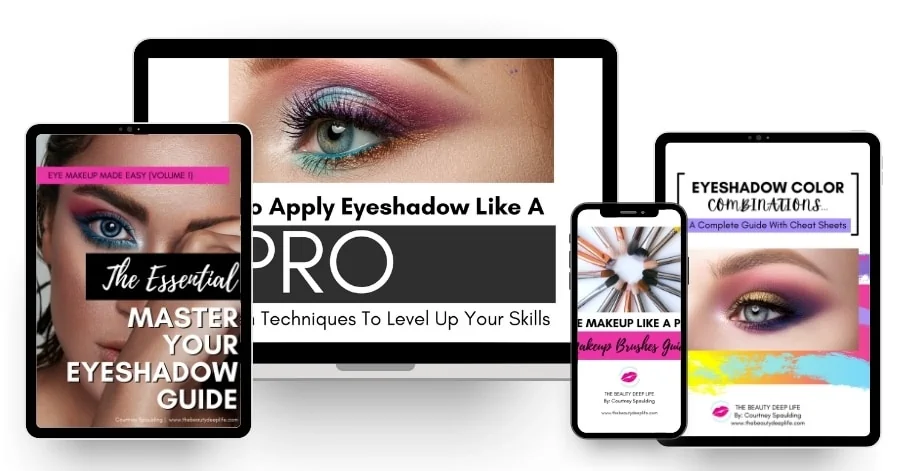
EYE MAKEUP MADE EASY For Beginners & Up!!!! Take Your Makeup Skills To The Next Level With The Essential Master Your Eyeshadow Guide!! 75+ Pages Packed with Exclusive Professional Makeup Tips, Tricks, & More!!
- Learn How To Apply Eyeshadow With 14 Stunning Step-By-Step Looks & Techniques
- Easily Follow Along, Step By Step Looking In The Mirror At Home!!
- Eye Makeup Cheat Sheets & Charts!
- Learn How To Correctly Use Your Brushes, Pair Your Eyeshadows, Pick Your Best Colors, Apply False Lashes, + Several Additional Bonus Tutorials!
- INSTANT, Convenient Access From Computer, Tablet, or Phone!
- Insider PRO Makeup Tips, Tricks, & Makeup Artist Secrets To Help You Upgrade Your Makeup Game!!
Eye Makeup Look 2: Purple Gaze Eyeshadow & Liner
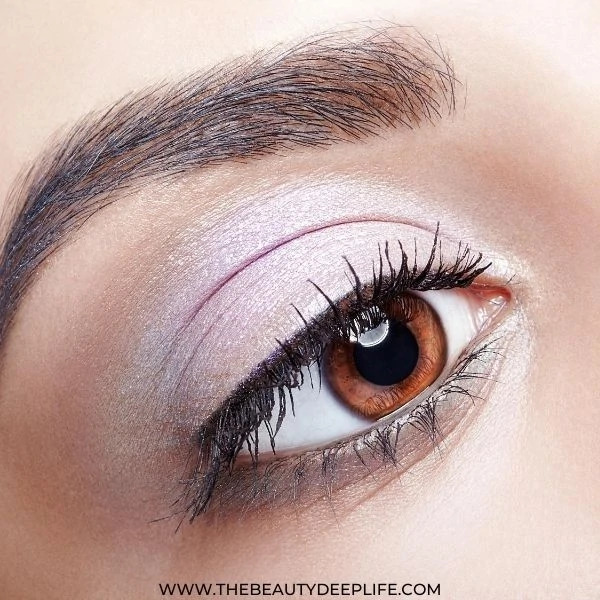
Now, let’s move beyond natural eye makeup to a mesmerizing look for beginners that adds a lush, purply pop of color!!
PRO TIP: If you have brown eyes purple is a very flattering shade for you, so you may want to consider a few eyeshadow palettes with that color! You can check out a few of my favorite palettes for brown eyes here.
To Achieve A Look Like This You Will Need:
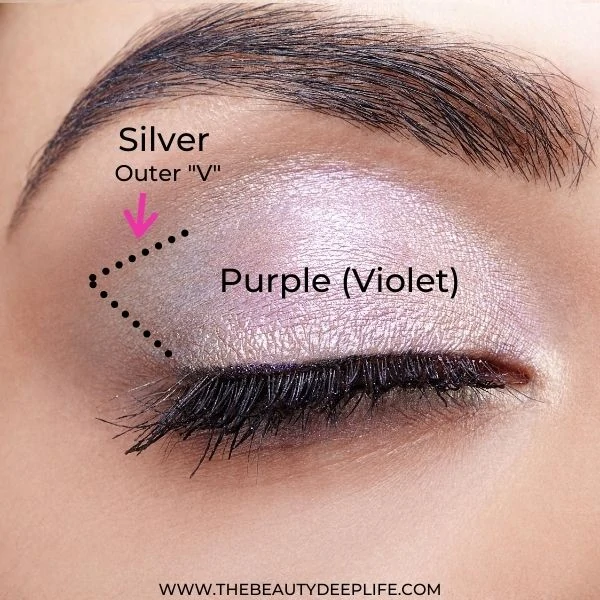
- A Shimmery Purple (Violet) Eyeshadow Shade
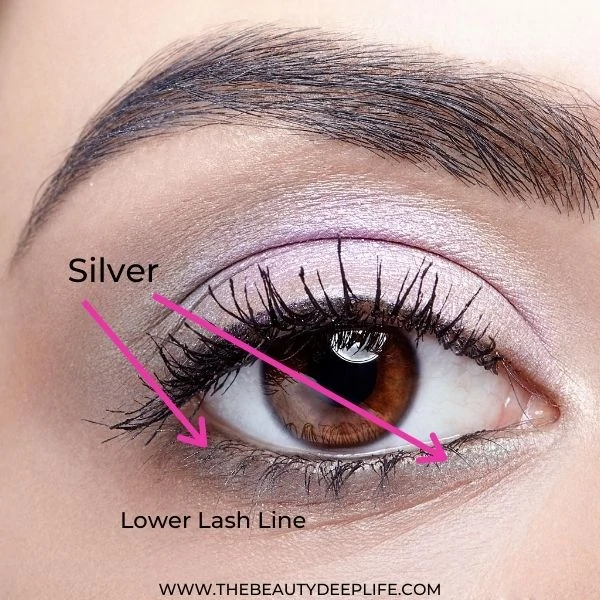
- Light Shimmery Silver Eyeshadow Shade
- Soft Warm Brown Eyeshadow Shade
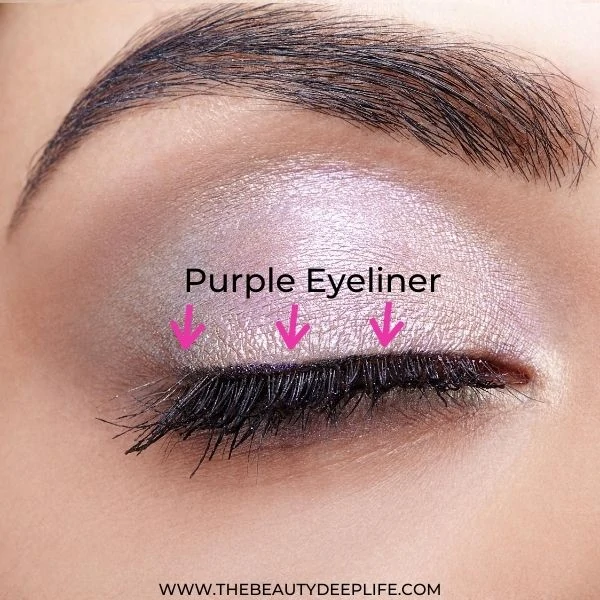
- Purple Eyeliner – If you can’t find the perfect purple, you can always use a slim black liner like this one. I actually use this liner two nights ago for date night haha :). You’ll love how the micro-fine tip will make it so incredibly easy to keep your lines precise and thin!
- Mascara
Our Top Picks:
Light Shimmery Purple Shades
- NYX Mystic Petals Shadow Palette
- Urban Decay Eyeshadow in Free Bird
- Sephora Collection Eyeshadow in Magnolia Garden
Shimmery Silver Shades
- Master Crystal Reflector (Makeup By Mario)
- Sephora Collection Eyeshadow in Diamond Crushed could work depending on your skin tone.
Warm Brown Shades
- Sandstone from MAC
- MAC Espresso Matte
- Soft Brown from MAC
- MAC Charcoal Brown
Purple Eyeliner
Purple Gaze Eyeshadow & Liner Look Steps:
Step 1
- Apply a primer to your lid. You may also apply it under your lash line for this look. Allow it to dry before the next step. However, if you don’t have a primer, you may apply some foundation and concealer to your eye area, and then set with a translucent powder.
Step 2
- For this step, the goal is to apply a warm brown lightly to the outermost edge of your eye and along the crease connecting them. The final general shape should look like the second image below, only very diffused with no hard lines…
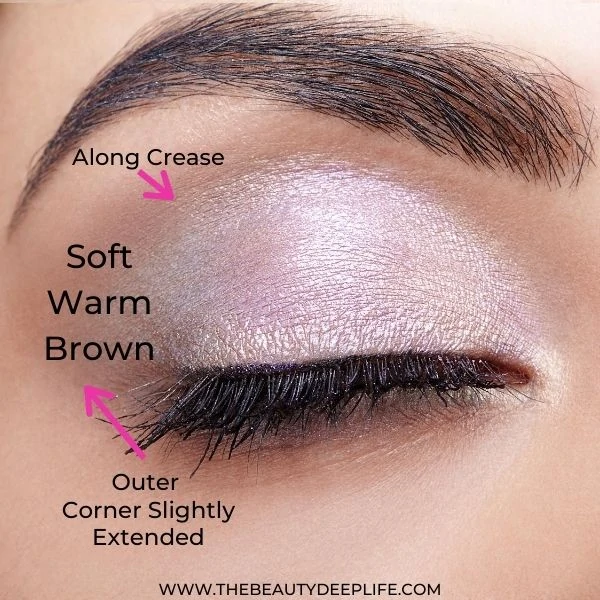
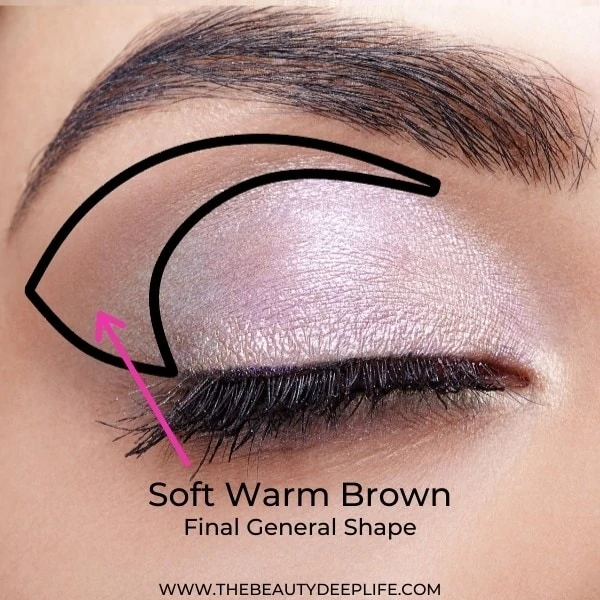
- To create a lengthening effect on the eyes, you will slightly extend the brown at an angle from their outer corners. Starting at the outermost edge of the eye, lightly apply the warm brown with a small brush moving upwards and at an angle towards the outer end of your crease.
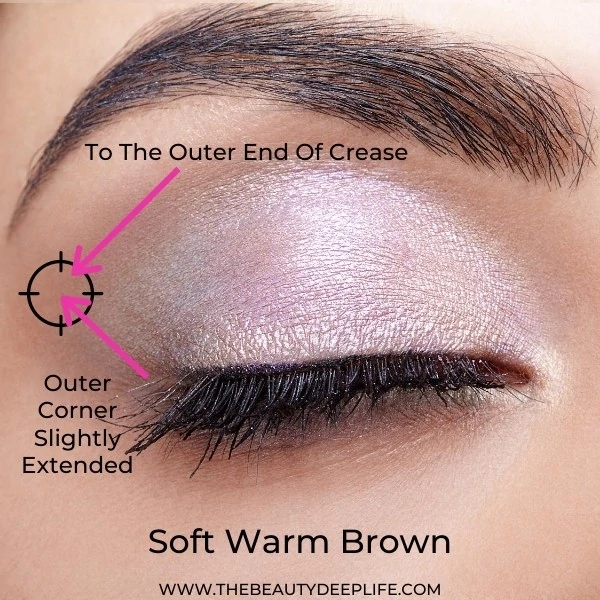
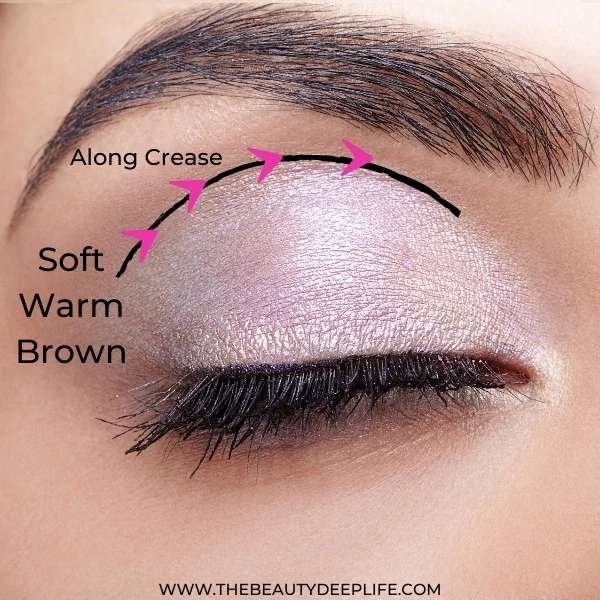
- Now go to the outer end of the crease with your fluffy blending brush. Using just the tips of this brush, apply the brown from that outer section sweeping inwards along the crease in a windshield wiper-like motion.
- Continue with this windshield wiper-like motion, back and forth in the crease a few times to blend it a bit. You also want to sweep the brown you applied to the outer edge up and over into the crease a few times with your blending brush.
Step 3
- Then blend the brown from the crease upwards (still using the windshield wiper motion). You want to move slightly above the crease while blending, stopping under the brow bone. As you go upwards, the goal is to make sure the color fades ever so softly and lightly as you get closer to the brow bone.
- Once you finish blending, it should look like it was very lightly applied, and quite diffused with no hard lines or edges.
Step 4
- Now, with your basic shader brush, you should apply your purple to your eyelid.
Step 5
- Next, you’ll apply the silver shade to the outer “V”. When applying, start at the edge of your upper lash line and stop at the crease. Then create the next line in the crease forming the sideways “V” shape. Keep the “V” small. You have a few options of brushes you can use for the “V” application, like a pencil eyeshadow brush or a tapered blending brush.
- If you want to kill two birds with one stone, I’d suggest using a tapered blending brush like this one, because you’ll want to blend the silver inward into the purple on your lid.
- Blend using the tapered blending brush in little circular motions from the outer silver inward into the purple.
- Make sure you wipe the excess pigment off your brush and onto a clean towel before moving on. Or if you’d prefer, grab a new clean blending brush. You’ll want to blend the silver ever so slightly upward and outward into the brown. It is best to use small circular motions to keep the colors from becoming muddy.
Step 6
- Next, using a small shader brush, smudger brush, or a pencil brush, apply the silver shade to your full lower lash line. Use the brush to sweep the color right up under the lashes.
Step 7
- Apply purple eyeliner in a skinny line along your upper lash line. Keep it as close as possible to the roots of your lashes. It should be thin, but can gradually get thicker towards the outer section of your lash line.
Step 8
- Curl your lashes and apply your mascara!!
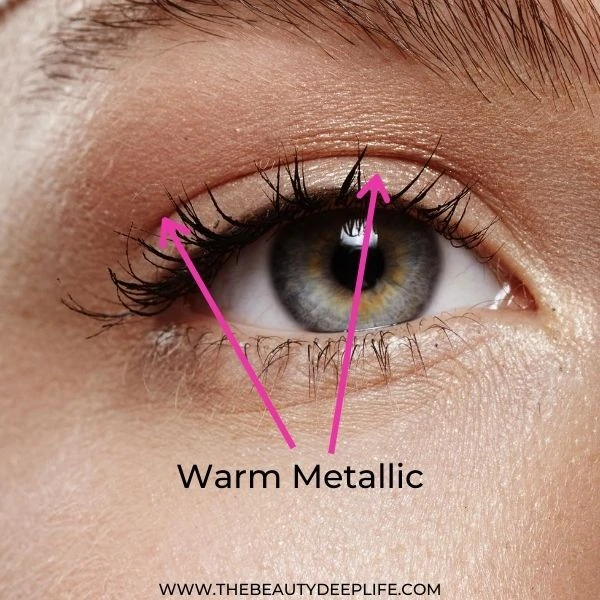
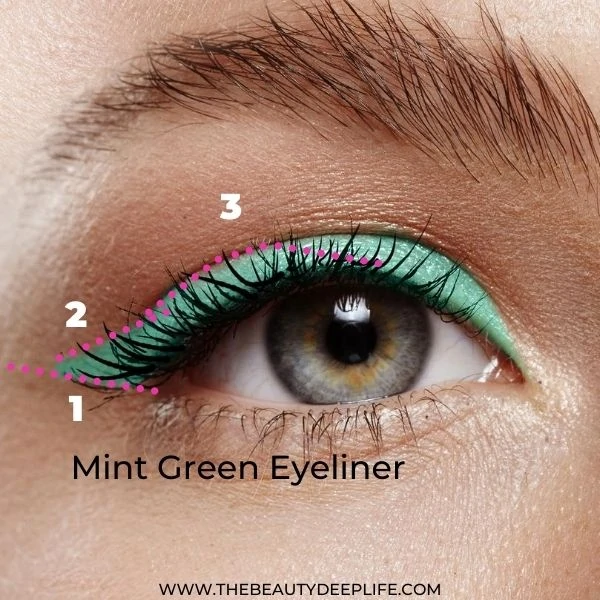
Eye Makeup Look 3: Feline Minty Green Liner & Eyeshadow Metallics
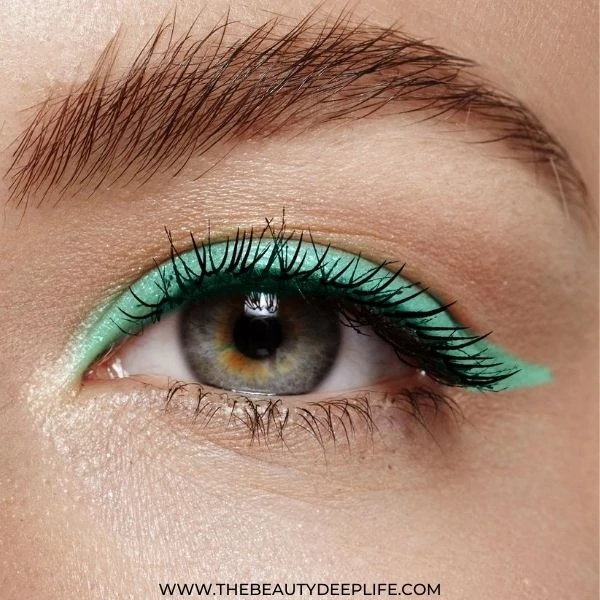
Looking for a bold, flirty, and feminine eye makeup look? Give this one a try!!! But, if you aren’t a fan of mint green, you can always substitute this look with a medium or dark blue liner instead. Additionally, if you want to keep it simple you can always go with a classic black.
To Achieve A Look Like This You Will Need:
- Warm Metallic Eyeshadow Shade
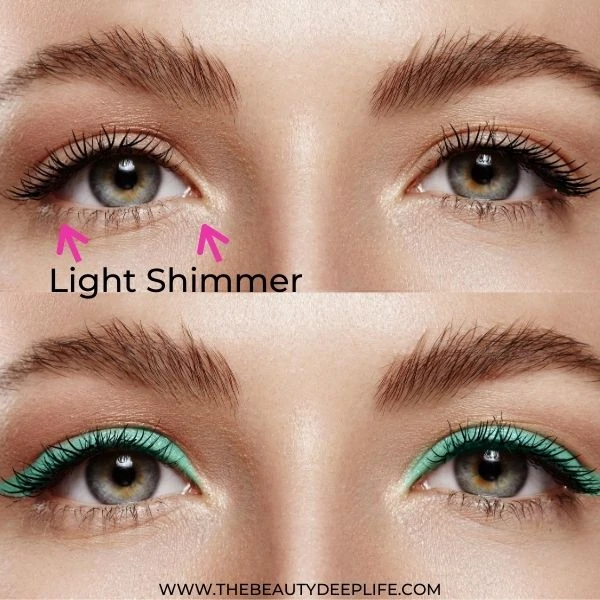
- Optional – Light Shimmer Eyeshadow Shade – (a gold champagne would work)
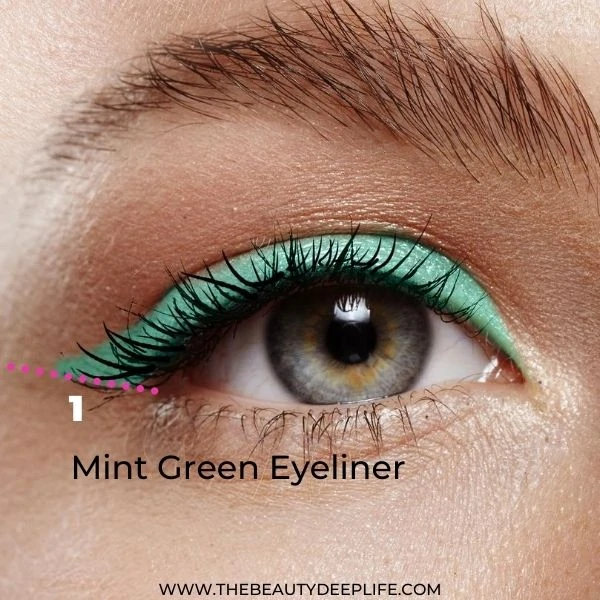
- Mint Green Eyeliner
- Mascara
Our Top Picks:
Warm Metallic & Light Shimmer Shades
- TARTE Chrome Paint Shadow Pot in Sun-Drenched
- Chrome Paint Shadow Pot in Top Yacht
- Anastasia Eyeshadow in Glisten Or Vermeer
- Sephora Collection Eyeshadow in Sunset At The Beach Or Copper Rush
- NYX PRISMATIC SHADOWS in Liquid Gold
- Anastasia Eyeshadow in Legend
Eyeliners
- NYX Slim Eye Pencil in Teal
- NYX VIVID BRIGHTS CRÈME COLOUR Aqua Sapphire
- NARS Larger Than Life Eyeliner in Barrow Street
Feline Minty Green Liner & Eyeshadow Metallics Look Steps:
Step 1
- Apply your primer to your lid (optional – you can apply under the lower lashes too). Let it dry before the next step. If you decide not to use a primer, you can apply foundation and some concealer to your eye area. Make sure to then set with a translucent powder.
Step 2
- Apply the warm metallic shade lightly as the base to your eyelid and blend slightly above your crease. With your blending brush, blend this out, so it is a very thin wash of color.
Step 3
- Using your smudge brush, small shader brush, or pencil brush, apply the light shimmer eyeshadow shade to your lower lash line and lightly to the skin area right near your inner tear duct. *However, if you’d like, instead of using a different shade here, you could instead just apply the same eyeshadow color you used in Step 2 (above).
Step 4
- Now, you will apply your mint green eyeliner to your upper lid along the entire lash line. What I find works best is to start at the outer corner of the eye and trace inward. You want to begin with the flick first. Add your first line from the outer edge at an angle and extend it. If you go with a cream liner, be sure to use an angled brush for application.
Step 5
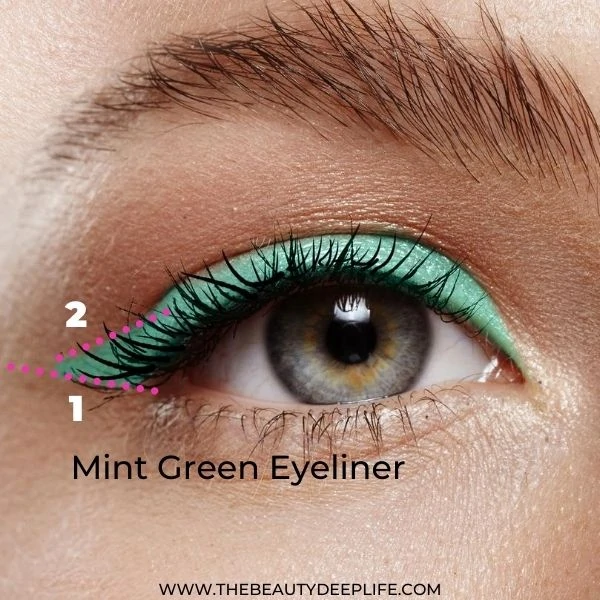
- From the edge of that line, draw a second line going back towards your lash line. Doing this creates a sort of little triangle shape. After doing this on one eye, then move to the other eye and repeat creating that same tiny triangle shape. Be sure they are symmetrical before moving on.
Step 6
- At this point, you can go back and fill in both mini triangles with your green.
Step 7
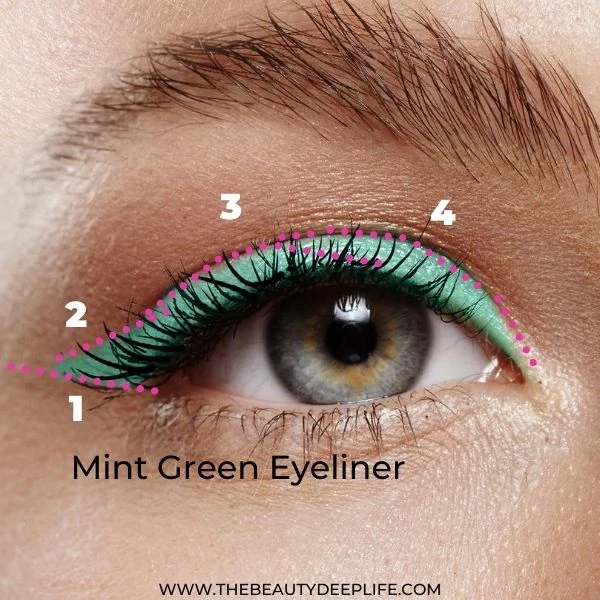
- Now, you’ll work in sections as you apply the eyeliner to the rest of your lash line and lid. For section 3, apply from the middle of the eye and connect to the triangle at the outer corner. Fill it in.
Step 8
- For section 4, apply from the inner corner of the eye, starting very thin and then move to the middle of the eye, connecting both sections. Be sure to keep the line slim, growing thicker as you get closer to section 3.
Step 9
- Finally, curl those lashes and apply mascara!!
Eye Makeup Look 4: Metallic Eyeshadow With Blue Liner Pop
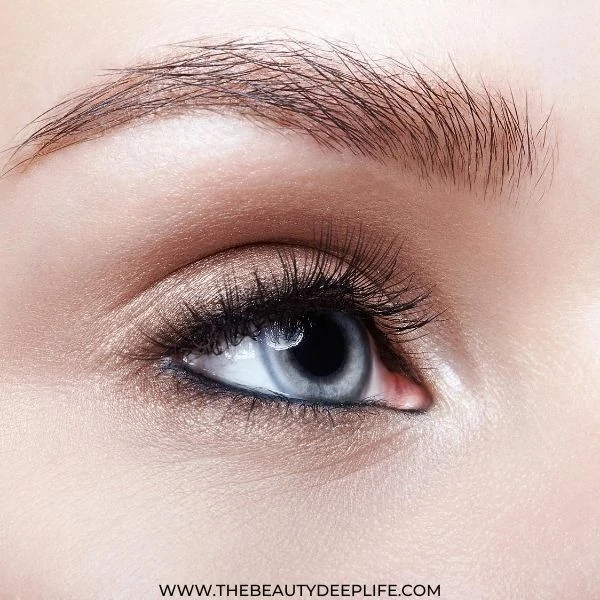
For an obsession-worthy, glistening smolder, this eye makeup look takes the cake and it’s rather easy to achieve for beginners!!
To Achieve A Look Like This You Will Need:
- Warm Metallic Eyeshadow Shade
- Black or Dark Grey Eyeshadow
- Blue Eyeliner
- Mascara
Our Top Picks:
Warm Metallic Shades
- Anastasia Eyeshadow in Pink Champagne
- Anastasia Eyeshadow in Vermeer
- Urban Decay Eyeshadow in Space Cowboy
Black or Gray Shades
- Urban Decay Eyeshadow Blackout or perhaps Mushroom
- Sephora Collection Eyeshadow in Hurricane Wave
Blue Eyeliners
Metallic Eyeshadow With Blue Liner Pop Look Steps:
Step 1
- Use primer on your lid (optional- you can also apply under the lower lash line). Next, allow it to dry before moving on. Don’t have a primer?? You may apply your foundation and some concealer to the eye area and then set it with some translucent powder.
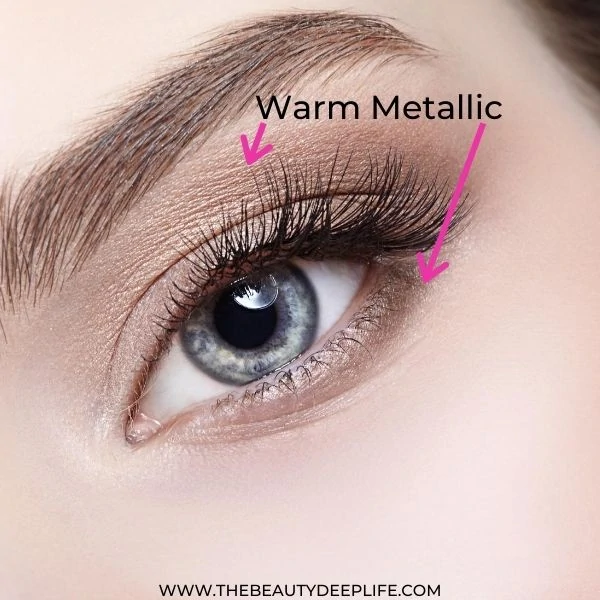
Step 2
- Now, for this step, you’ll want to apply your warm metallic shade to your eyelid, above your crease, along your lower lash line, and around your eye, while slightly extending the outer corner.
- Use a basic eyeshadow brush to apply to the lid and slightly above the crease. Blend out the harsh lines with your blending brush. And blend your outer corner upward and outward. When applying along your lower lash line and around the outer edge of the eye, you’ll want to use a small shader, smudger, or an eyeshadow pencil brush.
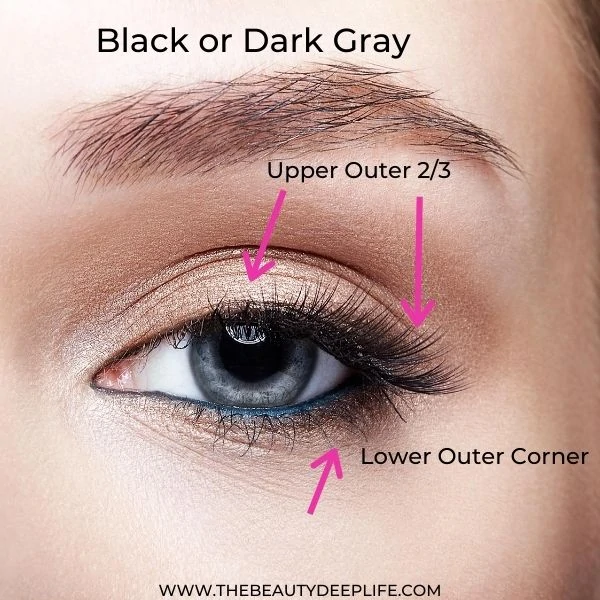
Step 3
- Apply a black or dark grey eyeshadow very lightly to the upper, outer 2/3 of the lash line, and the lower outer corner of the eye along the lash line. Gently blend it out with your smudge brush. Not a lot, just a tad!
*You could also use an eyeliner pencil for this. If you use a pencil, you’ll want to be sure to blend & smudge it out with a smudger brush.
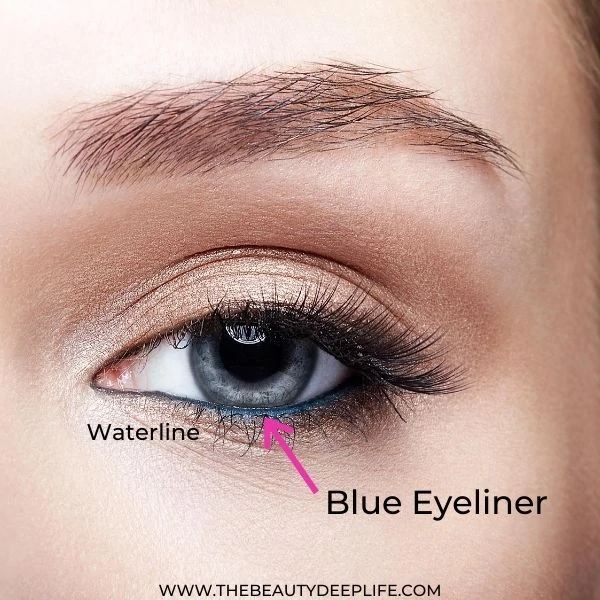
Step 4
- Apply your blue eyeliner pencil to the waterline of your lower lash line.
Step 5
- For this look, the model added a tiny strip of false lashes on her outer corner. We’ll go over applying false lashes in a future post. As a beginner, you can simply curl your lashes and use a volumize enhancing mascara!!
- If you have short lashes, try a lengthening mascara first, then do a coat of volumizing mascara.
Related: How To Apply Mascara Properly: 23 Insider Tips & Tricks
The Wrap-Up!!
Well, Beauties, I hope you enjoyed these eye makeup tips and looks for beginners! Take some time to experiment and practice this week. The more you play with these looks and products, the better you will get!
When you use the blending brushes, try different blending techniques like using back and forth (windshield wiper) motions as well as small circular motions until you get the hang of each. And as always, feel free to reach out if you have any questions!!
We want to hear from you!! Which of these 4 eye makeup looks for beginners is your favorite? Leave a comment below.
Related Makeup & Beauty Articles:
- Eyeshadow Tips For Beginners
- Best Eyeshadow Palettes For Brown Eyes + Eye-Popping Single Shades
- 15+ Eyeshadow Makeup Looks For Your Most Captivating Eyes Ever!
- Beginner Makeup For The Everyday Woman
- How To Apply Eyeshadow Like A Pro
- Eyeliners For Blue Eyes: 15 Eye-Catching Must-Haves
We are a participant in the Amazon Services LLC Associates Program, an affiliate advertising program designed to provide a means for us to earn fees by linking to Amazon.com and affiliated sites. For more info, see Disclosure Policy.
Thank you for such a complete eye makeup tutorial! I loved the pictures and the detailed application techniques, very useful tips.
Thank you 😀 very informative and pretty results!! <3
Thank you very informative brushes, makeup and descriptive content on how to properly use the different tools’
Do you also sell the recommended tools and make up if not I have no problem going to a makeup counter and buying them unless you can recommend a good source on line.
There should be some links in the article with recommended options but you can also check out my eye makeup resource page here https://thebeautydeeplife.com/eye-makeup-resources/
Amazing content! Really helpful too. Would like some tips on eye brows too. ?
Thanks! Glad you enjoyed it! Be sure to check out my article on eyebrows under the makeup category.. 🙂
Thankyou for this informative blog 🙂
glad you enjoy it 🙂
this is the best step by step I’ve ever seen!! thank you so much!
So glad to help!
Your article has proven useful to me. It’s very informative and you are obviously very knowledgeable in this area. This topic has interesting and solid content.
Thank you! 🙂
That picture looks beautiful. I am a beginner I am going to send you my completed first practice. Thank you p.s. awesome information.
Thank you so glad you liked it!! Yes, please email your pics to me, would love to see! 🙂
Great Post! This is so simple to understand yet goes into the details of how to achieve the perfect eye makeup. I especially loved the tips on metallic eye shadow. It’s a look that done correctly can give you fantastic results and vice versa. Keep sharing such wonderful makeup tips.
Thank you so much for your feedback!! 🙂