
Apply Eyeshadow Like A Pro: Step-By-Step Tips
Over the years as a makeup artist, I’ve been asked for numerous tips by clients related to eyeshadow. Everything from selecting the best eyeshadow colors to what sort of brushes to use, and of course, the most asked question was always precisely how does one apply it like a Pro!
Well, today, I’m going to share several of my go-to tips for clients to help any gals out there currently struggling!
Generally, I like to focus on powder eyeshadow when giving client tutorials or demos. As a matter of fact, it has always been my go-to formula of choice for on-set. Therefore, this article shall be centered around powder eyeshadow, particularly palettes.
I’ll touch on a few basics for using an eyeshadow palette like application location (what range of colors to apply to where), tools & brushes, and give some insight into blending.
Then I will move into six fun techniques you’ll love for enhancing your eyes. And lastly, touch on a few tips and tricks for using eyeshadow to alter eye shapes & sizes.
So, no matter whether you’re looking to learn new makeup techniques, find new tools & palettes to try, or want to learn how to perfect your eye makeup based on your specific eye type, this article has something for everyone!!
Let’s proceed, shall we beauties?!!
This post contains affiliate links, which means I receive a small commission (at no extra cost to you) if you make a purchase using one of these links. For more info, please see our Disclosure Policy. As an Amazon Associate, I earn from qualifying purchases.
Table of Contents For This Article
- The Basics: How To Get Started With An Eyeshadow Palette: Palette selection, terminology, application location w/ color ranges, brushes & tools, and blending tips
- Apply Like A Pro: Six Eyeshadow Techniques To Level Up Your Skills: Top products (palettes) & eye makeup tool picks & six techniques
- Apply Like A Pro: Eyeshadow Tips & Tricks For Eye Shapes And Sizes
- Final Thoughts On Pro Eyeshadow Tips & Tricks
The Basics: How To Get Started With An Eyeshadow Palette
Step 1: Palette Selection
First, you’ll want to pick your eyeshadow palette, preferably one with a wide variety of shades ranging from dark to light and containing some of the color choices that look best for your specific eye color.
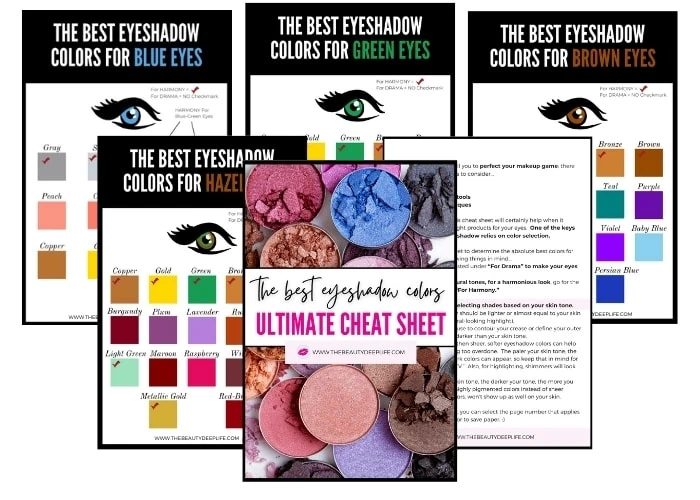
Start Here: Find out which eyeshadow colors are the most flattering for your eye color. Get The FREE Best Eyeshadow Colors Ultimate Cheat Sheet Below!!
PRO Tip: I find it’s sometimes best to take baby steps with makeup beginners. So, if you consider yourself one, keep in mind that many of these techniques can be created using a neutral palette. To further help you learn to apply eyeshadow like a pro, I made sure to include a few neutral palettes that offer the perfect range of shades in this article.
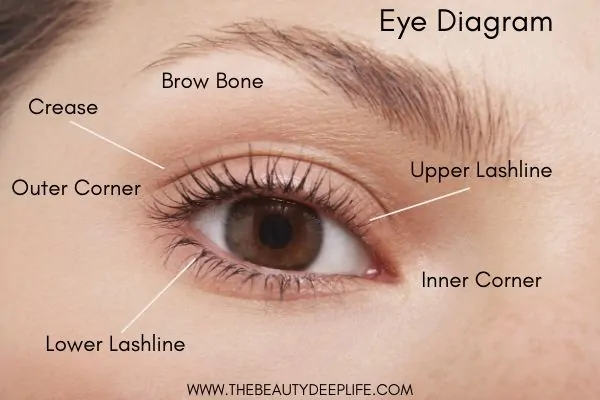
Step 2: Learn The Different Eye Terms
Next, you want to become familiar with the different parts of the eye and terminology, so you’ll know where to apply your products. You will need this knowledge for the next step!
Step 3: Determine Your Range Of Colors
Open your palette and compare the colors you see. Determine which are your lightest colors, medium, and darkest colors.
To apply like a pro, you will use these eyeshadow colors (from light to dark) to manipulate the way your eyes appear, bringing some areas forward and causing others to recede. Here are three examples of how you will begin to do this…
- You will use the light colors to highlight. The areas where you apply these colors will be brought forward. Usually, this includes areas like the inner corner of the eye and the brow bone.
- Your medium colors will be used to define the basic shape of the eye and for blending from the lightest areas into the darkest areas. Usually, these are applied to the main portion of the eyelid and at times the crease.
- The dark colors you will use for contouring and for creating depth to your eyes. The areas where you apply the darker colors will recede. Darker colors are also used to add more intensity and drama to your look. Generally, these areas will include the outer portion of the eyelid, the corner of the eye, and the crease.
Step 4: Prepare Your Brushes & Tools
Now it’s time to pull out your eyeshadow brushes ladies. You may want to grab some Q-tips like these in case you make a few mistakes. If you aren’t sure which brushes to use, check out some of our top picks!
Some Of Our Top Brush Picks:
- Sigma Basic Eyes Kit – Literally, every brush you could need to apply like a PRO! Includes application brushes for the eyelid, highlighter, and for liner. Plus some options for blending and softening.

- Sigma Beauty Small Tapered Blending Brush – Worth the hype!! The size and shape of the tip help for applying eyeshadow color to your crease with more precision. You’ll want this brush for techniques 2 & 3 for sure!
- Sigma E25 – Blending Brush – You’ll love this one too!! Works well for all the techniques! You can blend out harsh lines and create a smooth transition with much ease with this brush.
- Sigma Beauty Diffused Crease Makeup Brush – A definite makeup lover favorite! Perfect to softly blend out and diffuse eyeshadow color in the crease for sheer or medium coverage.
A crucial thing to remember before moving on to the six eyeshadow techniques…A few blending tips!!
To truly learn to apply like a pro, you must never forget the importance of blending eyeshadow. You can try all the techniques in the world, but if you don’t blend well, you will not achieve your desired look.
When using an eyeshadow palette or more than one eyeshadow color, you want to blend out harsh lines and make the transition from color to color smooth and seamless.
The best way to blend from color to color is to use a blending brush in small circular motions. Focus on doing very small motions right where the two colors meet. Keep doing this until you no longer see a harsh line dividing them.
To blend the outer eyeshadow area with your skin and prevent a harsh line there, you want to try a very slight windshield wiper-like motion.
Apply Like A Pro: Six Eyeshadow Techniques To Level Up Your Skills
Before you proceed, here’s a brief rundown of what you’ll likely need for these next six PRO eyeshadow techniques…I have also included a few products and tool recommendations to help.
- Primer, Concealer, Foundation (as needed)
- Translucent Powder
- Eyeshadow Palette
- Brushes (for blending and applying)
- Eyeliner
- Lash Curler & Mascara
Top Product & Tool Picks:
UD Eyeshadow Primer Potion: This is my all-time favorite primer – seriously nothing beats it!
Essential Eyeshadow Palettes
I have included several palettes with excellent color stories that will make using the techniques in this article a breeze!
Urban Decay Naked 3 Palette: This is a great palette to use for eyeshadow technique #1 below. It works on a variety of skin tones and you can create lovely soft glam looks with it!

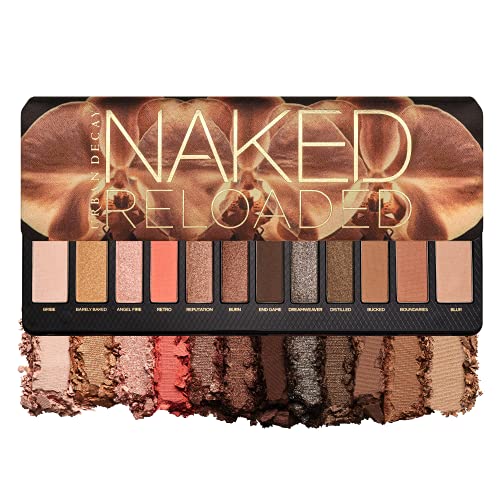
Naked Reloaded Palette: Another Urban Decay palette that’s a major beauty cult favorite!
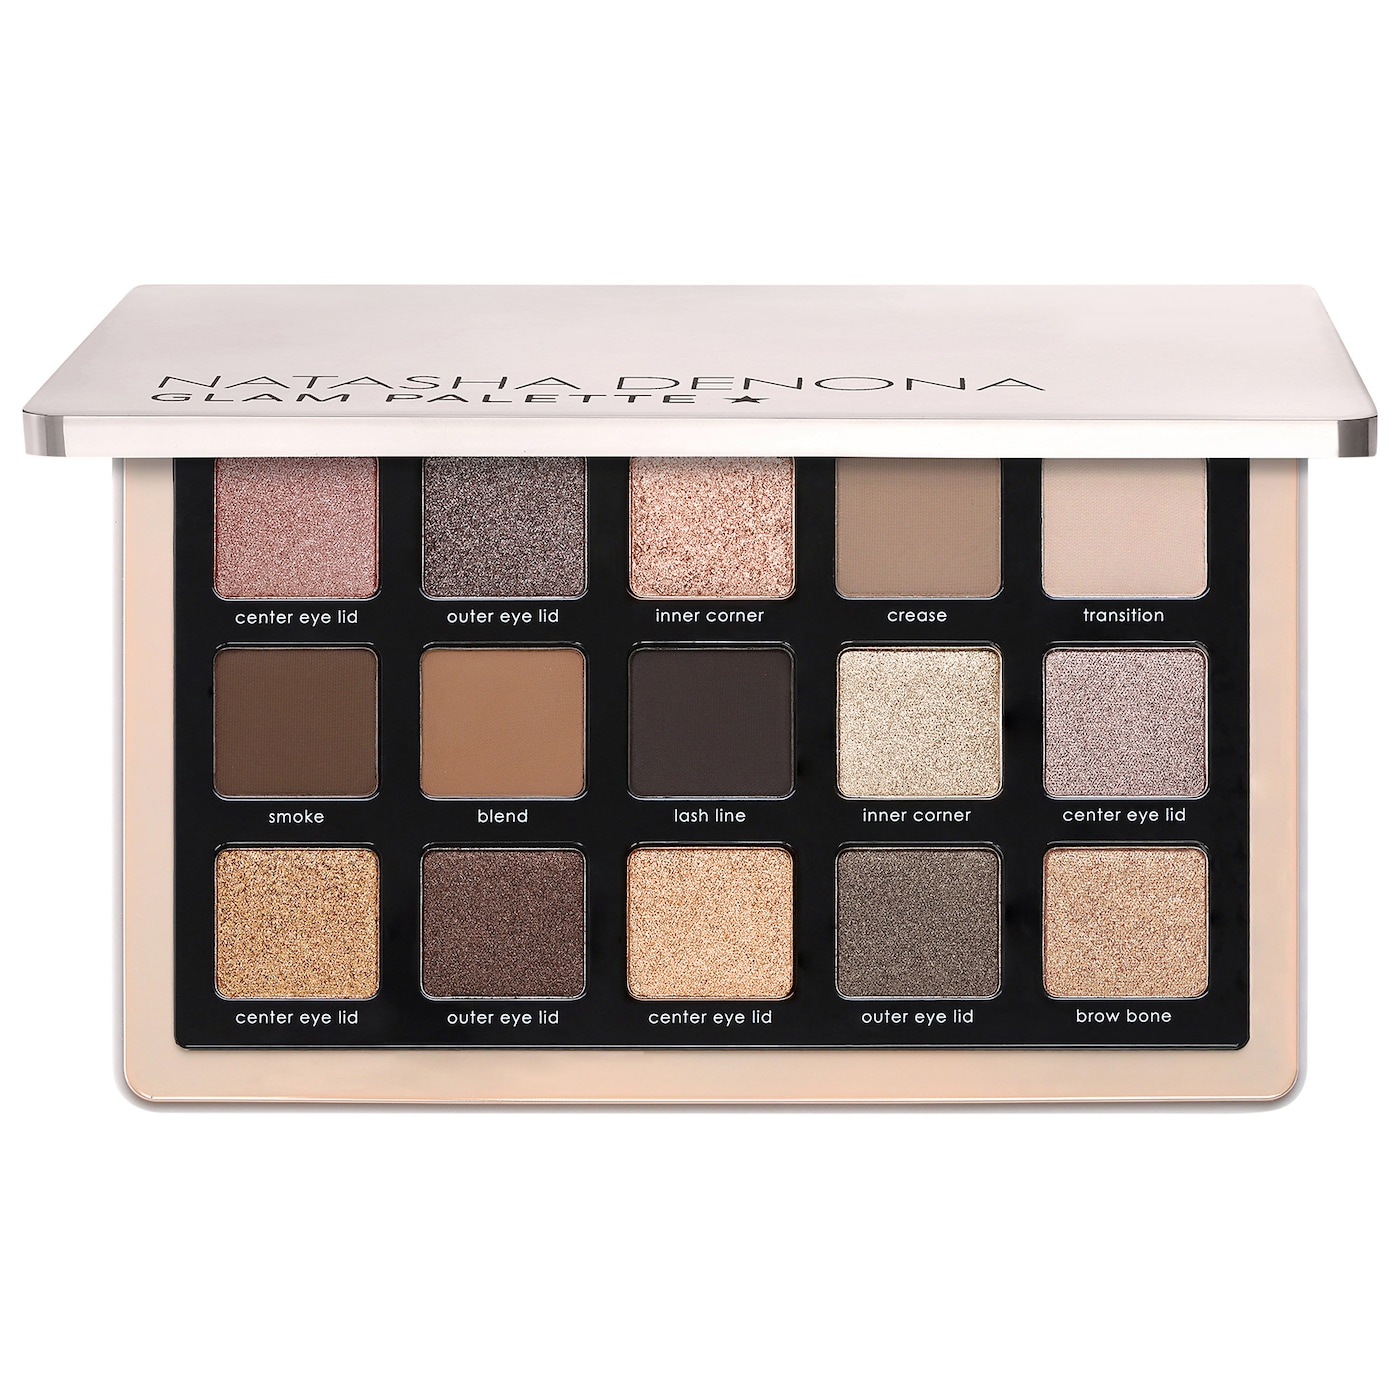
Natasha Denona Glam Palette: A gorgeous, versatile palette that can be used for natural eye makeup looks, smokey looks, and full glam looks! It is a great option for beginners experimenting with techniques!
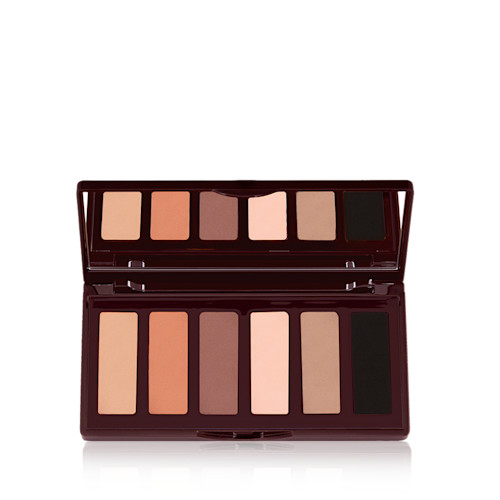
Super Nudes EASY EYE PALETTE: The perfect palette for anyone who prefers mattes for an everyday look! I love all of Tilbury’s palettes!!
LORAC PRO Palette Meraki: This palette features 25 shades, so you will have a ton of options to play around with!

stila Matte And Metal Eye Shadow Palette: A beautiful assortment of pink neutrals with metallics (rose gold, pewter, soft gold & bronzy tones) that you can use for easily transitioning from day to night!

Eyeliners
- L’Oréal Paris Voluminous Smoldering Eyeliner (one of my favorite drugstore pencil options)
- LORAC Front of the Line PRO Liquid Eyeliner – Perfect for a thin, defined line!
- stila Stay All Day Waterproof Liquid Eye Liner – If you want waterproof with two different sized tips (one on each end).
Lash Curlers
JAPONESQUE Go Curl Eyelash Curler: Great for travel or those of you gals who stay on the go! It can be used on your lashes or fake ones!

Shiseido Eyelash Curler: Award-winning lash curler and loved by makeup artists & makeup lovers alike!

Mascara
L’Oreal Paris Makeup Voluminous – One of my favorites & one of the best drugstore mascaras for volume…hands down!!
Related: For beautiful, luscious lashes check out this post on mascara with top picks for every type of lash goal or need!
Eyeshadow Technique 1: Vertical Gradient (aka Gradient Layers)
- Step 1: First, you can apply primer, foundation, and concealer as needed.
- Step 2: Second, set with a translucent powder.
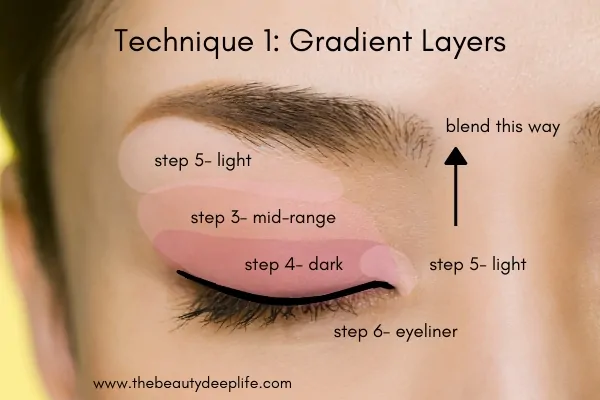
- Step 3: Apply a mid-range shade onto your eyelid. Using your brush, you can either gently tap the color on for more intensity or swipe the brush left to right.
- Step 4: Next, apply a darker shade of eyeshadow to your eyelid. Go right across your upper lash line, with a heavier concentration just above your lashes. You want to tap this color on, as opposed to swiping. Then, blend it upwards in the direction of the mid-range shade that you previously applied. The goal is to get rid of any demarcation between the two and make this transition seamless.
- Step 5: Then, using the lightest eyeshadow color, apply to your brow bone (right under your eyebrows). You may also apply a little bit to the inner corners of the eyes if you’d like. Don’t forget to blend, Ladies!
- Step 6: Apply your eyeliner.
- Step 7: Last step…curl your lashes and apply some mascara!
PRO Tip: When you apply eyeshadow with this technique, you want to think of the colors as going from dark to medium to light as you move upwards. The colors will sit right on top of each other but should be blended into each other with a smooth transition.
Eyeshadow Technique 2: Contouring
- Step 1: Start by using a primer, foundation, and concealer as needed.
- Step 2: Set with a translucent powder.
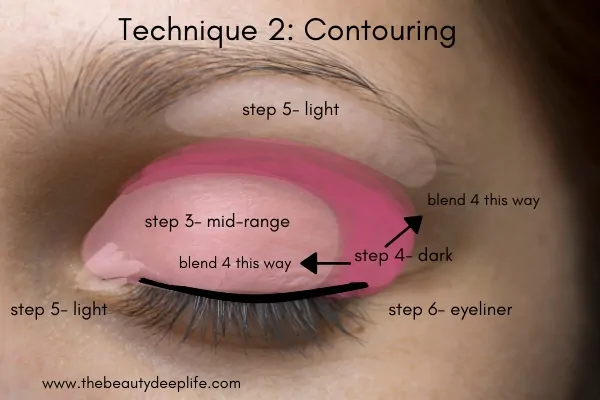
- Step 3: Apply your medium color to the eyelid. Using your brush, you can either gently tap the color on for more intensity, or you may swipe the brush from left to right. Begin on the lid, just above the lashes, and blend upwards.
- Step 4: Next, apply your dark shade to the crease of your eye and to the outer corner of your eyelid. Blend it moving inward, into the medium color you previously applied in step 3. Also, you want to blend the outer part upward and outward, going in the direction of the end of your brow.
- Step 5: Using the light eyeshadow color, apply to the brow bone area. You want it to be right under the eyebrows but above the crease. Lastly, apply it to the inner corner of the eye. Then blend!
- Step 6: Apply eyeliner
- Step 7: Curl your lovely lashes and apply some fabulous mascara!
- Reference for blending tips…
Are You Ready To Become A Total PRO At Eyeshadow & Skyrocket Your Eye Makeup Skills?
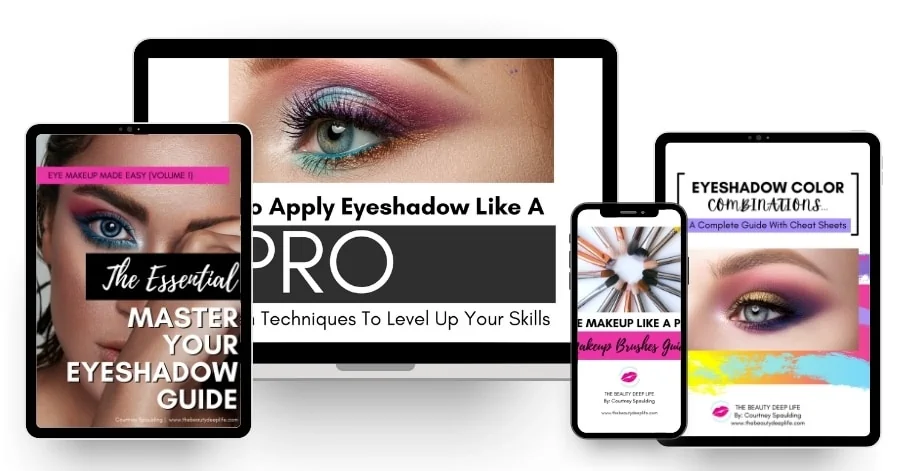
EYE MAKEUP MADE EASY!!!! Take Your Makeup Skills To The Next Level With The Essential Master Your Eyeshadow Guide!! 75+ Pages Packed with Exclusive Professional Makeup Tips, Tricks, Secrets, & More!!
- Detailed Breakdown Of The 6 Techniques In This Article, Plus Exclusive Access To 8 More New Techniques! (Section 4 of the guide)
- Find Out Exactly How To Apply Eyeshadow With Even More Pictures!!
- Easily Follow Along, Step By Step Looking In The Mirror At Home!!
- Eye Makeup Cheat Sheets & Charts!
- Learn How To Correctly Use Your Brushes, Pair Your Eyeshadows, Pick Your Best Colors, Apply False Lashes, + Several Additional Bonus Tutorials!
- Perfect for Beginners & Up!
- INSTANT, Convenient Access From Computer, Tablet, or Phone!
- Insider PRO Makeup Tips & Tricks To Help You Upgrade Your Makeup Game!!
Eyeshadow Technique 3: Contouring With A “V”
- Step 1: First, apply primer, foundation, and concealer as needed.
- Step 2: You may then set with a translucent powder.
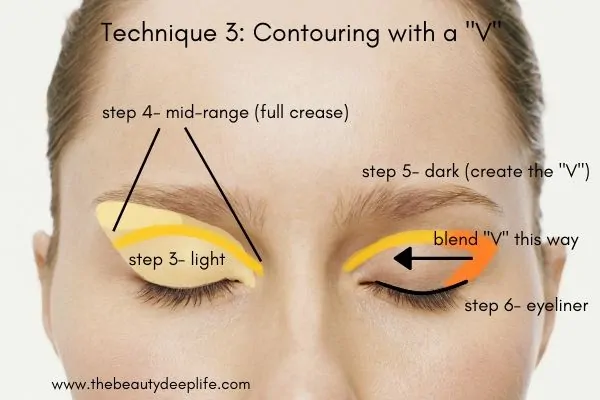
- Step 3: For this technique, use your lightest shade as your base color. Take it and apply it over your entire eyelid going from your upper lash line upwards to right below your brows. Focus the most concentration on the brow bone area. Optional: You can apply a little to the inner corner of the eye.
- Step 4: Take your mid-range shade and apply it along the full crease of your eye (go deep into the inner crease stretching it all the way to the outer crease). In this technique, you are taking the crease further inward than in technique #2 above. You are also just using this shade extended to the outer crease but not directly applying it to the outer corner of the lid. Blend out any harshness or lines by moving the brush in a windshield-wiper-like motion.
- Step 5: Take your darkest shadow color next, and using it, you will create an “Outer V”. Apply it, going directly from the outer corner of your eye upward at an angle until you reach the outer edge of your crease. This is the first leg of the “V”. One thing to note, the edge of your crease should fall roughly parallel to the end of your eyebrow. Next, create the second leg of your “V” by drawing slightly inward along just the outer section of your crease. (See photo) Blend the “V” inward.
- Step 6: Apply
eyeliner Step 7: Curl lashes and apply mascara!
Eyeshadow Technique 4: Contouring With A Triangle
- Step 1: Apply primer, foundation, and concealer as needed.
- Step 2: Set with a translucent powder
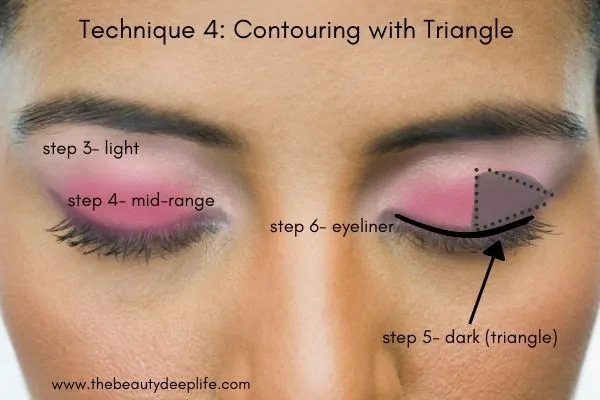
- Step 3: Take your light shade and apply it over your entire lid, going from your upper lash line up to the brow bone, right below your brows. The most concentration should be on the brow bone area. Optional: Apply a little to the inner corner of the eye.
- Step 4: Next, take your mid-range shade and apply just to the lid of the eye, stopping below the crease.
- Step 5: You will take the darkest shade and apply a triangle, similar to the “V,” but this time, fill it in fully and take up a larger section of the eye. You want to create this triangle shape on the outer half of the lid. One side of the triangle should start exactly at the center of the upper lash line (the 1/2 mark) and run along the lash line to the outer corner of the eye. Another side of it should fall from the outer corner of the eye across the lid where the crease is and stop directly center. The last side of it should go from the middle/center of the lash line vertically up the lid and stop center eyelid around the crease area. Fill the triangle in fully. Then, blend the triangle inward first. Lastly, soften the triangle’s outer edges by blending up and out toward the tail (end) of your eyebrow.
- Step 6: Apply eyeliner
- Step 7: Curl lashes and apply mascara!
Eyeshadow Technique 5: Horizontal Gradient
- Step 1: Apply primer, foundation, and concealer as needed.
- Step 2: Next, set with a translucent powder.
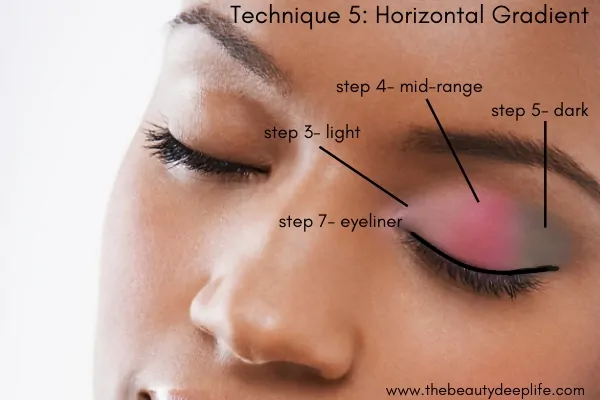
- Step 3: Divide your eye into 3 sections (1/3). Apply your lightest color eyeshadow to the inner 1/3 of the eye area. Just pat it on rather than swiping.
- Step 4: Next, apply a mid-range shade of eyeshadow to the center 3rd. Pat it on also.
- Step 5: Then, using the darkest eyeshadow color, gently pat it on the outer 3rd of the eye.
- Step 6: Now, you want to gently blend the three colors together so they move smoothly from one to the next. Smooth out harsh lines! Refer to these blending tips for specifics on how.
- Step 7: Apply eyeliner
- Step 8: Curl lashes and apply some mascara!
Eyeshadow Technique 6: Two Color Partial Halo
- Step 1: Use a primer, foundation, and concealer as needed.
- Step 2: Set with a translucent powder
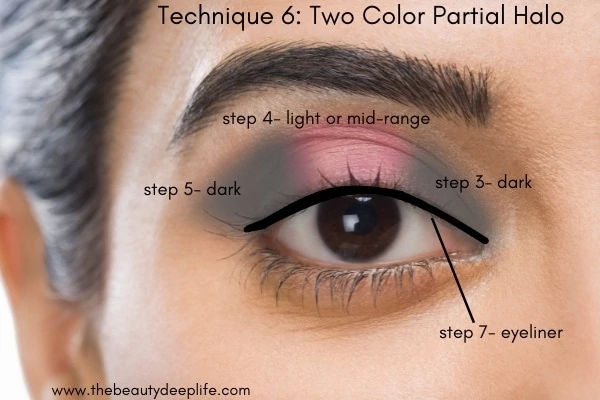
- Step 3: Divide your eye into 3 sections. Apply a dark-colored eyeshadow to the inner 1/3 of the eye area. Just pat it on rather than swiping.
- Step 4: Next, apply a lighter shimmer shade of eyeshadow to the center 3rd. This can be a mid-range shade or a light shade. Pat it on also.
- Step 5: Then, again, using the same dark eyeshadow color from step 2, gently pat it on the outer 3rd of the eye.
- Step 6: Now, you want to gently blend the three sections. Refer to these eyeshadow blending tips.
- Step 7: Apply eyeliner to upper and lower lash lines.
- Step 8: Last, curl your lashes and apply mascara!
Apply Like A Pro: Eyeshadow Tips & Tricks For Eye Shapes And Sizes
Click each shape or size below to go directly to its specific Pro Application Tips!
How To Apply Eyeshadow For Small Eyes
If you have small eyes, the pro goal is to apply eyeshadow in a way that gives the illusion of larger and wider eyes instead. So, here are the best practices for that.
- In general, you should focus on using light shades as opposed to dark shades. Lighter shades will open the area up.
- Apply a light color over your full eyelid and to your brow bone area. You should also apply a light, highlighter eyeshadow to the inner corner of your eyes to open that area up a bit as well.
- It is best to avoid using a ton of dark eyeshadow color on your lid, as this will make your eyes appear smaller. You can, however, apply the darker shade to the outer portion of your crease for more definition, as well as the far outer corner of the lid. But this darker color will look best if it remains only on the far outer corners.
Other Makeup Tricks For Small Eyes
- Don’t use dark liner in your waterline area; it will make your eyes smaller.
- When applying eyeliner, keep the line thin. A thin-tipped pen eyeliner like this one from stila will help for the upper lash line.
- Always curl your lashes, as this will open up the eye area. Then be sure to apply some lengthening mascara.
- Don’t apply eyeliner fully to both the top and bottom lash lines. This will close the area off, making them appear even smaller.
- Try using a nude eyeliner pencil like this one from Tarte on the inner rim of the eyes to open that area up.
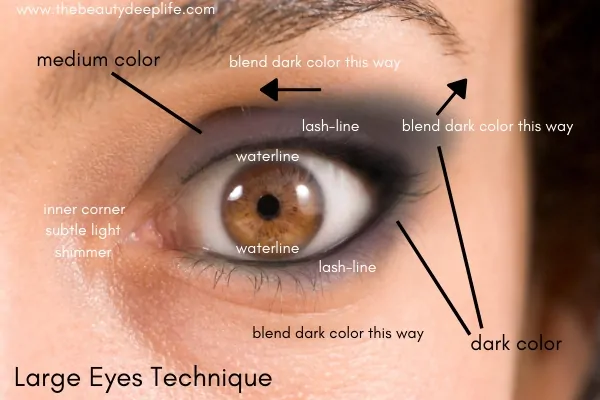
How To Apply Eyeshadow For Large Eyes
For large eyes, the pro task at hand is to make them look smaller, which can be done if you apply matte eyeshadows and stick to dark eyeshadow colors.
- First, line the upper and lower waterline areas using dark, waterproof eyeliner.
- Apply a medium or medium to
dark color to the base of the eyelid. - Next, using dark eyeliner, apply it to both the upper and lower lash lines. On the upper lash line, keep it thinner on the inner part and thicker on the outer part.
- Now, smudge the lash-line areas out a bit so it’s not so defined and a bit smokey. You can use a Q-tip for this.
- Apply a dark-colored eyeshadow to the outer corner of your lids. Also, focus on applying it close to the lash line.
- Blend the dark color from the outer lid inwards towards the center of the lid. If your eyes are round or a bit bulging, you want to try to lift and extend the dark shadow on the outer corner upward at an angle to form the shape of a “V”. Do this by blending upward.
- Next, you can apply a little of the darker shadow color to the lower lash line just don’t go too low.
- If you feel you need a hint of lightness, you can apply a little light shimmer shadow to the inner corner of the eye. But only a touch, keep it very subtle.
How To Apply Eyeshadow For Deep-Set Eyes
If you have deep-set eyes, your eyes sit a bit further back in their sockets. For this reason, the natural shadow in the crease is already pretty dark on its own.
Therefore, to avoid making the crease look even deeper, you don’t want to apply a dark shadow directly into the crease. You want to use a light to mid-range shade and apply it to the majority of your lid.
- Apply your lightest shade to the inner corner of your eyes. You can also apply a little to your browbone if you’d like.
- You can apply a light to medium or medium color to your eyelid as your base color. Take this color and bring it upward above your crease (to help minimize the crease).
- Apply your darker shade to the very outer corner of the eye (the outer eyelid area), and keep it rather close to the upper lash line.

Other Makeup Tricks For Deep-Set Eyes
- If you notice your lashes hit your lids often, leaving marks or smudges, due to your deep-set eyes, try using waterproof mascara.
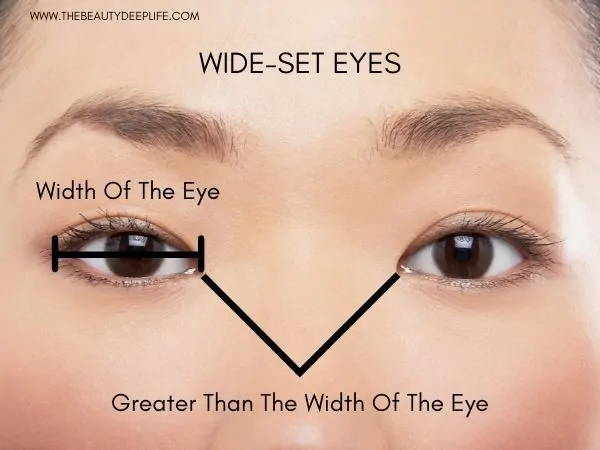
How To Apply Eyeshadow For Wide-Set Eyes
How do you know if you have wide-set eyes? Well, if you look at the distance between your two eyes, if you could fit another eye in between them easily and then still have some more room, then you have wide-set eyes. (See photo)
First off, with wide-set eyes, the goal is to use the inner corner and parts of the eye to make the eyes appear closer together. In contrast to some of the basic techniques we already talked about, you don’t want to accentuate the outer portion of the eye.
So, we will be doing the reverse of some of the previously mentioned techniques. We will highlight where we previously contoured. And contour where we previously highlighted.
- Apply your base color (can be a light color) to your full eyelid.
- By contrast, instead of using your darker shades on the outer parts of the eye, you will focus on the inner parts. Use a medium-dark or dark eyeshadow and apply it just to the inner 1/2 or 1/3 of the lid. Start at the inner corner of the eye and extend back to about the middle of the eyelid. Blend outward from the middle.
- Instead of using a highlighter and light eyeshadow at the inner corner of the eye and around the tear duct, you will apply it to the outer parts of the eye. You can also use shimmer shadows here. Apply to the outer half or two-thirds of the eyelid and blend upward to the browbone and outward, stopping at the outer corners of the eye.
Other Makeup Tricks For Wide-Set Eyes
- When it comes to eyeliner, focus on lining the inner half of the upper lash line and/or lower lash line. Line the inner tear duct of your eye with a dark eyeliner color. Another option is you extend the line past the inner edge of the eye towards the nose a tiny bit. Use a Q-tip to smudge the eyeliner outward a little bit, where it stops around halfway on the lash line, so the stop doesn’t look too sudden or abrupt.
- You don’t want to extend any eye makeup past the outer corners of the eyes. Therefore, you should probably avoid doing a cat-eye and outer flicks with the liner. But if you really want a flick, just be sure to keep it short and at more of a vertical angle.
- Look for volumizing mascara like Buxom’s and focus on applying it most and heaviest to the inner lashes nearest your tear duct. Apply a bit less to the outer lashes than to the inner lashes. When using the mascara wand, apply in an upward sweep-like motion rather than an outward motion.
- Eyebrow tips for wide-set eyes!
How To Apply Eyeshadow For Close-Set Eyes
First, let’s determine if your eyes are indeed close-set. Look at your eyes in the mirror. Are your eyes more or less than the width of an eye part from each other? (See photo) If they are less, then you have close-set eyes.
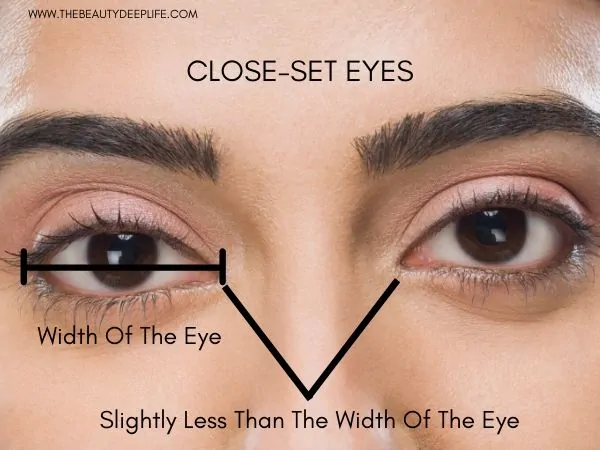
With close-set eyes, the task is to use light eyeshadows to open up the area between the eyes, creating the illusion of eyes that are further apart. Also, you want to draw attention to the outer 1/3 of the eyelid using a dark eyeshadow.
You will need to focus on moving from lightest to darkest as you move from the inner part of the eye to the outer part (just think light on the inside and dark on the outside). Lastly, extend the dark a bit further than usual.
- Apply a light shade to the inner corners of the eye and extend it all the way to about the middle of the eyelid. Shimmery eyeshadows would work great here too!
- Next, apply a highlighter or light shade around the tear duct.
- Around mid-eyelid, you should shift from light to medium shade and blend outward from that point into your darker shade.
- Lastly, apply your darkest shade, focusing on just the outer 1/3 of the eye, and extend it outward a bit further than normal.
Other Makeup Tricks For Close-Set Eyes
- Apply eyeliner just to the outer ¾ or 1/2 of the upper lash line. Taper and elongate the line by drawing it up and outwards from the outer corner of the eye. Extend the line a bit beyond the outer corner, giving it a nice flick. This will pull the eyes further out.
- If you use eyeliner on your lower lash line, be sure to avoid the inner portion of the eye. Instead, focus on lining just the outer 1/2 or 1/3 of your eye.
- With mascara, you want to apply it the heaviest to the outermost lashes and less on the inner lashes. Apply in an outward sweep-like motion.
- Eyebrow tips for close-set eyes!
Final Thoughts On Pro Eyeshadow Tips & Tricks
When it comes to eyeshadow, you can always just stick to applying one color or two. However, if you really want to take things up a notch and apply your eyeshadow like a pro by adding some drama or dimension to your eyes, then three is a great number to shoot for.
Using different eyeshadow techniques, you can truly enhance your eyes and even alter a less-than-ideal eye shape or size! It really comes down to manipulating light and where you decide to place different colors.
Ready to apply your eyeshadow like a Pro? Try out the featured techniques, and of course, always feel free to reach out if you have questions.
Do you like to use more than one eyeshadow color? Do you have a favorite eyeshadow technique? Would love to hear from you! Leave your comments below. 🙂
Related Makeup & Beauty Articles:
- Eyeliners For Blue Eyes: 15 Eye-Catching Must-Haves
- Best Eyeshadow For Blue Eyes: 14 Absolutely Irresistible Makeup Finds!
- Best Eyeshadow Palettes For Brown Eyes + Eye-Popping Single Shades
- Eyeshadow Tips For Beginners
- Beginner Makeup For The Everyday Woman
- Eyeshadows For Hazel Eyes: Most Flattering Makeup Finds!
We are a participant in the Amazon Services LLC Associates Program, an affiliate advertising program designed to provide a means for us to earn fees by linking to Amazon.com and affiliated sites. For more info, see Disclosure Policy.
Omg. Found your site. So very helpful. My facial skin is pretty good at 79 yrs. But I have hooded eyes comes with age, darn. Do you have a YouTube Channel? Thank you for all the much needed makeup tips, it’s the best.
Hi there, I don’t have a channel but you can always check back here for more tips and tricks…:)
I have a question about a certain technique & what other colors go together as you apply this type of style. The best description I have is…Using only 2 colors “Teal” on the middle of the eye lid & then “Brown” on the outer corners. Once again please help & share the name of this technique & what other colors can you use? Thank you for reading this.
Hi Julie, sure, I believe you are referring to something similar to bi-color contouring..but you can send me an email at [email protected] and I’d be happy to help with all your questions!
This is very helpful and informative. Thank you so much for sharing this.
You are very welcome!! So happy you enjoyed it!!
I found this super helpful and look forward to reading about tips for aging lids.. but in the meantime, could you give me some ideas about what would be a good overall light neutral overall lid colour (from MAC) to use on blue eyes that sometimes shift to green?
Rebecca please feel free to email me for help and tips [email protected]
Loved this article! Helped a lot. Saved this to my apple home screen!
So glad you loved it!! 🙂
I’ve always used just one shadow, especially for the last decade or so (and I’ve been wearing makeup for about 35 years)… 😉 I just feel it looks better on me & my eyes. Multiple eye shadows very easily looks somehow fake, in my opinion. And I usually use a fairly dark eye shadow. Also, now I see makeup bloggers & youtubers use eyeliner *after* eye shadow, and I’ve always done it the other way round…! 😮 I just feel the eye shadow blends the eyeliner in very nicely, and of course it can only do this if you apply eyeliber first, and then the eye shadow. 😉
Hi Melinda, perhaps you could try multiple shades in the same color family and try a gradient look like technique 1? But I get it, I personally prefer a nude shadow while I play up my eyes with a fierce winged liner look. 🙂 Yes, it’s better to apply your eyeliner after your eyeshadow if you are going for a sharp liner look, however, if you are going for a more smudged, blended look then I totally agree, eyeliner first is a great option. 🙂 Thanks so much for commenting, love hearing from all you Beauties 🙂
Your tutorials are written so well and the diagrams are especially helpful. I would love to see your description for halo eyes and a cut crease. Thank you!
Thank you so much!! I’m considering creating an ebook tutorial if I do, I will include those 🙂
Amazing tips, especially pictures are really great idea to deeply explanation of these tricks. Such a helpful post, thanks.
thank you 🙂
This is a great resource! The pictures are very helpful. I tried to request the cheat sheet, but I don’t think it went through.
Hi Amy!! Thank you…send me your email address and I’ll make sure you get sent the cheat sheet, sorry about that not sure why it didn’t go through, I’ll be sure to fix that.
Useful article I want to learn more
Thank you!! Will be sure to post more 🙂
Your article is very helpful.
How to apply one color eyeshadow to create a look? For hooded eyes.
Working on some makeup tips for hooded eyes real soon!! But feel free to shoot me an email in the meantime and I can give you some extra tips until then 🙂