
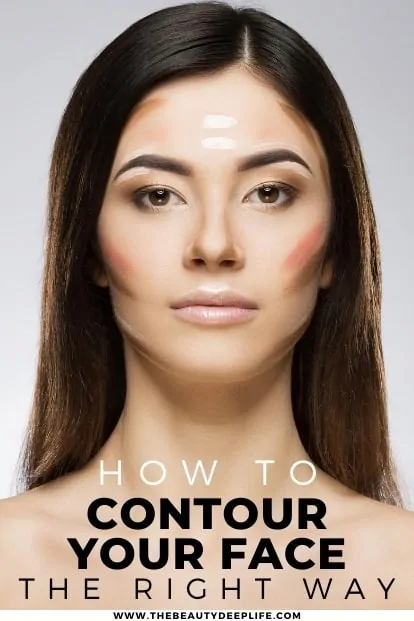
How To Contour Your Face: Tips From A Makeup Artist For Beginners & Up!!
Despite the countless Youtube tutorials, IG pics, and hoards of websites promoting makeup tips, the truth is contouring can STILL be a tad bit confusing and overwhelming…. Am I right?? Even the most beauty-savvy gal can find herself without a 100% solid understanding of precisely how she’s supposed to contour her face.
With so many tips, hacks, opinions, and techniques circulating online (talk about information overload…geez), after just a few quick searches and you’ve likely found yourself more lost than ever before. Add to that, the fact that there is a lot of inaccurate advice and misinformation floating around out there, and it’s no wonder for all the contouring confusion.
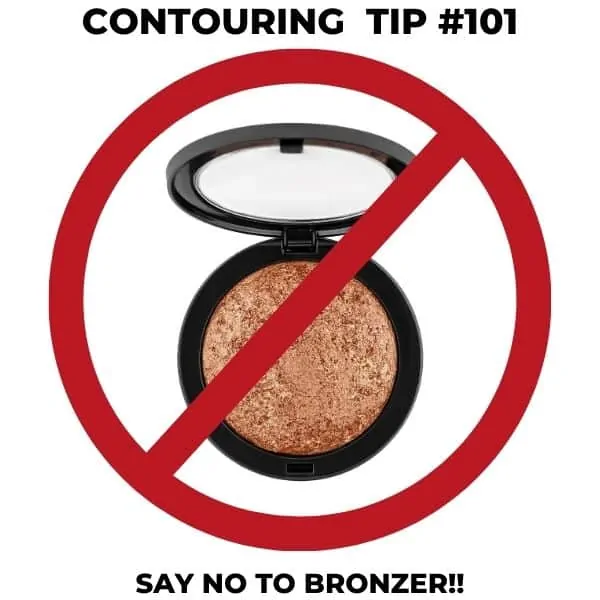
Contouring Misinformation #1
Videos instructing women to use a traditional bronzer for contouring. As a makeup artist, I can tell you with certainty this is a BIG No-No! Keep scrolling…more on WHY to come…
Tell me…Have you ever found yourself in a state of complete “information overload-triggered makeup uncertainty”? You’ve seen and read so many things giving so many different kinds of makeup advice that you have no clue what you should do, shouldn’t do, or how to even get started? If so, you’re not alone… When it comes to contouring, quite a few women feel this way.
From not knowing what types of products & tools to use to understanding where exactly to apply those products, and even the step-by-step order for that makeup application… contouring is an ever-present, elusive mystery to many a gal!
So, to help, whether you’re just now branching into the world of contouring or already somewhat familiar with it… let’s clear away all those uncertainties and that confusion! I want to simplify things a bit for you and give you the inside scoop on some contouring makeup tricks.
Today, I’m going to cover everything you need to know to contour your face the right way, once and for all, starting with the basics!
Disclosure: This post may contain affiliate links, which means I receive a small commission at no extra cost to you if you decide to complete a purchase using one of these links. For more info, see Disclosure Policy. Additionally, as an Amazon Associate, I earn from qualifying purchases.
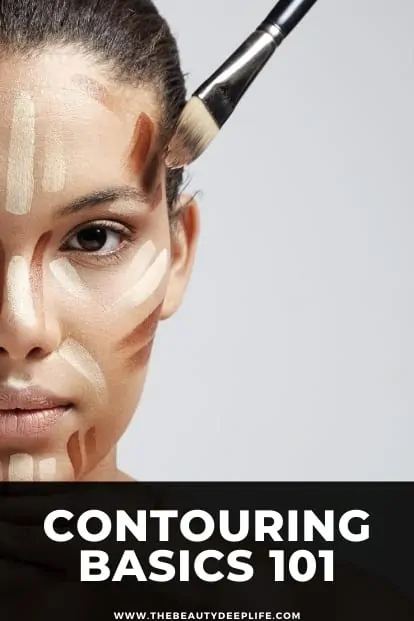
Contouring Basics 101
Let’s take it back to the basics…shall we?? Beauties, contouring, when done correctly, will manipulate light and shadows through the use of your light and dark-colored makeup products.
The ultimate goal is to add more depth & dimension to your face, and upon occasion, to make a few flattering, corrective changes to your features… As in… Want to fake a “fierce AF jawline” with “higher than high” sexy cheekbones?!? Ummm, Yes, please!!
To boil it down, products in light colors (your highlighting products) reflect light and can be used to lift, enlarge, or emphasize your features, bringing them forward and making them more apparent.
Products in dark colors (your shading products) can be used to define or sculpt, downplay your features, and make them appear smaller. When used strategically, your contour shading products can also quite magically cause certain areas on your face to recede.
To further explain, let’s break contouring down into two categories…
Basic Contouring (Category 1)
If you are looking for something less dramatic, you can use contouring to simply enhance what mother nature gave you! In this case, it’s all about embracing your natural features and face shape. The idea is to contour just enough to accentuate and define your features while bringing a gorgeous depth & dimension to your face.
Here are a few things you can achieve through this type of contouring…
- Bring out & define your cheekbones
- Define your jawline
- Add depth to your eyes
- Define your temples & the bone structure of the upper part of your face
- Define your nose
- Accentuate the brows or enhance the brow arch
- Accentuate the chin
Corrective Contouring (Category 2)
Contouring is also used for what industry makeup artists refer to as corrective makeup. In this case, it’s used to bring more balance to your face, create more symmetry for your features, and often change the shape of your features or face altogether.
Here are just a few things achieved through this type of contouring…
- Minimize forehead size
- Make a nose appear slimmer
- Shorten a nose
- Create a slimmer-looking face
- Hide a double chin
- Create fuller-looking lips
- Lift the brows
- Create a perfect overall balance for one’s face shape
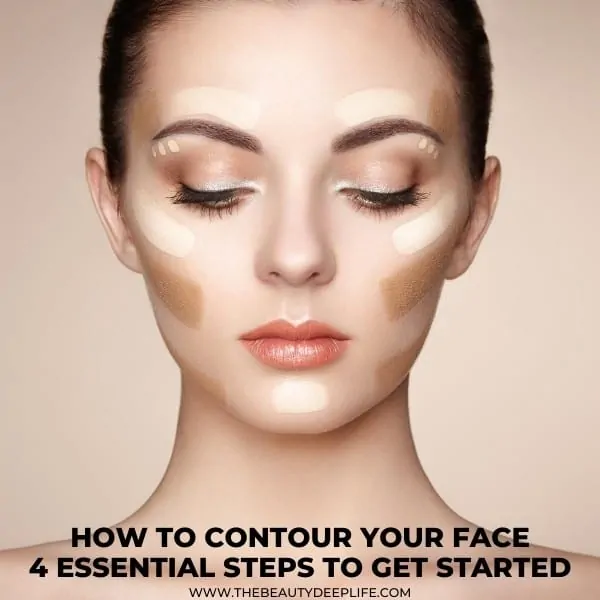
How To Contour Your Face: 4 Essential Steps To Get Started
Ok, let’s get down to business and get you started! We’re going to go over choosing makeup products & tools, deciding on the look you want to achieve with contouring, determining your face shape, and exactly where to apply your products.
Follow these next four steps so that we can set you up for the ultimate contouring success based on your goals!!
Step 1: Make Sure You Have What You Need To Contour Your Face – Tips For Choosing Makeup Products & Tools
Makeup Products
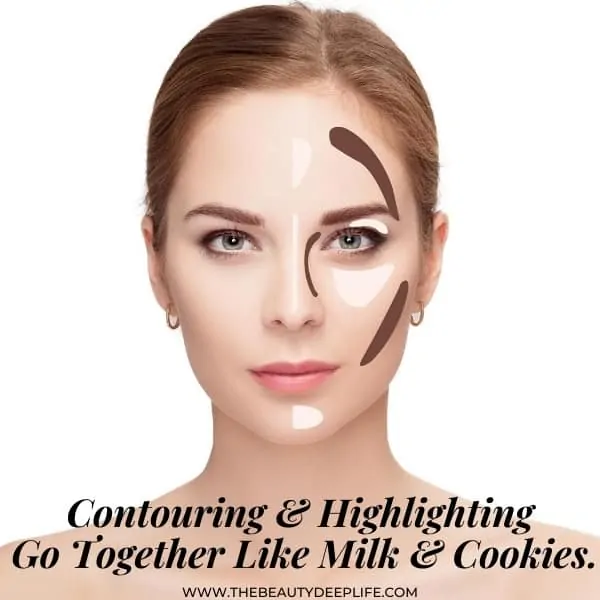
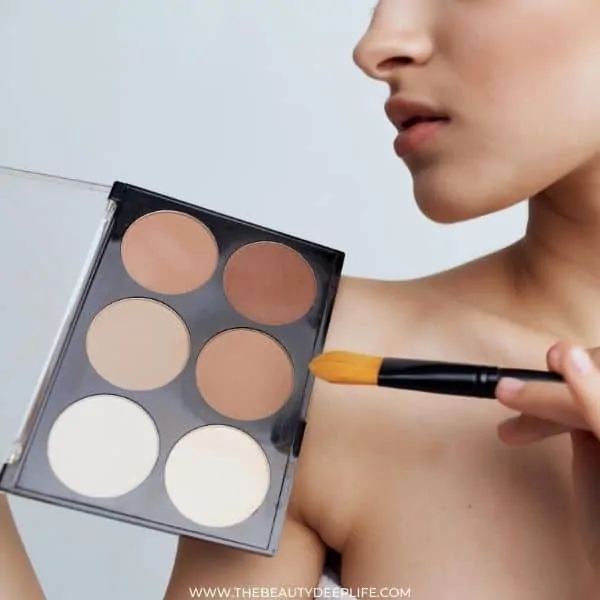
When it comes to selecting makeup to contour your face, there are two main products you need… a shading product and a product for highlighting. Now for both of these, there are three vital things to think about before making your selections: Finish, Color, and Formula.
Shading Products (Darker-Colored Makeup Product)
Finish:
- Always use a matte shading product to contour your face. Avoid anything with shimmer or sheen.
Color:
- Go with something that is 2-3 shades darker than your skin tone.
- Generally, you want to avoid products with too much of an orange or red undertone. This, along with its needing to be matte, is precisely why you should never use a traditional bronzer to contour. Most bronzers have a tendency to veer in the direction of shimmery with either orange or reddish tones.
- When you contour your face, the goal is to mimic shadow with your shading product. Think about the way shadows fall upon your face from natural lighting. Shadows don’t have a shimmer, and they’ll usually have a grey undertone (not red or orange). Therefore, you need to lean more towards using a product with a cool undertone, or for some, a neutral undertone can be sufficient.
- Please Note: If you have very fair skin, you may want to do only one shade darker than your skin tone.
PRO Tip: With a bronzer, you run the risk of your contouring appearing unnatural. Rather than creating more definition or sculpting the face, a bronzer’s purpose is to create a sunkissed look. So instead of using a bronzer to contour, it should be applied to areas where the sun would naturally hit your face the most. For more on where to apply your bronzer…
Formula:
Now you’ll need to decide if you want to use powder or cream. It’s best to take into consideration your skill level and skin type when making your decision.
- If you’re a newbie, powder makeup will give you the most control. It’s also the best option if you have oily skin or want something less time-consuming for everyday wear.
- If you want to start with something subtle, go for powders since they are sheerer. *For more subtlety, just start very light and build.
- Creams are best for those with very dry skin, or if you often worry about your makeup settling into fine lines. Some think creams are not too difficult for beginners to contour with, but I usually suggest waiting until after someone’s gotten a little more comfortable with the contouring process.
- Creams will give you a bolder, more dramatic contour look.
Cream Shading Product Recommendations:
- Fenty Match Stix Matte Contour Skinstick – a ton of options with cool and neutral undertones for every skin tone!!
- Anastasia Beverly Hills Contour Stick Mink (Medium Skin)
- Contour Stick in Fawn (Light & Fair Skin)
- Anastasia Beverly Hills Contour Stick Shadow (Fair Skin)
Highlighting Products (Lighter-Colored Makeup Product)
Finish:
- You can go with either a matte or shimmer. However, certain areas of the face will look more natural if you use a product with a matte or a satin finish, as opposed to a shimmer.
- If you decide to use shimmer, it’s best to stick to the following areas when applying your highlighter: cheekbones, inner corners of the eyes, possibly above or below the eyebrow arch, and perhaps a tiny bit above the cupid’s bow. You can also try down the bridge of the nose and forehead, but sometimes it’s best to avoid the T-zone with shimmers if you have oily skin. These areas, unfortunately, tend to create shine there already.
Color:
- You generally want to go a shade or 2 lighter than your skin tone.
Formula:
Highlighters come in a variety of formulas and textures from powder to cream to liquid. For the sake of simplicity, I’ll stick to creams and powder for this article. Like with your shading product, you want to consider your skill level and skin type before making a selection.
- Powders tend to be easier to control than creams for beginners.
- As far as application time, powders are quicker.
- Those with oily skin will do better with powders.
- Creams will sort of melt into the skin during application, which can often make for a more realistic look.
- If you have dry or mature skin, creams are a better option.
- Additionally, a basic concealer can be used for highlighting.
Highlighting Product Recommendations:
- Fenty KILLAWATT Freestyle Highlighter – powder
- Anastasia Beverly Hills – Glow Kits – powder
- Smashbox X BECCA Shimmering Skin Perfector (Champagne Pop) – powder
- Anastasia Beverly Hills Highlight Stick Banana (Medium Skin) – cream stick
- Fenty Beauty Match Stix Shimmer Skinstick
PRO Tip: When picking a highlighter, to reduce chances of caking, it’s always a good idea to stick with the same formula you use for your shading product.
For a few additional shimmery highlighter recommendations check out this article on summer makeup!
Makeup Tools
When selecting your makeup tools for contouring, you want to consider which product you are using (highlighter vs. shading product), the formulas of the products you are using (cream vs. powder), and where you are applying the products (large vs. small areas).
Tools & Brushes For Cream Highlighter Products:
- When applying your cream highlighter, you can use anything from your fingers to a mini-makeup blender, wedged sponge, synthetic stippling brush, concealer brush (for small areas), or even a flat synthetic bristled brush for larger areas (like forehead, cheekbones, etc.).
- If you are using a cream stick highlighter, you can take the stick and apply it directly to your face, or you can rub your finger over the stick and then pat it onto your skin. But, if you prefer using a brush instead, just run your brush over the stick and then apply.
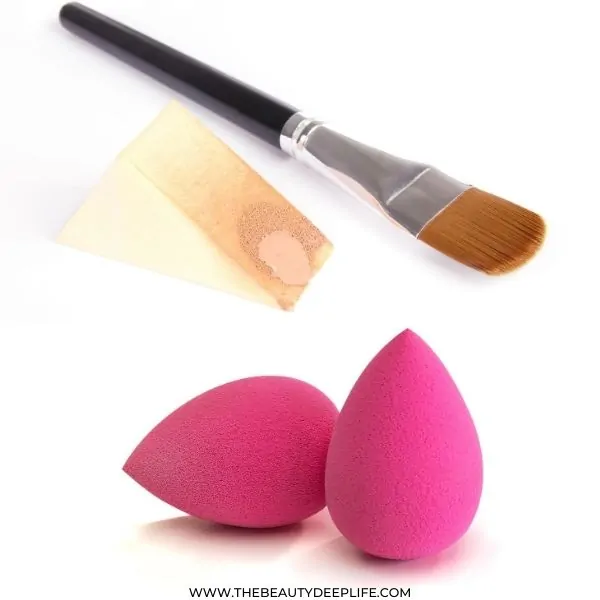
Tools & Brushes For Powder Highlighter Products:
- For a powder highlighter, fan brush, tapered brush, or angled brush can be used on larger areas (cheekbones, forehead, etc.).
- A smaller, more pointed highlighting brush works well for applying powder to the small areas that need more precision like around the brows, cupid’s bow, or nose. You could also try an eyeshadow blending brush.
- If you’re looking for a tapered brush, this one from Tilbury is an excellent option, as it can be used for your powder highlighter or your shading powder.
Tools & Brushes For Cream Shading Products:
- With cream shading products, most people use either a flat tapered concealer-like brush, an angled brush with synthetic bristles, a wedged sponge, a beauty blender, or several of these.
- If you opt for a cream stick shader, you can apply it directly to your face as you map out your locations. Or you may run your brush over the stick before applying it to your face.
- For small areas like the sides of the nose, a small, angled brush or tapered flat brush works well with cream products.
Tools & Brushes For Powder Shading Products:
- An angled brush is perfect for applying shading powder to larger areas like under the cheekbones. My personal current favorite angled brush for contouring in that area is this one from Fenty. Though it’s technically a highlighter brush I find its shape is ideal for carving out fierce cheekbones, as it fits perfectly in the hollows of my cheeks.
- For smaller areas, stick to a small shading brush that’s a bit firm (it can be an angled one for around the nose or a more tapered shape for areas like the eye crease).
PRO Tip: For blending cream contouring products, a sponge or beauty blender is suggested. To blend out powder contouring products, a soft fluffy brush can buff out harsh lines.
Step 2: Decide On The Look You Want To Achieve
It’s important to use this step to figure out your makeup look goals, as this will help with determining where you will apply your products and which features to focus on under Step 4.
Remember the two categories of contouring (basic & corrective) we talked about? Well, often, after applying foundation, the face can appear a bit flat, as it loses some of its definition from your natural bone structure.
So for starters, in terms of that look that you want to achieve, you may want to bring some depth and dimension back to your face with some of the suggestions under basic contouring. Ask yourself… What do I want to enhance? Are there any features I want to accentuate and bring out?
Next, think about whether there are any things you want to hide or minimize. Are there any corrections you feel are needed? Did any of the options listed under corrective contouring appeal to you?
Keep in mind, that when it comes to contouring, you can do as much or as little as you would like. You don’t have to sculpt your full face, and you can hide or enhance it to whatever degree you feel comfortable with. In fact, just a little contouring can make a huge difference, even if you only focus on your cheeks and jawline.
Step 3: Determine Your Face Shape
There are quite a few makeup tricks for contouring based on different shapes of the face. And choosing to contour for your specific shape will generally create a more flattering final makeup look.
If you want to make the most of those tricks, use this next section to figure out which face shape you have. Once you know your shape, keep scrolling to find out exactly where to apply your contour products (Step 4)!!
ROUND
This face shape has a softer, rounded appearance with no distinguishing angles or edges. Usually, you’ll have full cheeks, a rounded chin, and a non-defined or non-angular jawline.

Related: How To Wear Makeup For A Round Face: A Quick & Simplified Guide
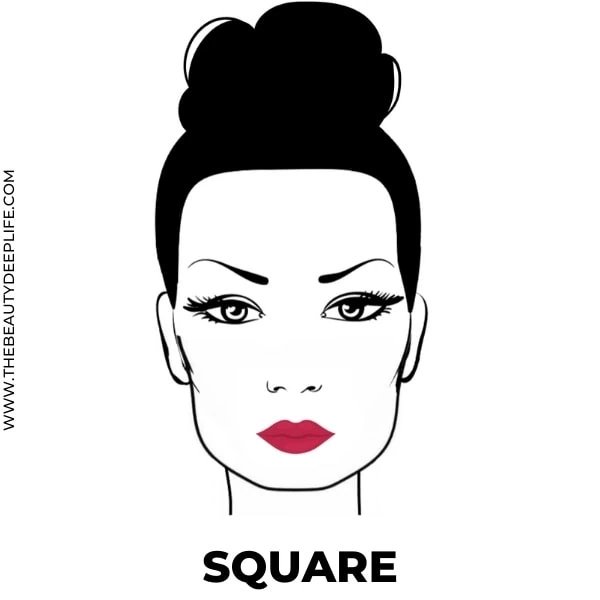
SQUARE
With a square face shape, the forehead, cheekbones, and jawline are all close to the same width. The jawline will be prominent and sharply angled.
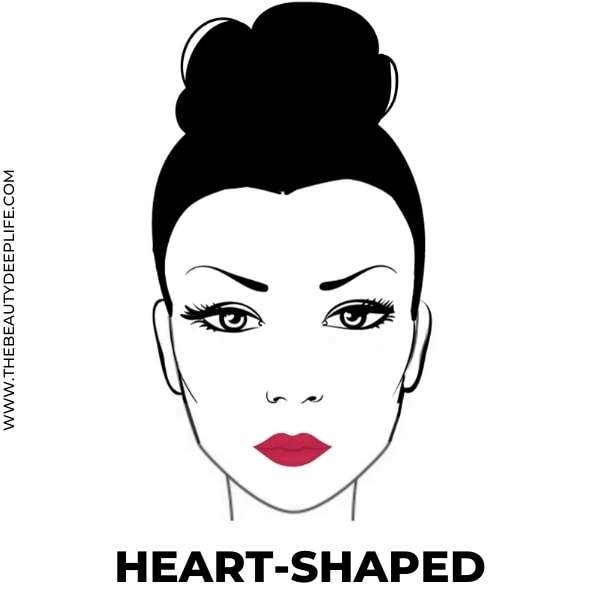
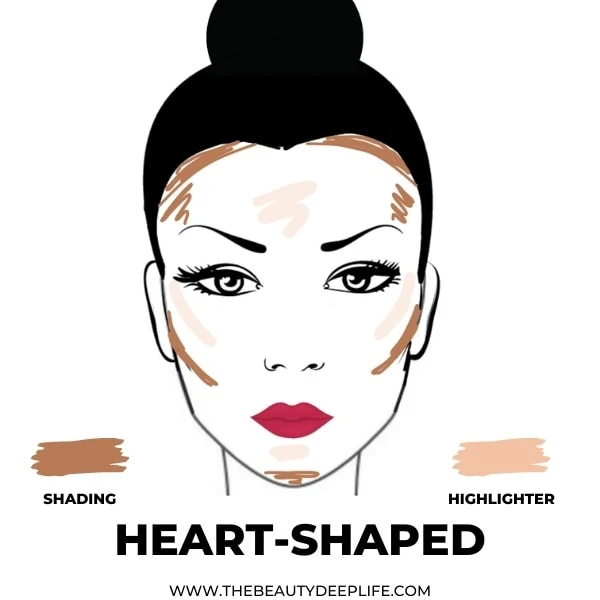
HEART-SHAPED
A heart-shaped face is commonly widest at the forehead, with its width greater than the cheekbones and jawline. Your face will narrow as it curves down and tapers to form a pointy chin. You may also have a widow’s peak, but if you don’t, that’s ok, you’re still likely considered a heart-shaped gal :). If your face shape resembles an upside-down triangle, then it’s likely heart-shaped.
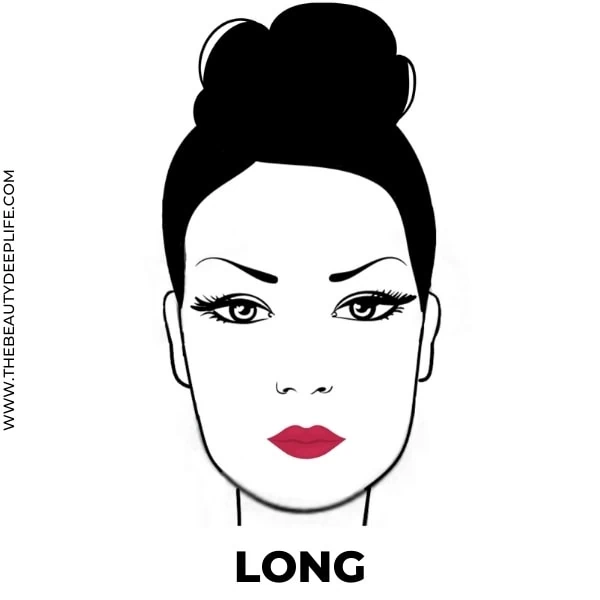
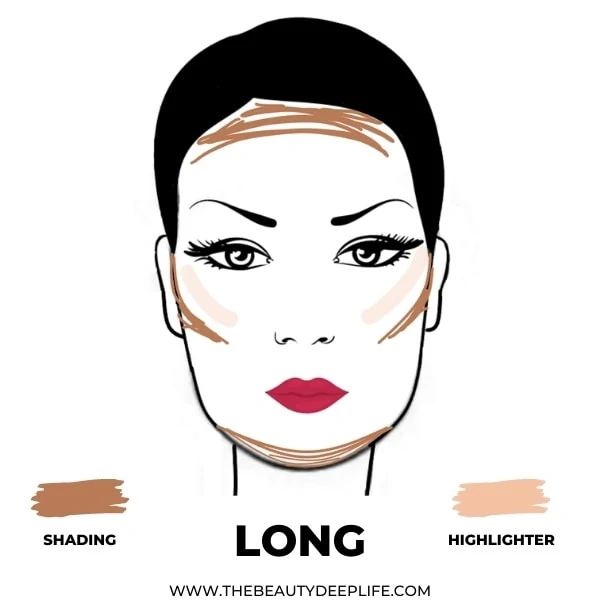
LONG
Is your face very noticeably longer than it is wide? You probably fall into the long face category. Your forehead, cheekbones, and jawline will all have a similar width across, and you’ll have a rounded chin and jawline.
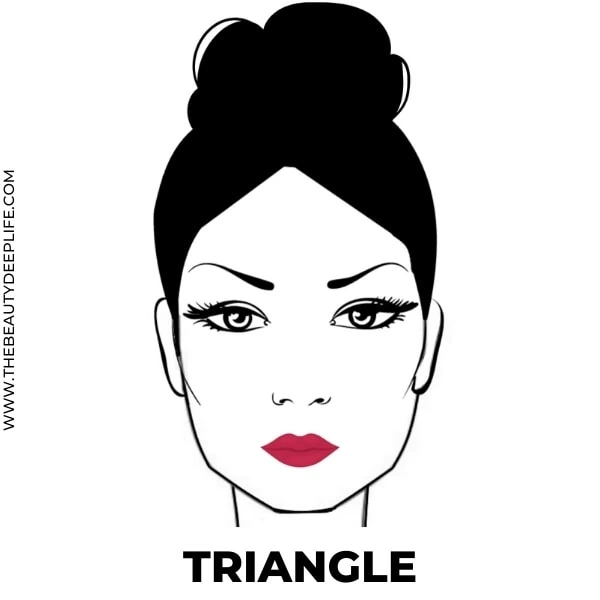
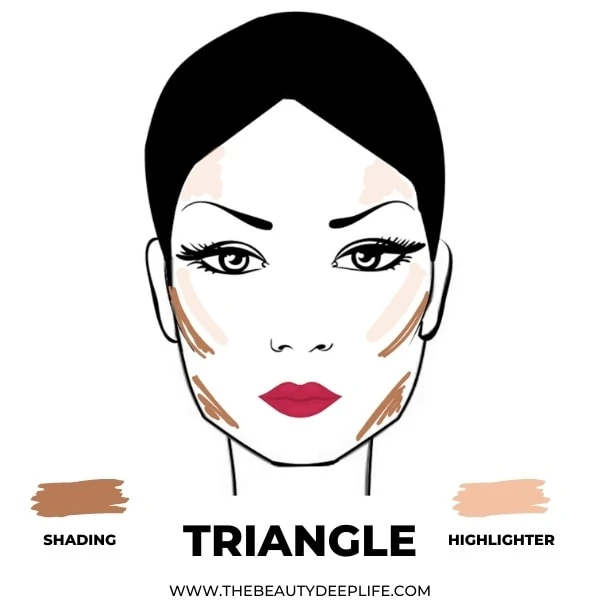
TRIANGLE
A triangle-shaped face will have a very prominent jawline. Your jaw is the widest part of your face (representing the bottom of a triangle), while your face becomes more narrow at your cheekbones and then your forehead.
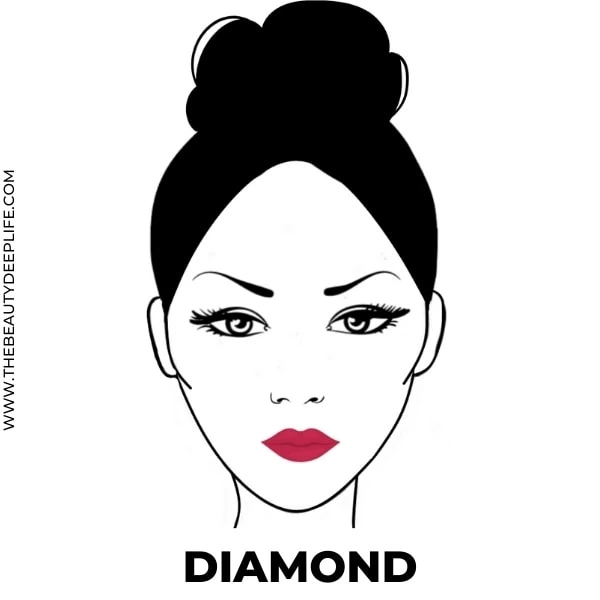
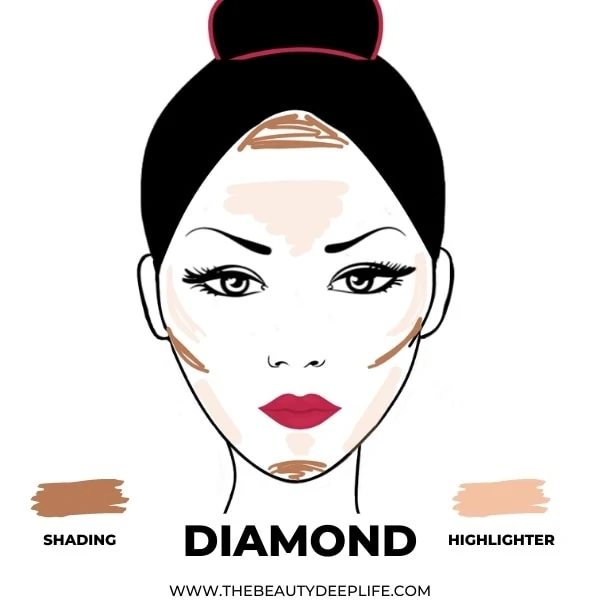
DIAMOND
If you have a diamond-shaped face, you’ll have a pointy chin and lovely high cheekbones that are the widest part of your face. Imagine a line going down from the center of your hairline to one cheekbone and then down to your chin. Then imagine another line going from the center of the hairline down to the opposite cheekbone and down to the center of your chin. If these imaginary lines formed a diamond, well, then… yep, you guessed it…you’re a diamond face Beauty! 🙂
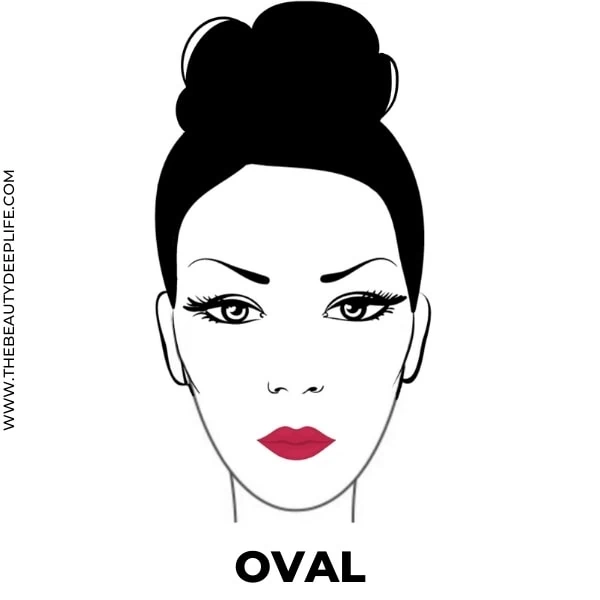
OVAL
Last but certainly not least, the perfect oval! You have an oval face if your cheekbones are high, your forehead is narrow (but still wider than your jawline), and your chin is curved. Additionally, the length of your face will be greater than the width.
Step 4: Find Out Where Exactly To Apply Your Makeup Products To Contour Your Face
Beauties, this step is broken down into sections based on your goals and choices from Steps 2 and 3. Do you simply want to enhance a few things, correct some things…. or maybe a bit of both? If so, check out the next targeted application tips and tricks.
Or perhaps, have you decided you want to contour your face based on its specific shape? Keep scrolling further down, to find out where you need to apply your products to create perfect symmetry and balance for its shape.
Application Tips & Tricks To Add Depth & Dimension, Enhance, Hide, Or Correct
With your highlighter and shading product, you can contour your face & play up your features using these next tips based on your goals. These are a combo of basic contouring and corrective contouring tips and tricks!!
Define & Bring Out Your Cheekbones (Basic Contouring)
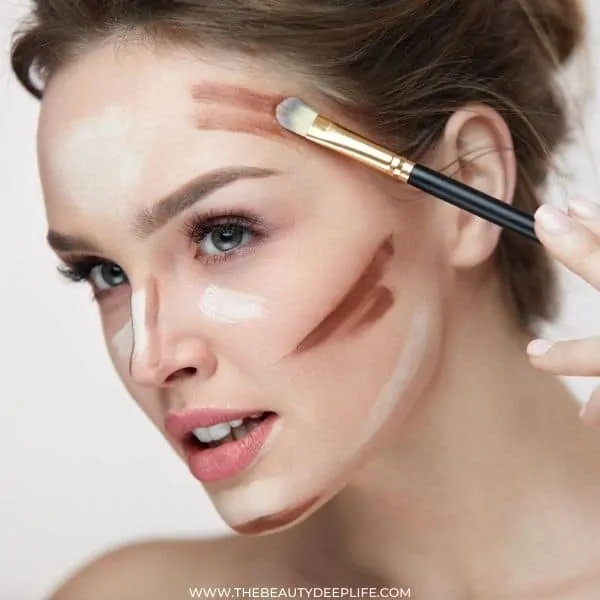
Ready to make those cheekbones pop? You want to apply your shading product to the underside of your cheekbones and your highlighter to the highest part of your cheekbones.
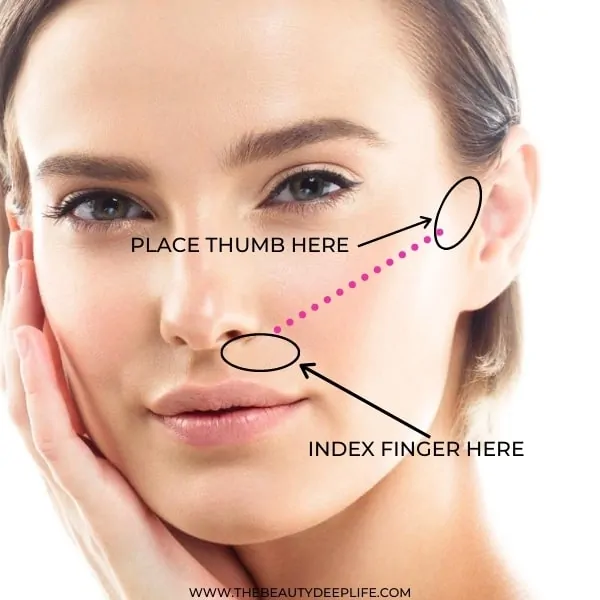
It’s important to follow your specific bone structure for your cheekbones. Take your left thumb and put it right above the tragus of your left ear.
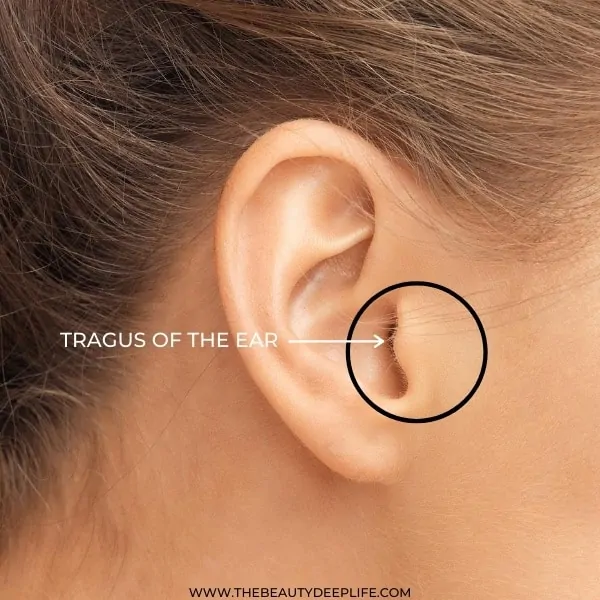
Keep it there, and with that same hand, put your index finger right below your left nostril. Where your hand rests on your face should form a line. This is where most people’s cheekbones are located. To further understand its location, you can then slide your thumb towards your index finger down your cheek, going right along that line and the bone.
Now that you’ve found your cheekbones… sweep the shading product along their bottom edge starting from the area closest to your ear working inward at an angle towards the corner of your mouth. You should stop around mid-cheek, which generally falls about an inch or so from the corner of the mouth.
PRO Tip: Here’s another trick you can use to know roughly where to stop. Imagine a line going vertically from the outside of your pupil down your face. Aim to stop your shading product where it would hit this imaginary line.
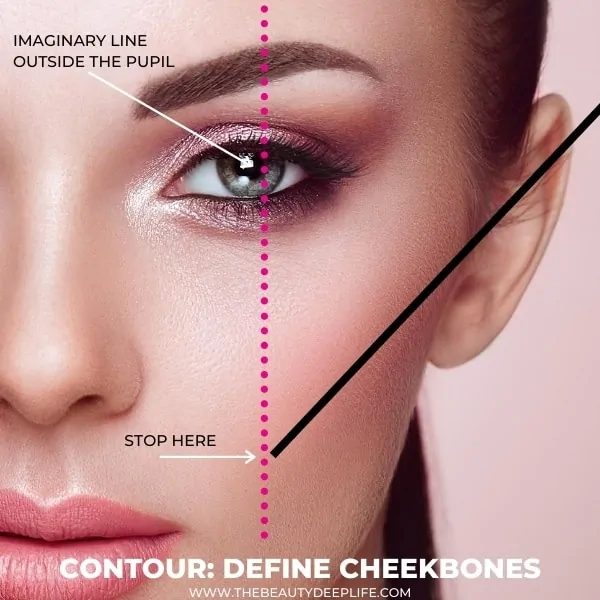
Apply your highlighter diagonally along the very top of your cheekbones (where light would naturally hit the bone). (See Below Photo)
To Define Your Jawline (Basic Contouring)
Start below the ear first and then move along the lower edge of your jawline. Optional: You can also apply a line (roughly 1.5 – 2 inches) using your highlighter on the area above your jawline. A shimmer highlighter should not be used here. (See Below Photo)
PRO Tip: It helps to tilt your chin upwards as you apply your shading product along your jawline. Be sure to blend moving downwards onto the neck. This will not only contour the jawline but also as a bonus, create a slimmer-looking neck.
To Add Depth To Eyes (Basic Contouring)
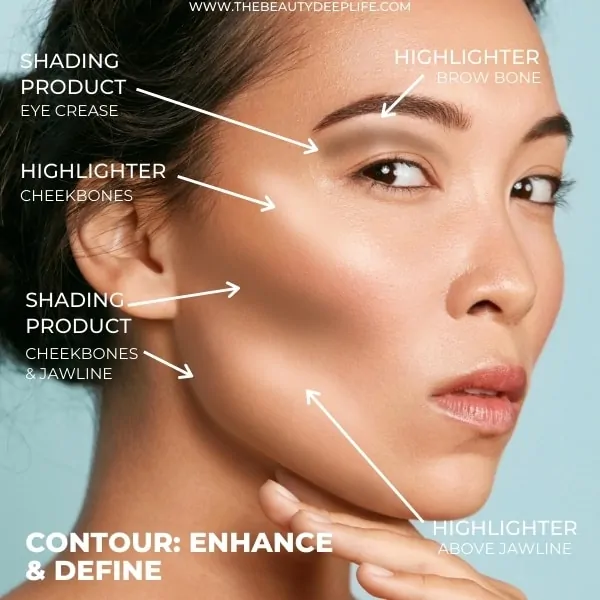
Apply the shading product to the crease of your eyelid. You’ll also want to apply a highlighter to the brow bone. (See Below Photo) Optional: You could additionally use a shimmery highlighter at the inner corner of your eye.
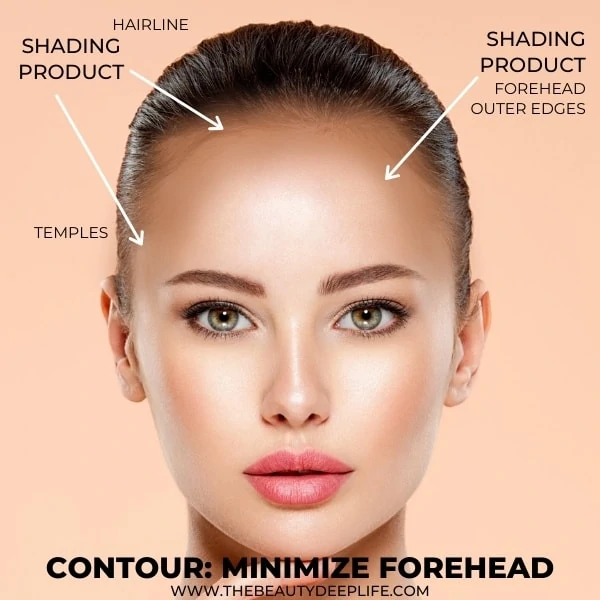
Minimize Your Forehead Size (Corrective Contouring)
To make a forehead less obvious, focus your shading product on the temples, along the outer edges of your forehead, and your hairline. In particular, applying around the hairline will help to shorten the forehead. Be sure to carry it from the forehead right into the hairline ladies.
For Defining Your Temples & Upper Facial Bone Structure (Basic Contouring)
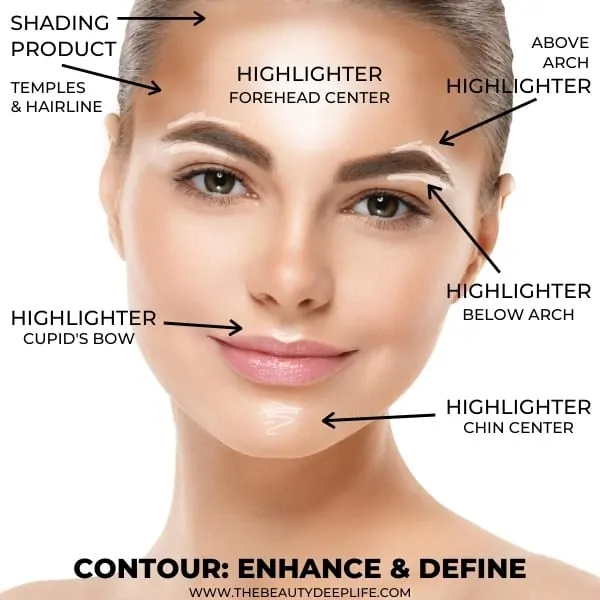
To add more depth to your face, you can trace your temples with your shading product and use it around the hairline to sharpen your forehead area. Apply a highlighter to the center of your forehead to complement the shading. (See Below Photo)
To Define The Arch Of Your Brow Or Lift The Brow (Basic Contouring & Corrective Contouring)
If you want to define your brows, you can apply your highlighter above and below the arch. By using it under your arch, you can give your brows a beautiful lift as well. (See Below Photo)
Give The Illusion Of Fuller-Looking Lips (Corrective Contouring)
Want To Fake A Fuller Pout? Apply your highlighter above the cupid’s bow. (See Below Photo) For more makeup tips for fuller lips, along with ways to look younger…
To Accentuate Your Chin (Basic Contouring)
Apply your highlighter to the center of your chin. This will not only bring it out but also add more brightness to the center of your face. (See Below Photo)
Hide A Double Chin (Corrective Contouring)
First, you want to create a stronger-looking jawline, as this will help to minimize the puffy, soft visible tissue that is under the chin and below the jawline. Starting just under the ear, you want to apply your shading product along the jawline’s outer edge. Then tilt your head up and apply right under the jawline moving inward towards the chin…
Paint in and diffuse the shading product downward under the chin. This will help to make the pooch area of excess tissue recede. Continue to blend under your chin and under the lower jaw downwards to soften the lines. For the jaw area below your ears, blend outward, away from the face, not inward.

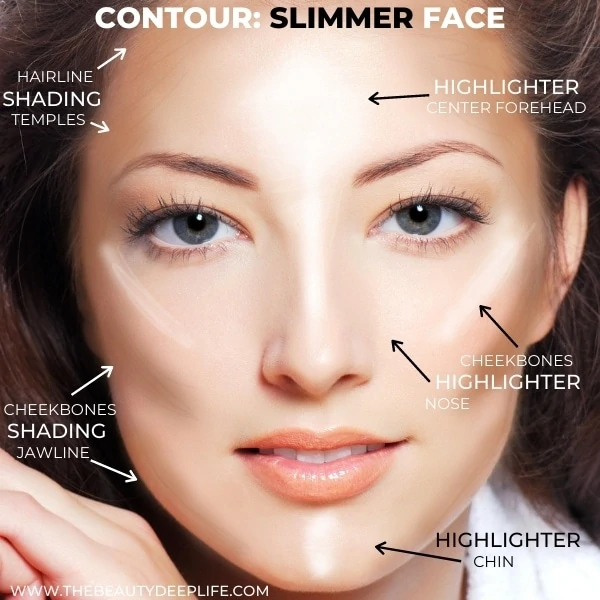
Create A Slimmer-Looking Face (Corrective Contouring)
To create the illusion of a thinner face, you want to use your highlighter to add light to the center of your face and make the outer portions of the face recede using your shading product. To add light to the center, you’ll need to apply your highlighter to the top of your cheekbones, the center of your nose, the center of the chin, and the center of the forehead (starting from between the brows).
For a wide face, focusing on its outer sides and perimeter with your shading product will help. Apply your shading product to the following places: along the jawline (starting from under the ears), your temples, and around the hairline with more emphasis on the sides. To help decrease the width of the sides of the face, you also need to apply slightly onto and under your cheekbones, blending into the hallows of your cheeks.
NOSES: Ok, when it comes to contouring the nose, there are so many tricks based on the considerable variety of nose shapes and sizes that I could literally devote a whole other full article to the topic. But, for today, I’m just going to focus on some general guidelines and touch on the basics, saving the MEGA details for another post.
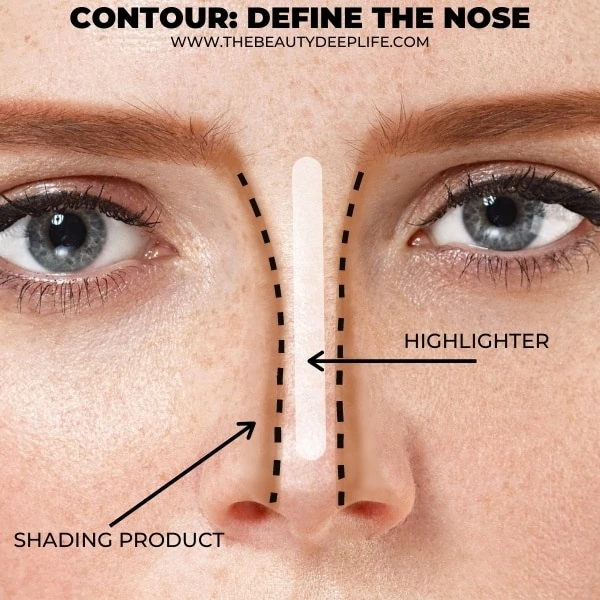
Define Your Nose (Basic Contouring)
After applying your concealer and foundation to your face, your features will generally look rather flat, particularly your nose. So to make it appear less flat, you can shade along the sides. Start at the inner corner of your eyebrows and draw two lines straight down each side of your nose, all the way to the bottom of the nose stopping above your nostrils. Apply your highlighter down the bridge of the nose.
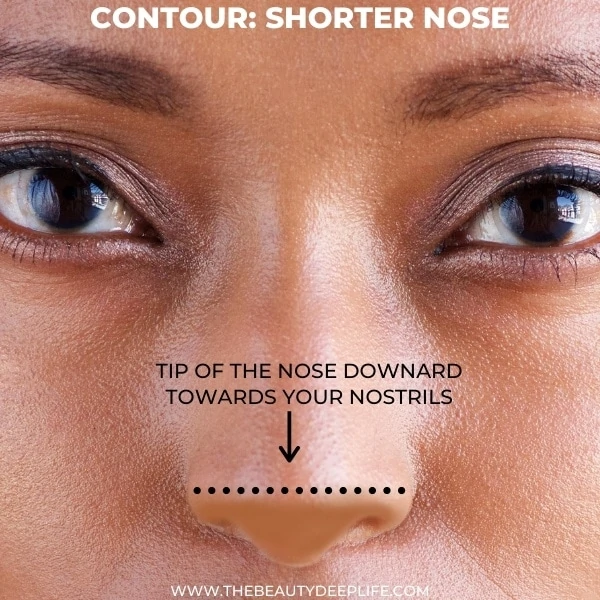
Shorten Your Nose (Corrective Contouring)
Let’s say you want to make your nose appear not quite so long… Well, with your shading product, apply to the tip of the nose working downward towards the nostrils and slightly around the nostrils.
To Make Your Nose Appear Slimmer (Corrective Contouring)
This technique works best with cream products. It is similar to the method to define your nose; however, with the shading lines, you can draw them closer together. The closer you make these lines, the slimmer the nose will appear. You may make your nose as thin as you’d like, but keep in mind that it may come off as unnatural if you go too thin.
Using a concealer that’s about 2 shades lighter than your foundation base color, you will apply it to the sides of your nose right outside where you plan to shade your two lines down the nose. Blend this outward and onto the cheek area.
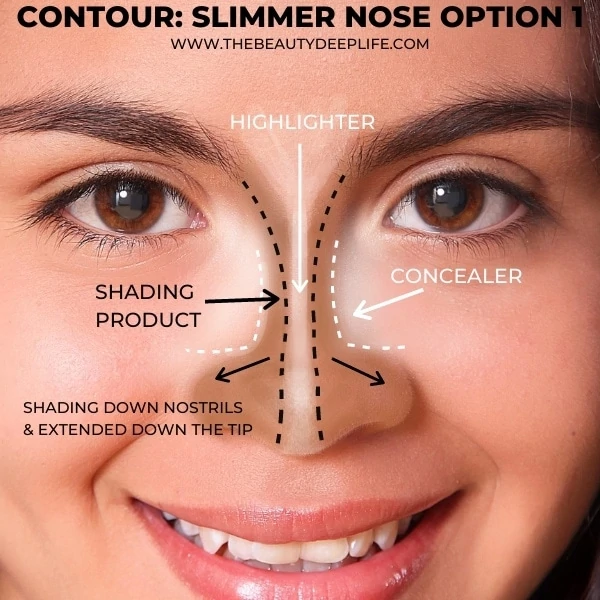
Then apply a line of concealer down the center of your nose. *For a shorter-looking nose, use the next photo as a guide. Blend this out by tapping very lightly with a sponge. You want to be careful not to move this line around too much when blending.
With your cream shading product, you’ll start where your brow begins (the inner corner of your brow) and then move down the side of your nose. Do this on both sides of the nose, bringing them as close together as you like. You can also paint the shading product onto the nostrils if you want to reduce their width. Make sure to blend the shading and then set your nose with a translucent powder.
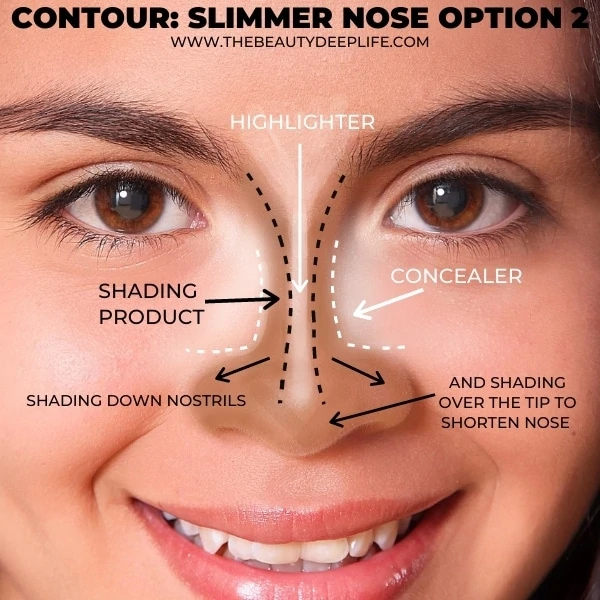
After you set with powder, if you feel the need to intensify your nose definition more, you can go over the same area with a powder shading product. Just repeat with the powder going over exactly where you used the cream for shading. Then, using a matte highlighter, go back over the sides of the nose where you used the concealer (right up next to where the shading powder was applied). Don’t forget to blend!
Lastly, very lightly apply a line using your highlighter down the center of the nose. Keep this line thin to avoid making the nose look wider. And, blend, Beauties!!
Application Tips To Contour Based On Your Face Shape
The beauty of applying your contouring products with your face shape in mind is that it ensures you create the most flattering look for your particular face.
*Please Note: The primary locations focused on in these tips include the cheeks, jaw, forehead, temples, and chin. If you want to contour other features not listed like your nose, eye crease, etc., you’ll want to use the application tips in the previous section, here.
ROUND
With a round face, the goal is to create more angles, diminish the roundness, and slim down its sides. First, to create more angles and add the illusion of thinness, you want to contour using your shading product slightly onto and under your cheekbones, moving into the hollows of your cheeks. Start by applying at the cheekbones and then lightly work down into the hollows.
Now, just like the suggestions for a slimmer face in the previous section, to slim down the sides, we want to shade the outer perimeters of the face. So first, you want to blend a bit downwards from the hollows right into the sides of your jawline.
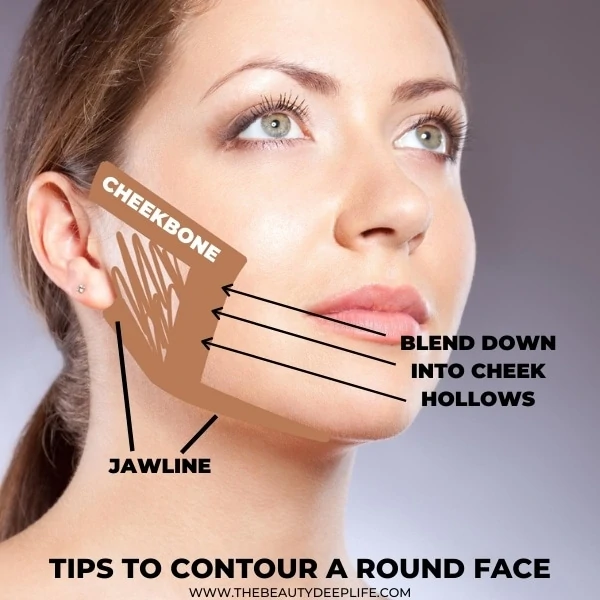
Then apply your shader along the sides of your jaw starting from right under the ear. Continue around your jawline. This will also help minimize the roundness & fullness of both your jaw and lower cheek areas.
Next, you’ll want to contour along the outer edges or sides of your forehead and at your temples. You may also apply a thin line at the center upper hairline above your forehead if you’d like.
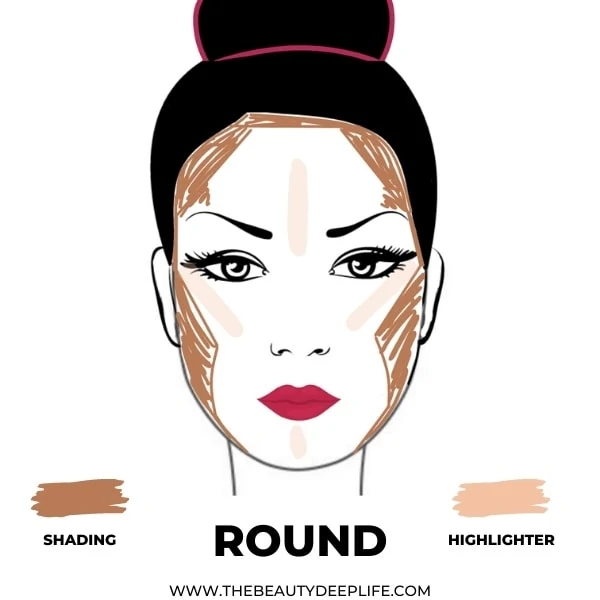
To continue to shift focus away from the roundness and width, you want to use your highlighter to move the focus instead to the center of your face. You can do this by applying it to the very center of your chin and forehead. For the forehead, be sure to start from between the brows and go upward. Optional: You can apply your highlighter in a vertical line right down the center of your nose.
Additionally, make sure you apply your highlighter to the cheekbones’ highest points to play up their bone structure.
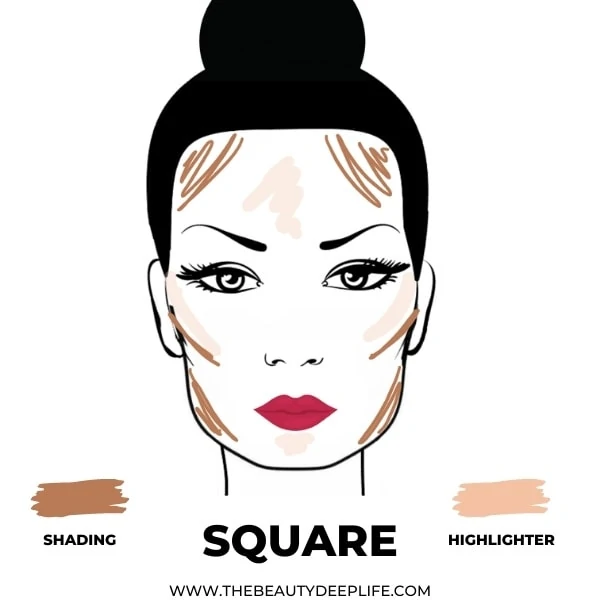
SQUARE
If your face has a square shape, you want to soften your features by contouring the outer edges & corners of your face. Think of it like rounding off the four corners of a square, along the outer corners of the jaw and the forehead.
Specifically with the jawline focus on the outer edge going from the bottom of each ear and connecting to the jaw. You can also use your shading product to contour the cheekbone area.
You’ll use your highlighter to soften things a bit and shift focus away from your face’s angles. To do this, you just need to apply it to your chin and the center of your forehead. If you have a really strong chin, skip highlighter there. You can also apply it to the top of your cheekbones.
HEART-SHAPED
For a heart-shaped face, we want to attempt to draw attention away from your chin, narrow down the forehead area, and accentuate your best features (like the cheeks). Apply your shading product subtly to the pointy bottom tip of the chin, along your outer hairline & forehead area moving into the temples. You should also shade the cheekbone area. You don’t need to contour the jawline.
For your highlighter, apply it to the top of your cheekbones, forehead center, and upper center chin to bring attention to the center of your face and balance the upper and lower portions of your face. Optional: You can also apply a matte highlighter along your jaw to add more fullness if you feel you need it there.
LONG
To draw attention away from a long face, you want to make it appear shorter. Apply your shading product along the top section of your forehead. You’ll also want to contour with this product along the jawline and a bit on the chin.
Also, to counter the length, we want to emphasize things horizontally, enhancing the width. So, for example, we can bring attention to the cheekbones by highlighting the tops of them. For more tips for your cheeks and how to strategically apply blush for a long face…
TRIANGLE
For a triangular-shaped face, with a wide jawline that then narrows at the cheekbones, you want to bring a little width back to the cheekbones and forehead while shaving some off at the jawline.
Using your shading product, lightly apply to the fullest part of the jawline and the underside of your cheekbones. Apply your highlighter to your temples and upper cheekbones.
DIAMOND
The pointiness of the chin and the narrow hairline of a diamond-shaped face can sometimes seem a little harsh, so if you want to soften things up, try using your shading product at the very bottom of your chin (where it’s pointy) and the very top of the forehead/hairline, where it’s most narrow. You may also apply your product to the bottom edge of your cheekbones (the underside).
Additionally, since your forehead and chin are narrow, you can create more fullness in those areas with your highlighter. To do this, apply the highlighter to the middle section of your forehead and the center of your chin. Lastly, you can also apply it to the top of your cheekbones.

Optional: Depending on how narrow your jawline is, you could apply a matte highlighter to that area to add more fullness.
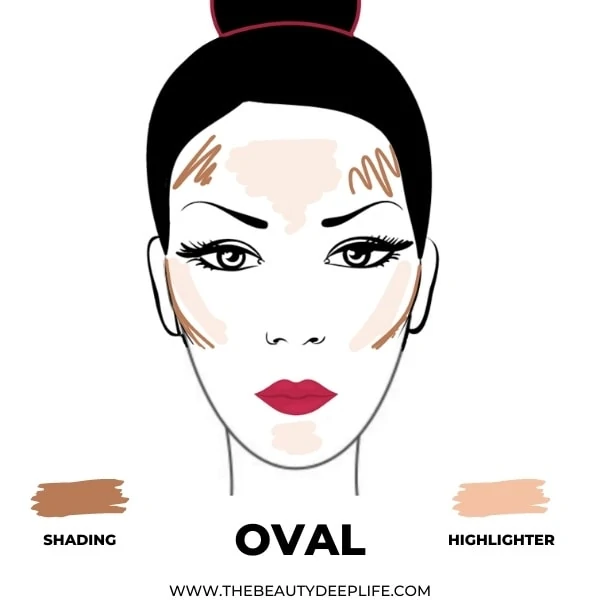
OVAL
Since an oval face is considered well-balanced, you can focus on bringing out your best features and adding some depth. Apply your shading product to your temples, outer forehead, and cheekbone area (underside) to make them a little more defined. Optional: If you want to give your jaw a little sharper definition, you can use your shading product along the jawline.
Apply your highlighter to your forehead, chin, and cheekbones. This will brighten up the face and balance out where you used your shading product.
The Order For Contour Makeup Application Step-By-Step
**These are loose and general guidelines for basic contouring makeup application. Depending on the locations you have chosen to focus on, you can customize both options to fit your needs. However, for more strategic tips, you should definitely refer back to the suggestions listed under Step 4 (here for specific features and here for face shapes).
Steps To Contour Your Face With Powder
PRO Tips: Gently tap off any powder excess from your brush before applying it to your face. Apply your powders lightly and then build up the color slowly.
Step 1: Prep
Always start by prepping your face. Apply a moisturizer to clean skin and then apply a primer if you’d like.
Step 2: Base & Concealer
Next, you want to apply your foundation and concealer, smoothing, and evening out your complexion.
Step 3: Set
Using a translucent powder and a powder brush, you want to set your makeup.
Step 4: Shading Powder
Based on your contouring goals and the previous section’s Step 4, you will want to apply your shading products to the suggested contouring locations. It will be easier if you focus on each individual location by first applying and then blending before moving on to the next location.
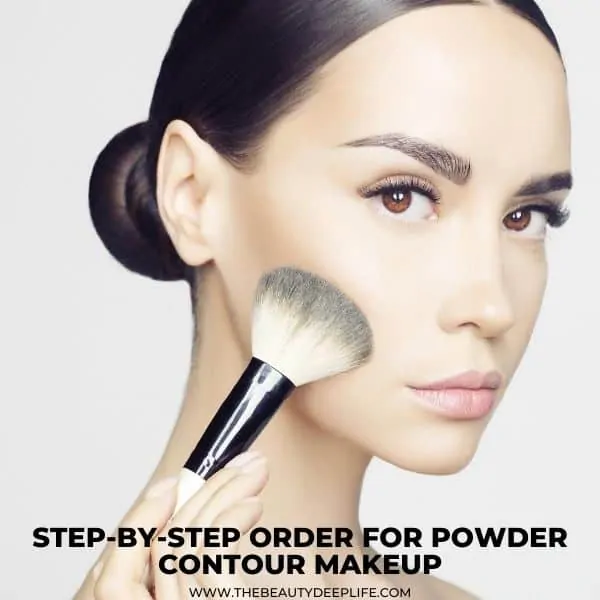
- You should start with your cheekbone area first. Focus on contouring the hollows of your cheeks, starting at the underside of the cheekbones. Start near the ear and sweep, working downward at an angle (going towards the corner of your mouth), stopping mid-cheek. To lift the face and help accentuate those cheekbones blend upwards!
- Second, move on to your forehead area, temples, and your hairline. Blend backward into the hairline from each.
- Then contour the jawline making sure to blend down the neck.
- Lastly, finish up with any additional areas with shading powder, like the nose or eye area. And of course, blend out any harsh lines.
Step 5: Apply Highlighter
Optional: You may apply your highlighter before or after your powder blush. For a more natural lit-from-within look, try applying it before your blush.
Apply your highlighter to areas you selected from the previous section’s Step 4. Or if you prefer, just focus on the typical areas where light naturally hits like along the very top of your cheekbones, the center of your forehead, the bridge of the nose, and the center of your chin. Make sure to blend each area before moving on to the next one.
*Some additional popular places you may want to highlight are the brow bone, inner eye corners, or cupid’s bow.
Step 6: Blend Once More If You Need To!
For a seamless finish, using a fluffy brush, you can go over your full face, and final makeup look once more, softly buffing using circular motions.
Steps To Contour Your Face With Cream
Step 1: Prep
First, prep your skin by applying a moisturizer based on your skin type. You can then use a primer.
Step 2: Base & Concealer
Next, apply your foundation and concealer as needed.
Step 3: Map Out Your Face With Your Contour Products
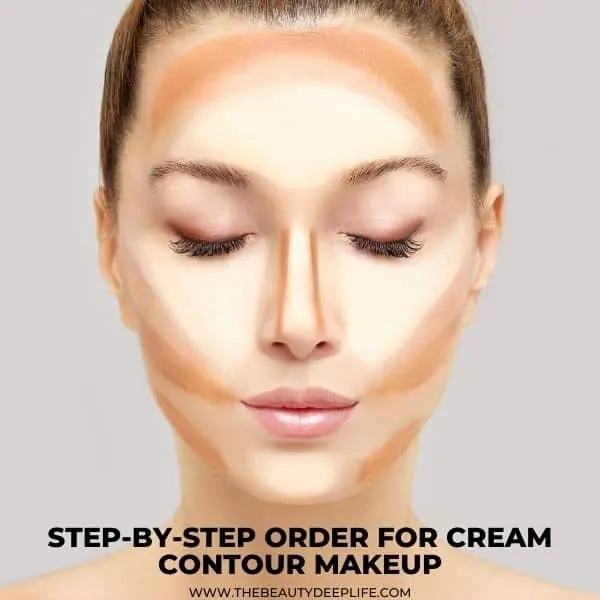
For this step, you can either start on your face with your contour shading cream or begin with your highlighting cream. This can be based on your personal preference, as I’ve seen it done both ways.
I generally like to use the shading cream in this step. What I usually do on others is to use a concealer to highlight/counter shade after using foundation. What this means is in the previous step (Step 2), I use concealer on the deep areas of the face that need a little lifting. For example, areas like under the eyes, at the inner eye corners, around the outer mouth corners, around the nasal labial folds, around the nostrils, etc. After blending this, I move on to my shading cream and then do the additional highlighting.
Again, this is something you can decide based on your preference. If you prefer starting with your highlighter cream, switch this step with Step 5. Otherwise, apply your shading contour cream to all your chosen areas based on your face shape, specific goals for your features, or the most popular areas to contour like under your cheekbones, temples, forehead, jawline, nose, etc.
PRO Tip: If using a cream blush, apply that before applying your cream contouring products.
Step 4: Blend
Now blend the product on your face in all the areas you just mapped out. Use a brush, sponge, or beauty blender for this.
Make sure you don’t move the product around too much. You want to blend out any harsh lines but still, keep the product in its place.
Step 5: Map Out The Rest Of Your Face
Apply cream highlighter to the places of your choosing or the usual places, like your chin, nose, forehead, top of your cheekbones, etc.
Step 6: Blend
Now blend your highlighting cream in with a sponge, beauty blender, or brush, making sure to keep the highlights where you put them. You can lightly pat and tap to blend.
Step 7: Set Makeup with Translucent Powder
After blending thoroughly, you need to use a translucent setting powder to set your makeup.
Step 8: Optional – Do Some Accent Contouring with Shading Powder & Highlighter
Now, if you’d like to emphasize or intensify your contouring more, you can always go back over the areas again using a powder shading product and powder highlighter.
Are You Ready To Become A PRO At Eyeshadow & Upgrade Your Eye Makeup Game?
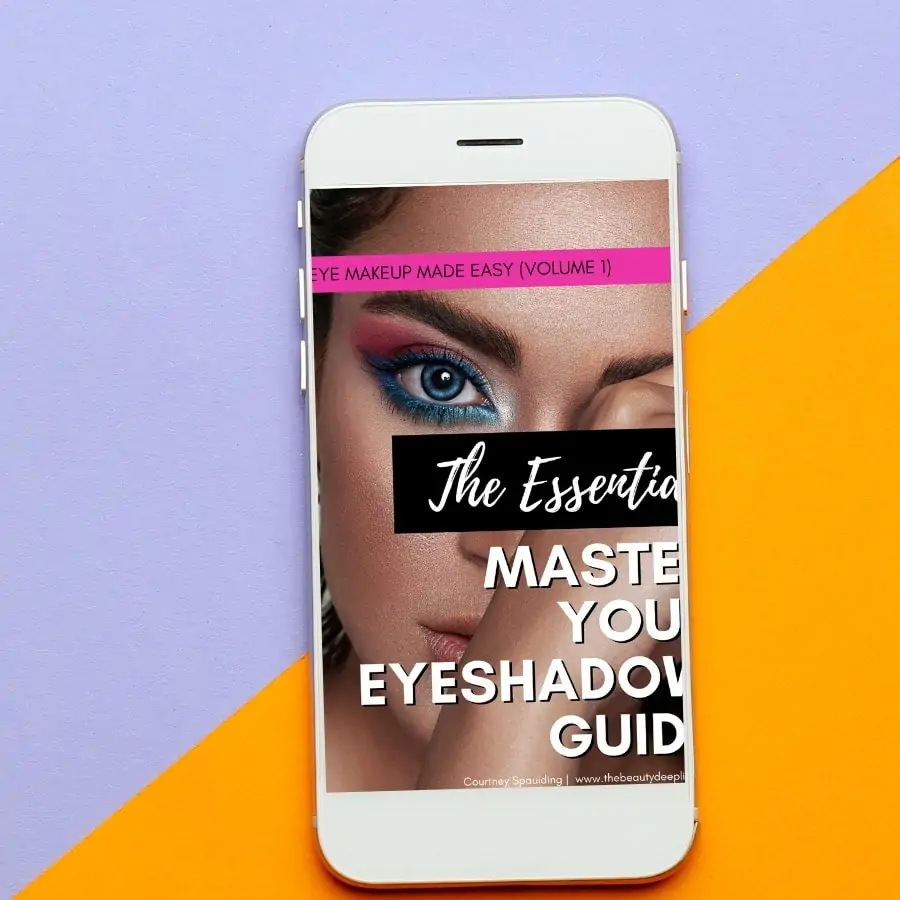
EYE MAKEUP MADE EASY!!!! Take Your Makeup Skills To The Next Level With The Essential Master Your Eyeshadow Guide!! 75+ Pages Packed with Exclusive Professional Makeup Tips, Tricks, & More!!
- 14 Stunning Step-By-Step Eyeshadow Looks & Techniques!
- Eye Makeup Cheat Sheets & Charts!
- Learn How To Correctly Use Eye Makeup Brushes, Combine Eyeshadows, Pick Your Best Colors, Apply False Lashes, + Several Additional Bonus Tutorials!
- Perfect for Beginners & Up!
- INSTANT Convenient Access From Computer, Tablet, or Phone!
The Last Thing You Need To Know About How To Contour Your Face
Practice makes perfect when it comes to learning to contour your face. If you’ve never contoured before, I recommend taking some time to play with all the tips and tricks I’ve given today when you have some downtime.
Rather than attempting significant contouring right before heading out, it’s best to experiment a little first and get the hang of it. Don’t give up if it doesn’t look perfect the first few times you try. Keep in mind, that if you struggle, often, it’s best to apply very lightly and build, blending as you go.
If you are more of a seasoned makeup veteran, try some of the corrective contour tricks for your features to see how they work for you. Or if you’ve never attempted to contour for your specific face shape, give that a whirl! You might be surprised at how your face transforms.
I hope you enjoyed these tips, Beauties!! Are you more of a contour your face with powder or with cream kind of gal?? Leave a comment below.
Related Makeup & Beauty Articles:
- Beginner Makeup For The Everyday Woman
- Foundation Makeup: 11 Tips For Complexion Perfection
- The Ultimate List Of Beauty Gifts For Her She’ll Never Return!!
- Blush Tips and Tricks: How to Wear Blush
- Makeup Tips To Look Younger Using Brows & Lips
We are a participant in the Amazon Services LLC Associates Program, an affiliate advertising program designed to provide a means for us to earn fees by linking to Amazon.com and affiliated sites. For more info, see Disclosure Policy.
I still don’t understand how to contour to make my sunken cheeks look fuller! I have very high cheek bones.
Hi Rhonda, you can shoot me an email with a photo and I can make some suggestions…[email protected]
NICE BLOG
I’ve not used contours yet, but have been researching articles before I try it. Your Pintrest article is the best and most simplified information and instruction I have found! Thanks so much for sharing your expertise! Meems T
I’ve contoured for a few year. But this is so refreshing and really eye opening. I’m 28 and with years (and maybe more definition) my face has shifted, this was a great article to read to to help me gain more of my youth back and confidence. Thank you. I will use these tips in my every day morning routine. Great read!
I’m so happy to hear this Britt! Thank you for your wonderful feedback! 🙂 If you ever have questions or need help just shoot me an email 🙂
Thank you for this thorough and easy to understand contour and highlighting techniques! So helpful. And I was enlightened by use of concealer to highlight instead of the more known shimmer. Your info has made a great improvement on my make up contour and highlighting. Thank you!
So glad you like it and that it has helped you! 🙂
That was so helpful thank you so much!!
you are so welcome !! 🙂