
Foundation Tips For Complexion Perfection: How To Achieve A Flawless Makeup Look!!
No matter how immaculately perfect we apply eyeliner, how fierce & fabulous our lipstick and lashes are, or how on-point our brows may be, nothing can throw off a makeup look quite like the wrong foundation! And no matter our skill level, we can all benefit from a few extra makeup tips & tricks every now and then, especially when it comes to foundation application or buzzworthy brushes, products, & tools.
Now, while a flawless complexion may be the ultimate goal, with so many options to choose from, where do you begin? What’s the secret to even coverage? How do you achieve that somewhat elusive complexion perfection?
Well, today, you are in luck! Today, you are going to become a full-fledged foundation makeup expert!
From selecting color & formula to the application process, to “holy-grail” products & tools for the smoothest coverage EVER… Let’s take your foundation makeup game to the next level!
Disclosure: This post contains affiliate links, which means I receive a small commission at no extra cost to you if you make a purchase using one of these links. For more info, click to see Disclosure Policy. As an Amazon Associate, I earn from qualifying purchases.
11 Foundation Tips For An Absolutely Flawless Makeup Look
1) Pick The Right Formula For Your Skin Type & Concerns
I’ve heard from many of my clients that selecting the right foundation formula can often be an overwhelming challenge. They buy a new foundation and are super excited to try it… they put it on… maybe even wear it for a few days or a week… only to find their skin has decided to start a full-on revolt & rebellion!! Or even worse, their skin may wage war within the first 24 hours!
By the end of the day, does it become so greasy that you feel like there’s an oil slick on your face? Do pimples suddenly begin emerging on your once perfectly clear skin?
Or perhaps, does it ever look cakey or splotchy to you? Does it settle into fine lines & wrinkles? Do you find yourself wishing it covered those acne scars, that sun damage, or those age spots better?
Well, this is where choosing the right formula comes into play. In fact, it’s a huge part of achieving that complexion perfection, ladies!
The right foundation formula can diminish flaws and imperfections (skin concerns), while the wrong one can, unfortunately, draw more attention to them.
Ok, let’s talk formula…Cream, Liquid, Tinted Moisturizer, Stick, Or Cream To Powder…What’s Right For You??
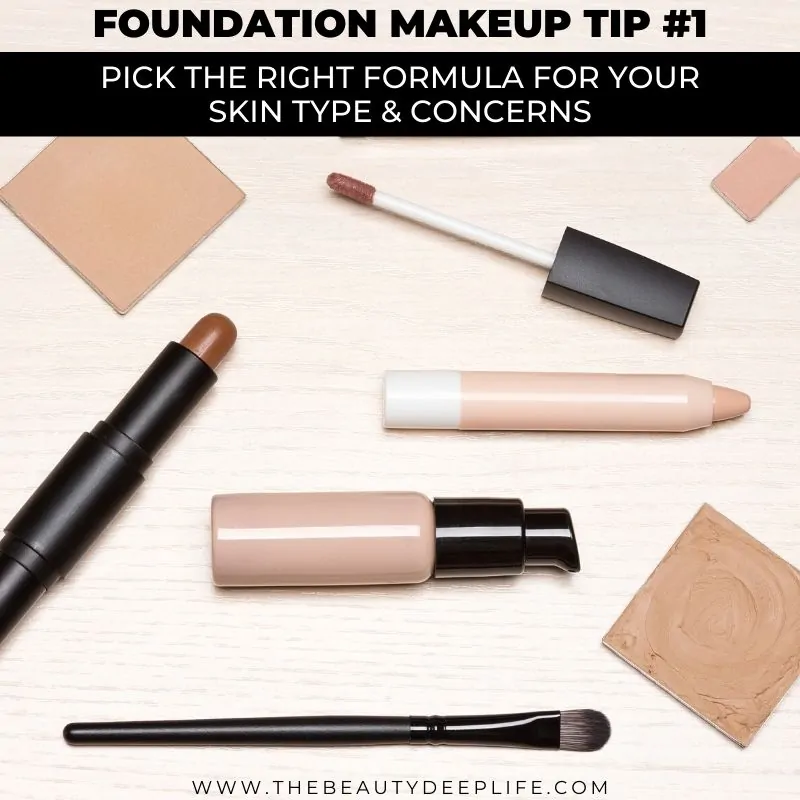
The key to choosing the right formula lies in knowing your skin type, skin concerns, and how much coverage you want or need. Use this next section to determine which is best for your skin and your particular needs!
PRO Tip: If you have acne, hyperpigmentation, or want longer-lasting makeup coverage that doesn’t require touchups, you should steer towards full coverage foundations.
Cream Foundation
- Skin Type/Concern: Normal to Dry Skin. Additionally, works well on hyperpigmentation issues, scars, age spots, etc. Also, the best option for mature skin (fine lines and wrinkles).
- Coverage: Generally ranges from Medium to Full
Liquid Foundation
- Skin Type: All Skin Types
- (However, you should look at the label and go for an oil-free, oil-control, liquid foundation with a matte finish if you have oily or acne-prone skin. Also, you can look for terms like non-acnegenic and non-comedogenic on the labels if you are acne-prone or struggle with enlarged pores.
- For normal to dry skin, a moisturizing liquid foundation will work best (look for satin or semi-matte finishes).
- Coverage: Ranges from Sheer (Light) to Full
Tinted Moisturizer
- Skin Type/Concern: Usually Normal to Dry Skin
- Coverage: Light – Sheer coverage with just a hint of tint to it.
Stick Foundation
- Skin Type/Concern: Normal to Dry Skin. Also, it works well on hyperpigmentation issues, scars, age spots, imperfections, etc.
- Coverage: Generally ranges from Medium to Full
Cream to Powder Foundation (goes on as cream dries as a powder)
- Skin Type/Concern: Normal, ONLY Slightly Oily Skin, ONLY Slightly Dry (Not recommended for fully dry or oily skin types).
- Coverage: On the spectrum, it falls somewhat in the middle per se, as it gives more coverage than liquid but less than a stick or cream. But it can look heavy, so keep that in mind when making your selections.
Want the “411” on skincare?? –> Check out my post on the most essential skincare tips every woman should know for healthy, gorgeous skin (tips for a skincare routine, healthy habits, and the best ingredients you need to reach all your beautiful skin goals!
2) Find The Right Color For Your Skin Tone
Finding the right foundation color can be a tricky feat for most. A grey cast or an ashy tint gone wrong can quickly turn into leaving the house looking like a hot mess!! So, how do you pick the right color?? What are some tips & tricks to a confident foundation makeup color selection??
First, figure out your undertone!
Foundations come in cool, neutral, and warm undertones. So, it’s important to first narrow down your options by starting with your skin’s undertone. No matter your complexion, from fair to dark, you will fall into one of these three undertone groups.
- Warm Undertone: Your skin has a yellow, golden, or peach tinge to it.
- Cool Undertone: Your skin has hints of blue, pink, or red to it.
- Neutral Undertone: Your skin has a mix of both warm and cool tones.
Here are some makeup tips & tricks to determine your undertone and help in your foundation makeup selection process…
1) Look at the veins on your wrist. If they appear kind of blue or purple, then you have a cool undertone. If they seem more greenish or olive in color, you have a warm undertone. Are they a mix of both, like a blue-green? You are likely neutral.
2) Grab some jewels! Hold silver and gold jewelry up against your skin. Does one look better with your skin?? If silver looks better on you, you’re cool. If gold looks better, you are warm. And if both are flattering without one being more striking, then you are probably neutral.
3) How does your skin do in the sun? Do you burn easily? If so, you probably have a cool undertone. Do you get darker and never burn? You’re likely warm. If you usually get darker but sometimes can burn, you are neutral.
Now, let’s narrow down on your shade…
The best way to determine your shade is to grab three options close to your skin color. However, you don’t want to use your hand or neck as a gauge. Our necks get the least amount of sun exposure, so they are always on the lighter side and don’t accurately reflect your coloring. Additionally, your hands get more sun, so they will be too dark to use as a gauge.
The happy medium lies in the jawline! It’s the perfect gauge since it’s the halfway mark between your face and your neck.
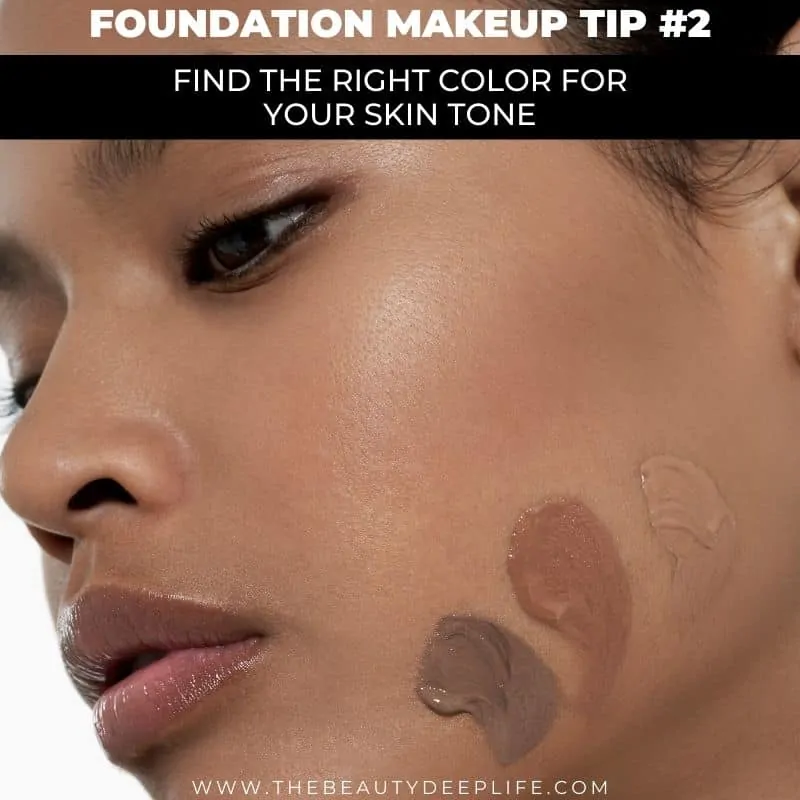
Here’s What You Need To Do…
- Swipe each shade as a stripe along your jawline.
- The one that disappears the most into your skin is your closest match!
3) Buy Two Shades To Maximize Your Potential
Your skin coloring changes so much during the year from season to season that even if you find one that seems 100% perfect, it likely won’t stay that way for very long. Give or take 3 – 4 months, and it’s soon no longer a match. The best way to counter this problem is to buy two shades close to your skin color and mix them.
This makes it customizable, so you can tweak it as you need, mixing the two colors. I tell my clients to try a 2:1 ratio first (2 parts one shade, 1 part the other shade). If that doesn’t work, try a 3:1 ratio next.
Another benefit of this is that you can always use the lighter shade as a subtle highlighter (cheekbones, nose, & forehead).
Lastly, this helps if you are ever on the fence, trying to decide between two different shades. That way, you don’t limit yourself to one option and stay fully prepared for the changing seasons.
4) Always Prep Your Skin
While it may require a bit more time, one of the essentials to perfect, flawless-looking makeup is to prep your skin. I can not stress enough how crucial prepping is, and I never realized just how much of a difference it makes until I trained as a makeup artist. Which is why it’s a core concept covered in The Ultimate Makeup Bundle.
Prepping ensures both a smoother application and more even coverage. It’s also vital if you want to avoid a splotchy or cakey makeup look.
Weekly you should aim at using a skincare product that exfoliates, removing dead skin cells. Accumulated dead skin cells can lead to rough skin texture, dryness, and/or flakiness. All of these things interfere with achieving an even application of makeup, causing unwanted splotches and patchiness to your finished look.
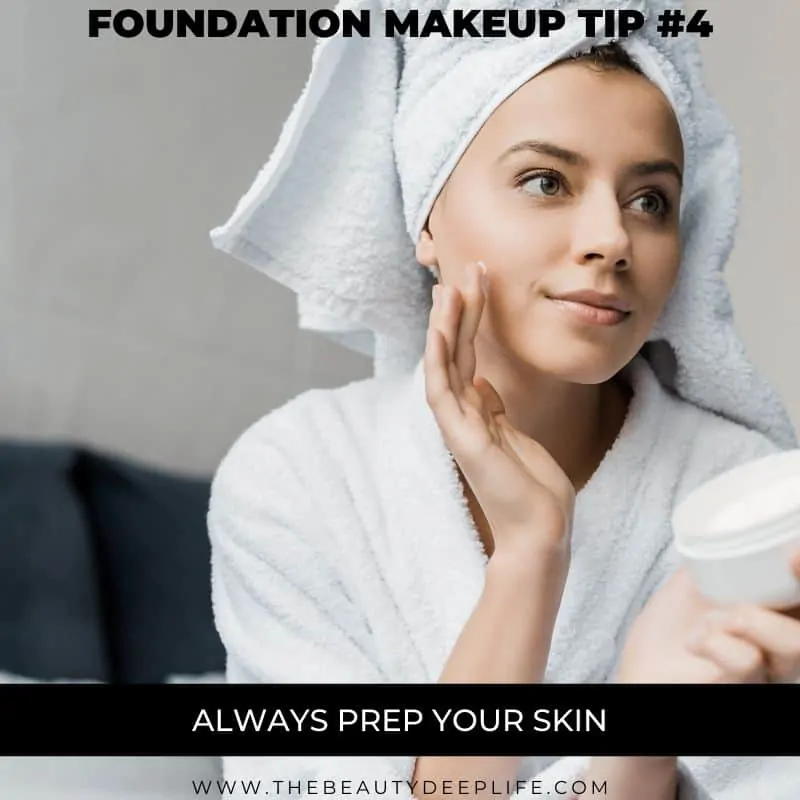
- Daily, before applying makeup, always make sure your skin is clean, use a cleanser for your skin type.
- Next, follow cleansing and toning with a moisturizer for your skin type. I can not stress enough, just how much moisturizing is needed for all skin types, and yes, even if you have oily skin. Pro Tip: Look for one with hyaluronic acid!
Why Is Using A Moisturizer Critical For Prepping??
Makeup loves a supple, hydrated canvas!! So, if you are on the dry side and skip a moisturizer, your makeup will stick to dry patches of skin and likely settle into creases, cracks, and lines as well.
Yet still, regardless of your skin type, a moisturizer will help to balance your skin for a more even and smooth application of your foundation makeup. It also serves as a base to help your makeup last longer.
A Few Moisturizer & Foundation Makeup Tips:
- If your skin is on the oily side, wait a few minutes after applying your moisturizer and allow it to dry. Then you can proceed with applying your foundation makeup or a primer.
- However, I find for a dewy, incredibly natural look and for easier blending, if I’m not using a primer, what works best for me is to apply foundation while my skin is still quite moist. It can help you to keep that “still looks like skin, but better” appearance rather than a sort of screaming “looks like makeup…makeup…makeup” appearance, if you know what I mean. 🙂
5) Don’t Get Stuck In A Beauty Rut!
Don’t get stuck in a beauty rut using the same foundation all year long or year after year even. You want to consider switching things up with the season and as you age.
As the seasons change, so does our skin, sometimes on the drier side (colder months) and sometimes more prone to oiliness (warmer months). Not to mention from summer to winter, our skin coloring shifts, transforming several shades lighter or darker. So, we should think about changing our foundation formula and shade during these times if it’s needed.
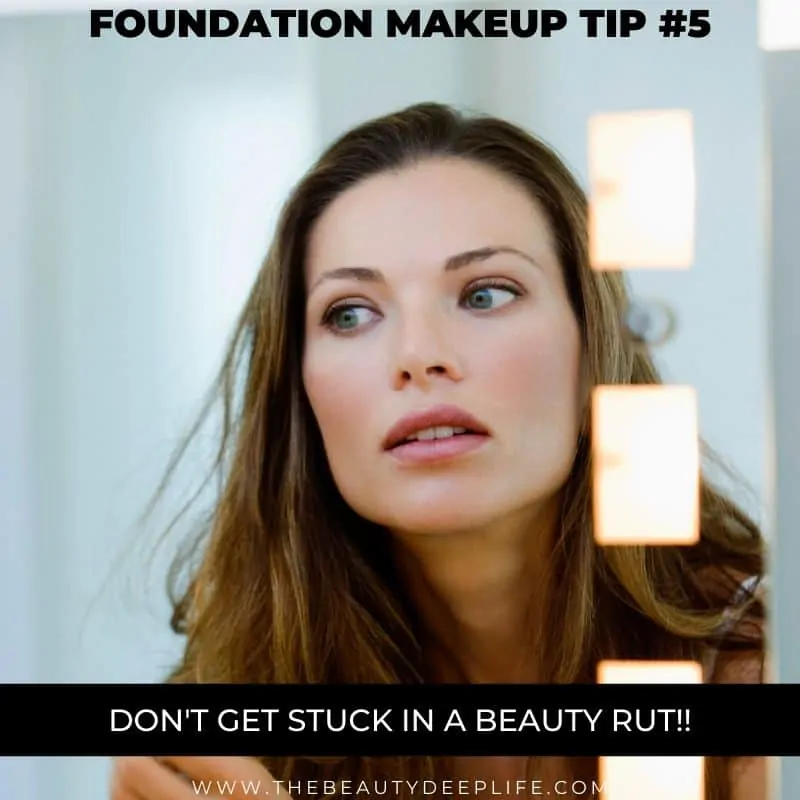
As we age, we all know our skin changes (lines and wrinkles emerge, skin can get drier, and pores get larger). What it may need today won’t be the case a few years from now. So, just as you adapt your skincare products and routine with age, you need to also adapt your makeup products, seeking out different formulas to address those changing skin concerns.
I talk about this quite a bit in my makeup guide for women over 40, because, unfortunately, many women don’t realize the importance of changing their makeup as they grow older. The wrong foundation formula will make you look even older, settling into lines and wrinkles and magnifying them.
Seasonal Change – Makeup Pro Tip: If you’re in a bind and notice your face and neck are drastically different in terms of coloring during the warmer months (like your neck is much lighter), a bronzer can sometimes be used to even things up a bit. Lightly dust the bronzer on your neck area until the transition from face to neck becomes less visible.
6) Prime For Success
While a primer isn’t 100% necessary for everyone, if you have oily skin, large pores, or a few skin concerns (lines, wrinkles, etc.), a primer will give you the biggest bang for your buck.
Primers, like moisturizers, help to create an even and smooth surface for an absolutely seamless foundation application. They can also minimize imperfections and address skin concerns, all while keeping your makeup long-lasting!
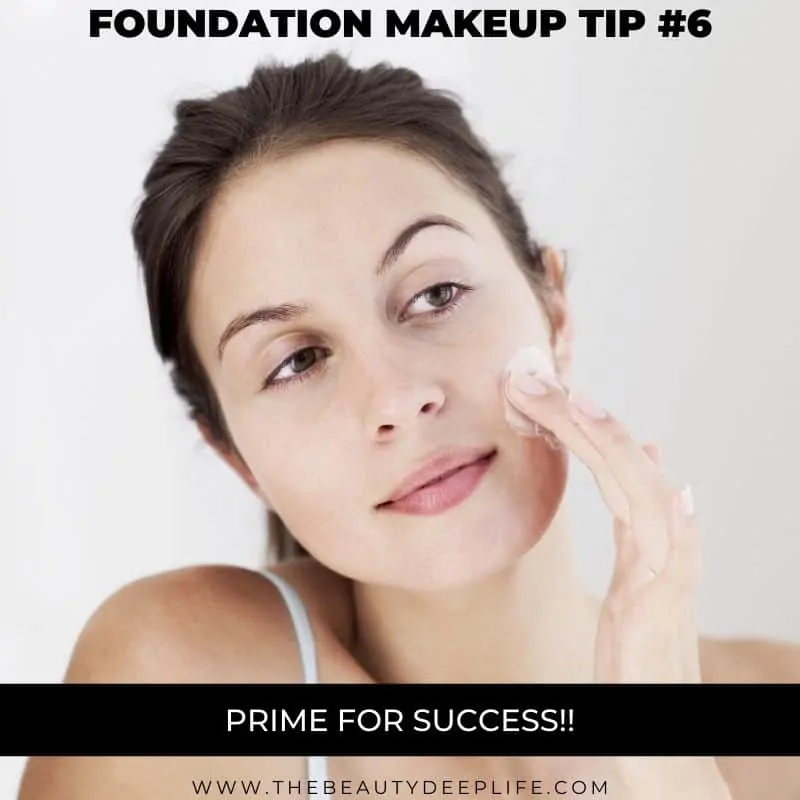
There are many primers to choose from, but the most important thing to remember is that your primer, just like your foundation needs to be compatible with your skin type.
Related: 5 Best Primers For Large Pores: Get Your Smoothest Makeup Look!
7) Lighting & The Perfect Mirror Are Key!
In addition, to having the correct foundation and prepping with a moisturizer or primer, using the right lighting and a great mirror can be powerful for achieving a flawless, finished look.
Where do you put on your makeup? In your bathroom or your bedroom, perhaps?? How good is the lighting?
Of course, when it comes to lighting, natural daylight is always ideal for makeup, but for indoors, it’s all about finding the next best thing! Hence, the best lighting to keep you from leaving the house looking “cuckoo for cocoa puffs” is warm, white LED lighting (not yellow and not fluorescent lighting).
Secondly, it takes a well-lighted mirror (where you can look at your skin up close) to be certain everything appears well blended; there are no visible streaks, coverage is even, and the texture remains smooth.
From a standard mirror, everything looks great….from a distance, that is. But if you truly want to be sure that your makeup will look flawless, face-to-face with all the people you meet and interact with before you step out that door, consider using a lighted makeup mirror! Not to mention it makes grooming your brows and applying eyeliner easy peasy!!
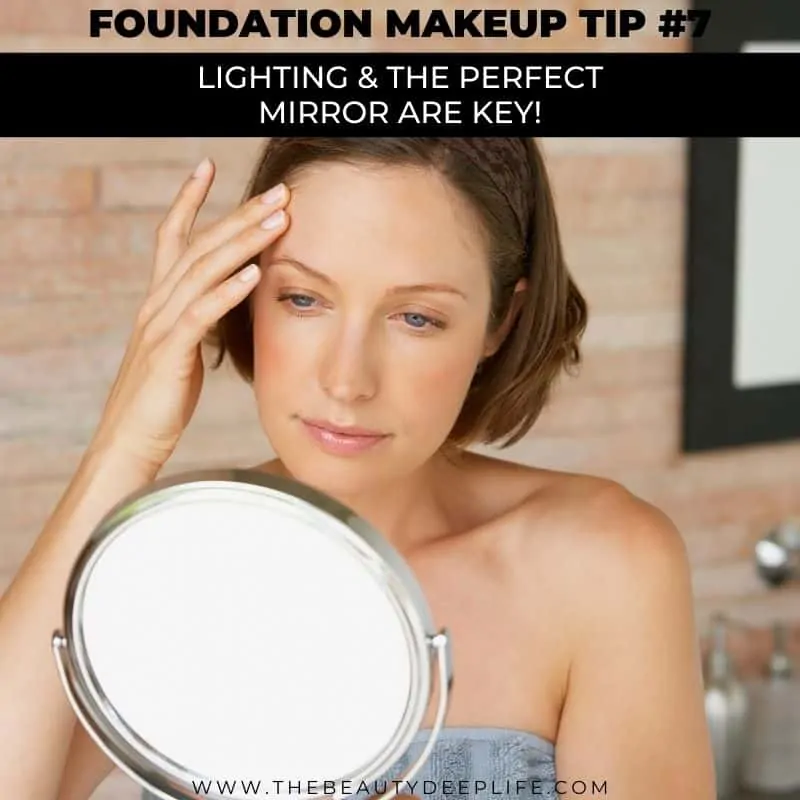
This is the LED mirror I use for applying my makeup, doing my facials, and pretty much anything and everything beauty-related! It just makes my life so much easier when it comes to beauty routines! However, if you want an option that simulates natural daylight without full magnification this one is loved by fans, giving it raving Amazon reviews!!
Now, I’m not saying ignore the larger primary mirror in your bathroom. You actually do need to use that, so you can step back and get the general overall look. But, I do recommend using that plus a lighted vanity mirror, if you really want to attain a beautiful, flawless finish!
8) Pick Your Power Tools
The tools you use are just as important as your products. I can’t overemphasize the importance of investing in good tools for makeup application if you want to take your makeup to the next level.
You can use the best foundation and products on the market, but if you apply them with mediocre brushes & tools, you’re cheating yourself out of getting that foundation or makeup product’s maximum potential and full capability. For a perfect complexion, that flawless finish… well, the truth is cheating yourself will not get you there.
So, if you are ready to perfect your foundation game, check out these next tips and suggestions for makeup power tools!! I narrowed down this list to include some of the best tools I’ve used, other makeup artists recommend, and beauty editors go nuts over!!
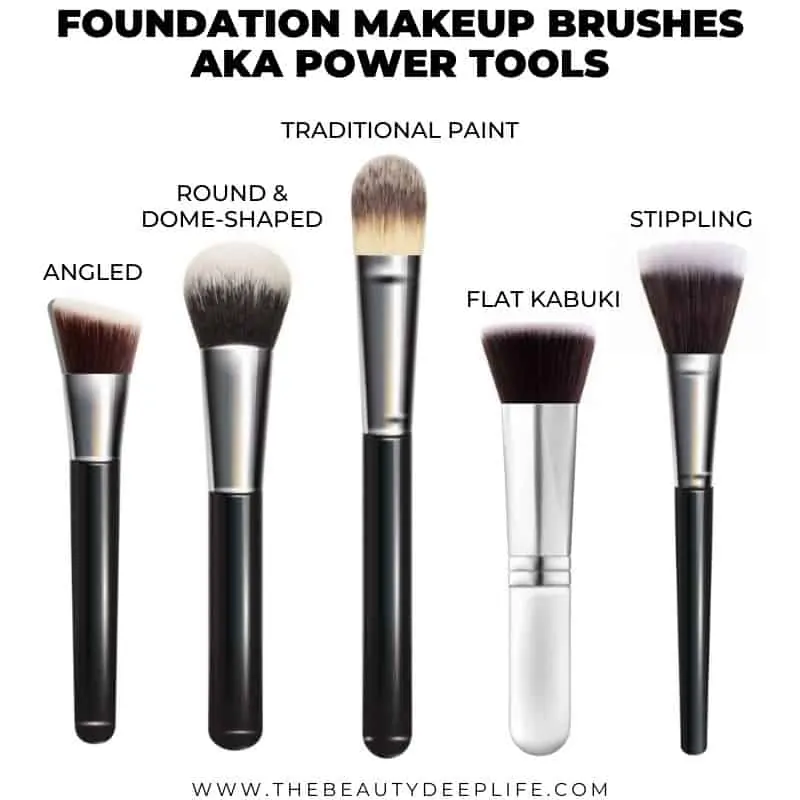
Top Foundation Makeup Brushes & Tools:
Traditional Paint Foundation Brush
This is a classic brush that you are probably accustomed to seeing. It’s a tapered, oval, flatter-shaped brush, ideal for makeup beginners interested in creating a natural look when applying a cream foundation, liquid foundation, or even a tinted moisturizer. A superb brush for reaching all those hard-to-get areas of the face like around the eyes and nose.
- IT Cosmetics Love Flawless Foundation Brush – One of my favorites, this classically shaped foundation brush has soft, synthetic bristles for the smoothest, streak-free coverage you could truly ever find! It’s a definite winner for buildable, easy application!!
- Sigma Beauty F60 Foundation Makeup Brush – This brush from Sigma features synthetic bristles, strategically designed for superior hold, application, and blending! You can even use it for applying your primer and moisturizer too. If you’re looking for a handy, everyday coverage brush that will help you get an even, natural finish, grab this beauty!
Angled Foundation Brush
These brushes tend to be dense, soft-bristled, and angled. Like the previous style of brushes, they are also great for getting into the contours of the face and hitting those hard-to-reach spots (around the nose & eyes).
- Hourglass Vanish Seamless Finish Foundation Brush – The shape and bristle density of this brush were designed to help you reach those difficult contours of the face like around the nose and your undereye areas. It features super, soft Taklon bristles which make it a great one for even distribution of foundation across your face, but in particular under your eyes. Since our skin is most fragile in that area, using very soft brushes for makeup there is a necessity.
- Kat Von D – Vegan Beauty- Lock-It Edge Foundation Brush – A high-performance brush with dense bristles and a stylish stiletto handle that you can also use for mixing multiple shades of foundation together if you need to. You can blend everything seamlessly, smoothly, and easily with this tool! And reaching all those nooks and crannies is effortless!
Round Or Dome-Shaped Foundation Brush
Generally, these work well for creams and liquids. Their shape happens to be more rounded than a traditional paint foundation brush. They are also fluffier and wonderfully fabulous for blending!
- Fenty Beauty Full-Bodied Foundation Brush 110 – A medium-density brush that will give you the impeccable airbrushed look of a greek goddess indeed!! It happens to be one of my all-time favorites!! This brush is an undeniable must-have for a perfectly blended foundation.
- Marc Jacobs The Face II – Sculpting Foundation Brush No. 2 – This go-to brush is excellent for applying your liquids or creams for a poreless, no-streak finish! You can get the smoothest application and blend with absolute ease for a picture-perfect, gorgeous complexion! With nearly 5 stars, it’s clear to see why makeup lovers go completely gaga over this one!!
Stippling Brush
This type of brush is a duo fiber one that can be used for creams, liquids, and even powders. It’s superb for creating an airbrushed look and achieving a slow, buildable coverage.
- Sigma F50 Duo Fibre Brush – This particular brush features soft, lightweight bristles and a flat top. Whether you’re using a cream, liquid, or powder, it makes airbrushed-looking skin surely achievable! Like other Sigma brushes, it was designed with special fibers to hold, blend and apply your makeup product better than most brushes.
Kabuki Brush (Flat & Classic Featured)
These brushes are on the dense side and ideal for applying, buffing, and blending. They are another good choice for an airbrushed, flawless-looking complexion. Also, they can work well with cream or liquid foundations.
- Sigma F80 Flat Kabuki Brush – Talk about a favorite among makeup artists, makeup lovers, influencers, and beauty editors for giving an ultra-high def airbrushed finish!! The densely packed, incredibly soft, synthetic bristles will provide you with a buildable, smooth coverage like no other. Did I mention those silky, luxurious-feeling bristles are antimicrobial??!! Yep…a win-win for skin and makeup both!!
- Tarte Buffer Foundation Brush – This brush, while not technically flat, features dense bristles for blending, buffing, and super-fast application! The size and dimensions of the bristles help you to cover a larger area in record time, so if you are that constant “in a hurry” gal, this one’s for you!!
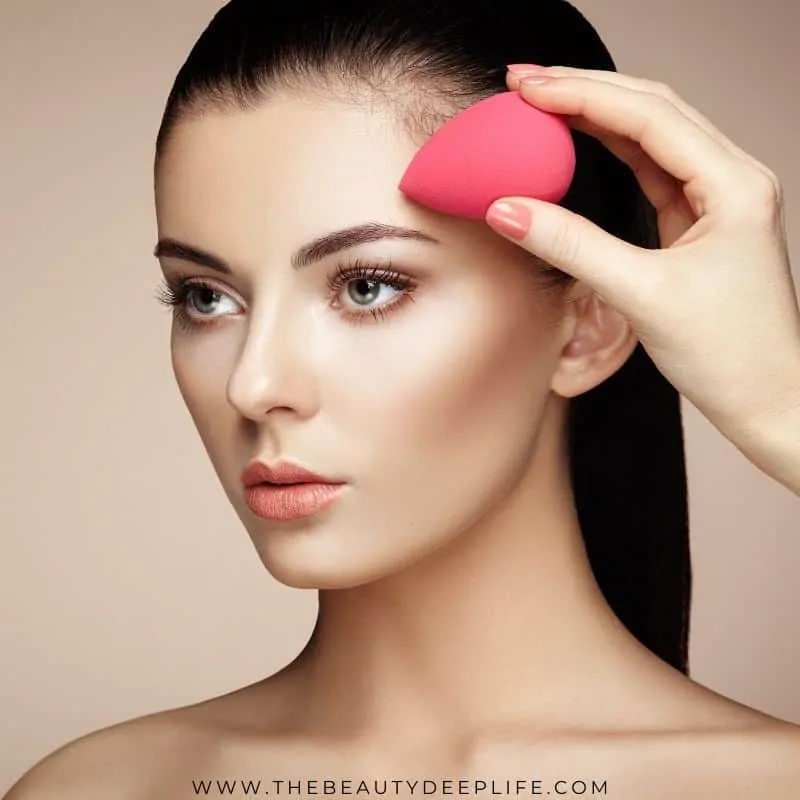
Sponges
Sponges are great for a smooth, seamless application. They can be used with liquids, creams, sticks, and powders.
- Beauty Blender – The #1 heavyweight hitter, for a powerful, blendable punch!! When it comes to blending foundation, this legendary beauty tool never disappoints! A “best of beauty” winner for Allure, over and over again!!!
- BEAKEY 5 Piece Makeup Sponge Set – A super cost-efficient blender sponge for wet or dry application.
PRO Tip: Keep your brushes & tools clean. Dirty brushes break down faster and lead to a shorter lifespan. Not to mention a dirty brush or sponge can negatively impact the application process.
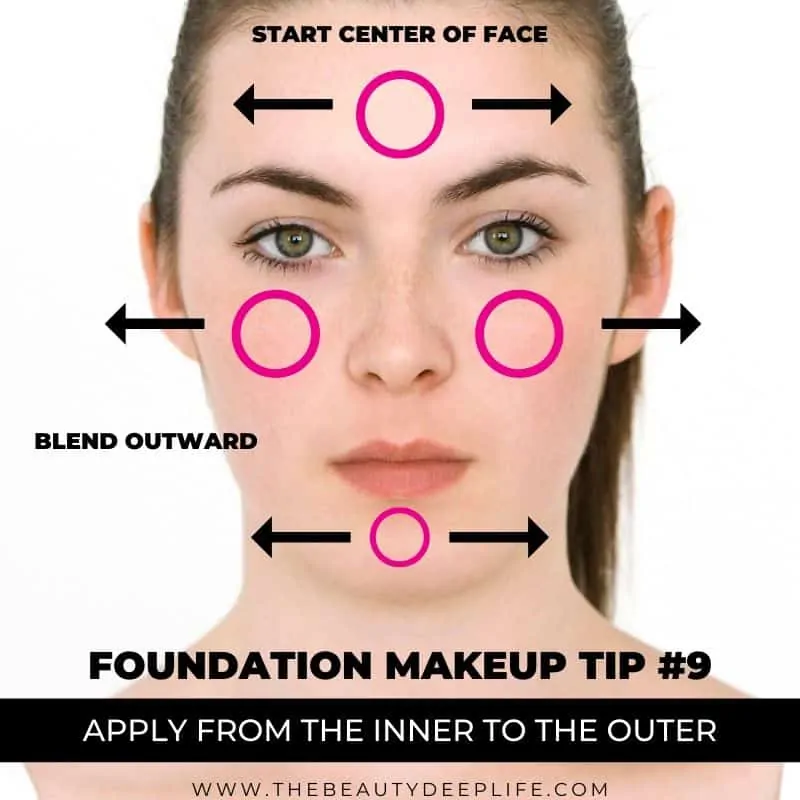
9) Apply From The Inner To The Outer
Focus on applying your makeup from the center of the face and move outwards, blending towards your hairline, jawline, and neck.
You also want to take a less is more approach by starting with a small amount of product and then building as needed. This reduces your chances of accidentally over-applying and ending up with cakey makeup. It also ensures the most natural look possible.
Now, are you ready to take your makeup skills to the next level? Check out the following makeup tips & techniques for applying your foundation based on the formula choice.
How To Apply Cream Or Liquid Foundation (Makeup Tips)
You have a few options for application with various power tools (aka brushes) and all of these techniques work well for both creams and liquids. I suggest playing around with each of these next makeup application steps and tips to see which method you prefer most with your foundation product.
PRO Application Tip: Keep in mind that cream foundation tends to be on the thicker side, so you may want to warm it up a tad on the back of your hand before applying.
Application With A Traditional Paint Foundation Brush
- If you use this type of brush, once again, you want to start from the middle of your face and then work outward.
- Apply a small amount to your forehead, then down your nose, to each cheek, and then end at your chin.
- To apply, you can either paint it on or do so in a dot/tapping-like fashion. If you opt to paint it on, use light, quick downward strokes. If you opt for the dot/tapping method, simply take the brush and apply a few small dots to each of the above-suggested areas on your face.
- To blend, take your brush and move outward from the center lightly patting and tapping. I find patting to be the best way to get the most flawless, perfect finish. You can also alternate between your brush and a wedged sponge to blend it out.
- PRO Tip: To avoid streaks, you can either use a primer before applying your foundation or you can try patting any visible ones out when blending.
Application With An Angled Foundation Brush
- Much like the previous brush, you want to pat and tap the product in when applying it. Use the same order as with the previous brush, start with your forehead, then your nose, cheeks, and lastly, your chin.
- For the Kat Von D Lock-It Edge Foundation Brush and the Hourglass Foundation Brush, both suggested in this article, to blend it in try buffing (small circular motions) or quick back and forth sweep-like motions. Normally I don’t suggest sweeping motions as it can lead to streaks but for these brushes it’s ok.
Application With A Round Or Dome-Shaped Foundation Brush
- With these types of brushes, you generally want to start from the center and move outward with either a stippling/patting motion or downward strokes. Applying in a downward fashion will minimize pores and peach fuzz if you have any. Begin at the forehead and nose, then move outward to the cheeks and chin.
- However, for the Fenty Beauty Full-Bodied Brush, if you’d like, you can also try applying with Rhianna’s signature method, “press brush into skin, roll-off, and repeat”.
- And for the Marc Jacobs The Face II – Sculpting Foundation Brush No. 2, you may find that a pressing and patting method of application works best.
- Blending Option 1: To blend out, you can buff using small circular motions with your brush.
- Blending Option 2: Or if you’d rather, you can simply continue to pat and tap to blend it out.
- What I like to do is to continue to stipple (pat & tap) with my brush but also add in a wedged sponge.
- After stippling with the brush, I tap, and ever so lightly then press the wedged sponge back over any areas that need blending out or softening. I don’t press for too long, I keep it light and quick, so as to not remove too much product, but still smooth it all out.
Application With A Stippling Brush
- You want to lightly tap just the tips of this brush into your product.
- Next, gently tap, pat, and lightly press (stippling motion) the product over your face (again, start with the forehead, then your nose, cheeks, and chin).
- You can also lightly buff it into your skin with small circular motions. It’s best to avoid large sweeps across and over the face.
- For blending, I like to use a wedged sponge to smooth things out by tapping over any areas that need it. However, you can also simply continue with the buffing technique to blend it out.
Application With A Kabuki Brush (Flat Vs. Classic)
- For the Sigma F80 Brush, Dot the foundation onto your face using the flat top part of this kabuki brush going from the forehead to nose, cheeks, and chin, just like it was suggested for the previous techniques.
- Stipple the product in (tapping & light pressing motion).
- You can blend using a combo of stippling and circular motions to buff.
- For the Tarte Buffer Foundation Brush, to apply you can use a sweeping motion starting with the forehead, then the nose, cheeks, and chin working from the center of the face outward.
- To blend, you can buff the product, using circular motions.
Application With A Sponge
- For a sheerer finish that you can build, you may want to try a sponge.
- Dampen your Beauty Blender or Beakey Sponge with water, squeeze, and then apply your foundation. Gently tap and pat the product onto your face, starting from the center and moving outward in a bouncing fashion. Try not to wipe, rub, or sweep.
- Add more as needed in layers.
- To blend, go back over the face, lightly pressing the blender/sponge into the skin.
Makeup Tips For Applying A Tinted Moisturizer
For this, you may opt to use your hands, or what I like to do is to use either a Traditional Paint Foundation Brush or an Angled Foundation Brush. I find both of these options give me flawless, even coverage.
Makeup Tips For Applying Stick Foundation
- Twist the tube, and then apply it directly to your face starting from the middle.
- Apply two dots or circles to your forehead, then apply a line down your nose, apply a long dash along each cheek (or you can do two dots on each cheek), and finish with a circle on your chin.
- Blend starting at the center of your face and move outward with a Kabuki buffing brush or sponge (damp beauty blender).
- For areas of concern that need more coverage, go back in after this first application using a concealer brush. Sweep the concealer brush along the top of the foundation stick to get enough product on the bristles. Then go back over the areas of concern, tapping more foundation in with that brush.
PRO Tip: What I find works incredibly well with stick foundation is when I use a deeply hydrating moisturizer that contains hyaluronic acid. If I apply the foundation while the skin is still damp, I can very easily use a wedged sponge to blend things out super fast by patting back over my skin. This method also gives a naturally glowy look!
Makeup Tips For Applying Cream To Powder Foundation
Sponge
- Usually, cream to powders come with a sponge included in the compact. If you need heavier coverage and want to apply the product quickly, a sponge is your best bet.
- To apply, you want to just pat it into the skin.
Stippling Brush
- If you prefer using a brush, you can use a stippling brush and buff the product into your skin using light, small circular motions.
10) Don’t Forget The Neck, Ears, & Chest!
Apply and blend your foundation from your face all the way down your neck. This ensures consistency. If your chest is visible and there is an apparent shift in your skin coloring, it may require applying there too… or at the very least, using some bronzer in that area.
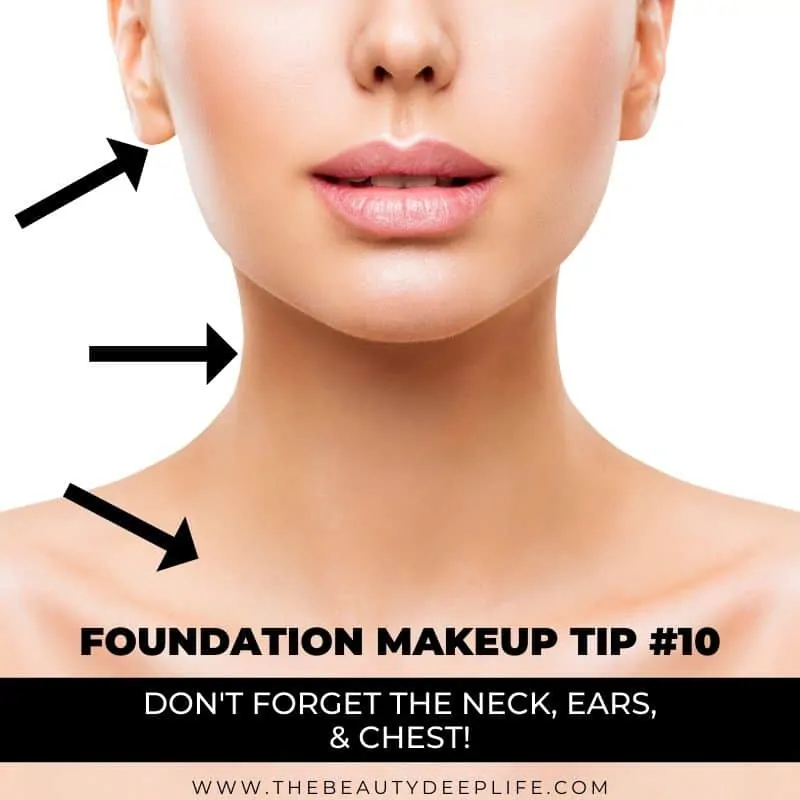
PRO Tip: Use foundation on your eyelids; this helps your eyeshadow stay put and primes your eyelids. Apply some powder to set and then follow with your eyeshadow makeup. This keeps things smooth, reduces fading, and decreases the possibility of smudging.
11) Set For Staying Power
Now for the last of our go-to foundation tips for achieving that next-level makeup look! To keep your makeup lasting all day long, make sure you set it with a loose, preferably translucent powder.
Translucent powders give you the most natural-looking finish that is long-lasting without adding unnecessary and rather unflattering texture to your face (like pigmented powders often do). This one from Hourglass happens to be my current favorite because it blurs out my fine lines and makes my pores disappear.
- Always tap your brush to remove excess powder before applying.
- If you have oily skin, apply it all over the face.
- If you have normal to dry skin, you can get away with a very light dusting on just a few key spots. Mainly you can just focus on areas that tend to get oily, like your nose, T- zone, and chin.
Tired Of Trying To Figure Makeup Out All On Your Own?
No longer feel confused, overwhelmed, or intimidated about your makeup products, brushes, and application!! Get started on your makeup journey with The Ultimate Makeup Beginners & Beyond Bundle!! *Extra Tips for getting a flawless makeup look & complexion with foundation and other products are included!!
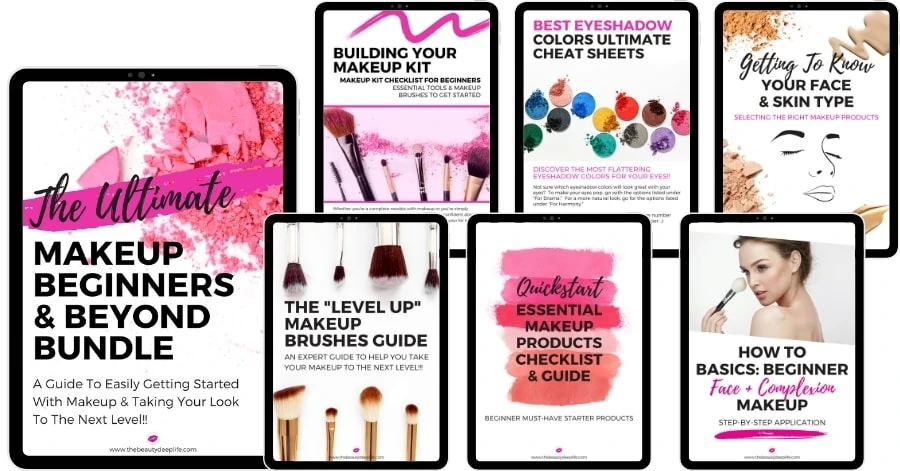
If you are ready to step into the world of makeup, improve your looks, and upgrade your makeup skills, click here to learn more about it!
Foundation Makeup Tips: The Wrap-Up!!
Ok, now it’s time to pull it all together, ladies! First, if you’ve been using the wrong foundation, use the formula and color selection tips in this article to help you grab your new foundation of choice!
Decide if you need a primer or if you would rather stick to just using a moisturizer to prep your face. Then, figure out which power tools you need! Depending on the tools you choose…practice, practice, practice… practice buffing, stippling, patting, tapping, doing downward strokes, etc.
Lastly, determine if you need a setting powder and set yourself up with some staying power!! I sincerely hope you found these makeup tips and suggestions helpful for selecting your foundation, applying it, and creating a gorgeous, unbeatably flawless look!
Related Articles:
- How To Get Flawless Makeup: 8 Makeup Rules You Must Stop Breaking
- Beginner Makeup for the Everyday Woman
- The Best Guide to Women’s Essential Skincare Tips
- How To Minimize Pores On Face: 11 Easy Ways That Work Like A Charm!
- How To Contour Your Face The Right Way: Get The Inside Scoop!
We are a participant in the Amazon Services LLC Associates Program, an affiliate advertising program designed to provide a means for us to earn fees by linking to Amazon.com and affiliated sites. For more info, see Disclosure Policy.
great to read your information. greatly appreciate. thank you.
glad it helped! 🙂
Finally found something useful. Thank you. You explained very well and I appreciate it. Keep it up.
Such a great information. This is really very helpful for bloggers
Very interesting stuff to read.
What is the best way to clean our brushes? I’ve spent good money on my brushes and I’d like to take care of them so they may last awhile before I need to go out and buy more. So if you could help me with some ideas there I’d greatly appreciate it. ? Thanks
Chelle
Hey, there have you read my article on that yet? https://thebeautydeeplife.com/how-to-clean-makeup-brushes/
Thank you for this post. It is really helpful for me!
happy to help! 🙂
Wow, I believe that foundation makeup tips should known by all skin conscious people because without doing this you skin may be rough and tough. For getting your skin smooth, you should use the product.
Yes, skincare and makeup go very much hand in hand!! Which is why I’m diligent with my skincare routine and only use a very specific premium skincare product brand.
Great Article! Your article is really helpful. I am very careful for my health and skin. So, I am glad to read this helpful article. thanks for sharing such a great post. Keep posting!!
These beauty tips are great. Thank you very much for sharing the information.
No problem! thanks for commenting 🙂
Thanks, Awesome Writing providing valuable information and it helps us too.
No problem, thanks for commenting 🙂
Thank you for sharing the information. I have read all tips. Wonderful article & good post. It’s really helpful for me.
I never did research before buying a foundation. So, I missed all these steps. But, now when I know these pointers, I am sure, I will choose a foundation according to my skin tone. Thanks for this impressive article.
I had read all main points, i like it. GREAT POST ,THANKS!
thank you!
Great article! Thank you!