
Let’s take it back to the basics… shall we? Let’s start with a handy dandy resource, an official everyday woman’s “Beginner Makeup Guide”.
Whether you are a makeup minimalist now looking to branch into new territory with full-face makeup, a complete newbie to the glorious world of beauty makeup, or a regular makeup user wanting to take your makeup look to the next level, starting with the basics is key!
Are You A Makeup Minimalist Or Complete Newbie?
I get it, the multitude of brands, products, and tools on the market can make makeup intimidating and overwhelming. But, having this guide will help you to determine what you need and don’t need so that you can eliminate the unnecessary.
I will also show you exactly what to use, when to use it, and give you some tips on how to use it, so you can end the confusion and gain confidence in your makeup skills.
Are You A Regular Makeup User?
For the regular makeup user looking to step things up a bit, let me share with you a story… Years ago, when I went to makeup school and trained, I thought I knew a lot about makeup, having used it myself for years. But in school, we started with the basics day one, month one.
As a result, I learned some overlooked tips for basic makeup application, not to mention a few tricks used for actors, models, and entertainers.
I discovered a more efficient order for applying my makeup products, and how to enhance someone’s natural beauty while hiding the things that needed a little hiding. I even found out some things I had been doing all wrong on myself for years.
Much later, when I hit my 40’s, I realized that these learned skills were a blessing. As I found out personally, what works when you are younger doesn’t always continue to work.
I learned that sometimes you must switch things up a bit, adapt, and try something new. And it all came from going back to the basics!
This post contains affiliate links, which means I receive a small commission, at no extra cost to you, if you make a purchase using one of these links. For more info, please see our Disclosure Policy.
The Basics & Fundamentals Of Beginner Makeup
Let’s get made up and beautiful ladies! Our mission for you is to find a makeup routine that works with your goals, concerns, life, and schedule in mind. It’s about keeping things simple yet effective. And most importantly, it’s about you feeling comfortable, confident, and beautiful in both the process and the end result!
Here is what it all boils down to…
- Using the Right Tools and Products
- Using Products in the Right Order
- Application & Techniques
Beginner Makeup 101: How To Get Started
First, you need to build your beginner makeup kit. This can be an incredibly fun part ladies! Brushes, sponges, tools, and treats! Oh my!! We are going to establish some absolute essentials as far as basic makeup tools and products.
Additionally, you may also want to look into getting a makeup bag for on-the-go makeup. Running late for a date, work, or traveling?? That makeup bag will come in handy, trust me!
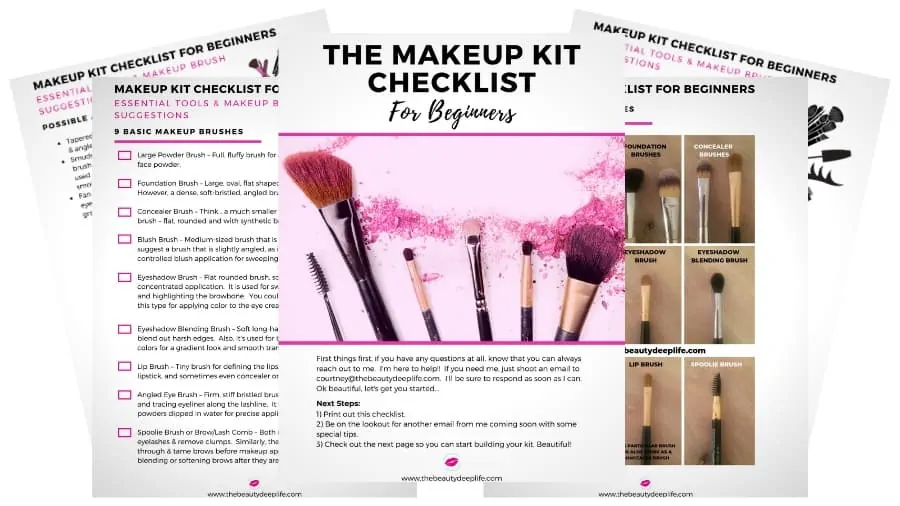
Get your own FREE copy of the Makeup Kit Checklist for Beginners Below! Start building your kit and check them off as you go Beauties!!
Now Beauties, before we go over the essentials for a beginner makeup kit…before you start buying makeup products, tools, and brushes, I want to let you in on a little secret… A beauty product lover —> Pro Tip!
Every time I buy beauty products & makeup online which let’s face it is quite often lol, I get cashback… And YOU CAN TOO!!!
A win-win for beauty shopping online!! If it’s something you want, need or plan to buy online anyway, why not get some money back for it?? Right?!
Sign up for Rakuten (aka Ebates) so you can start earning cash back on your online purchases! You can use my code and get $10 back after you make your first qualified purchase! Don’t miss out! It’s FREE to sign up! Make sure you JOIN HERE!!
For more info on how Rakuten works check out my review here.
Beginner Essential Makeup Tools
- A Lash Curler – Get those lashes lifted, prepped, and ready! Let your lash curler do the heavy lifting for you!
- Q-tips – As a makeup beginner, you will make some mistakes from time to time, shoot we all do! These will save you from having to do a major makeup re-do/ overhaul. Depending on what you are fixing, you can use it dry or add a little water.
- Makeup Wipes – Removing your makeup each night is crucial if you want to keep your skin healthy. If you have sensitive skin, use wipes made specifically for sensitive skin for gentle makeup removal and to avoid irritation.
- Wedged Sponge – I love using these from time to time and can be used for applying foundation as well as easy blending. Also, a great option if your foundation brush needs cleaning, but you are short on time. However, ladies, you can always try a beauty blender if you want to get fancy ;).
Let’s delve into brushes now. While you can certainly expand upon this list, these are the beginner makeup brushes every woman should have…
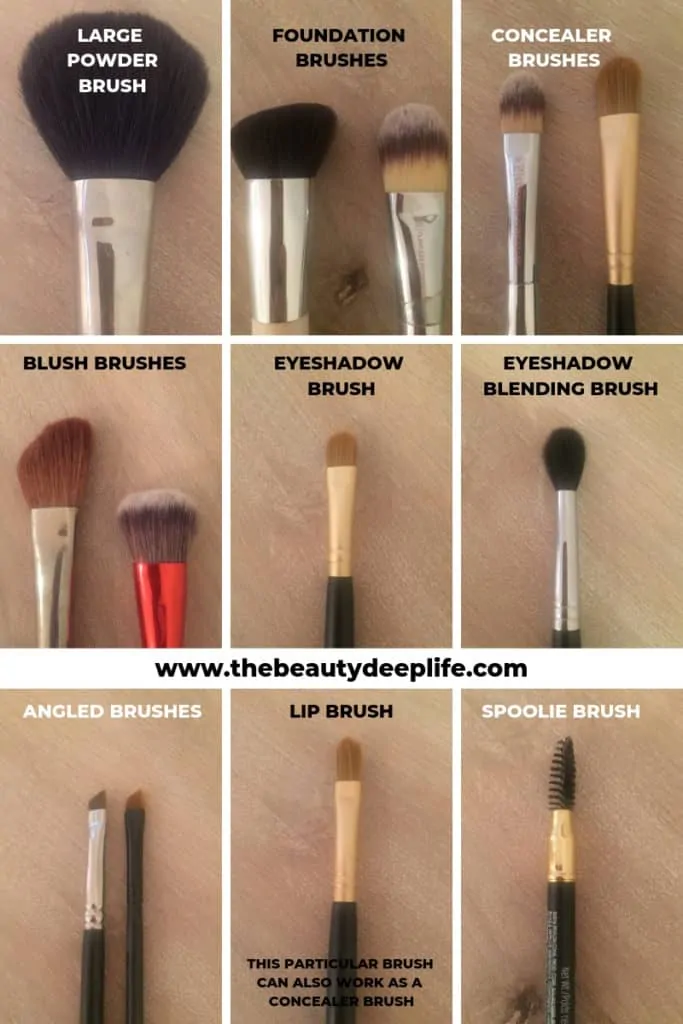
- Large Powder Brush – Full, fluffy brush for a dusting of loose face powder.
- Foundation Brush – Large, oval, flat-shaped brush with synthetic bristles. However, a dense, soft-bristled, angled brush works well too!
- Concealer Brush – Think… a much smaller version of your foundation brush – flat, rounded and with synthetic bristles.
- Blush Brush – Medium-sized brush that is rounded. However, I generally suggest a brush that is slightly angled, as it can give a more defined, controlled blush application for sweeping along the cheekbones.
- Eyeshadow Brush – Flat brush, sometimes can be denser for a concentrated application. It is used for sweeping color across the lids and highlighting the browbone. Also, you could get a smaller version of this type for applying color to the eye crease.
- Eyeshadow Blending Brush – Soft long-haired brush used to soften and blend out harsh edges. Also, can be used for blending multiple eyeshadow colors for a gradient look and smooth transition.
- Lip Brush – Tiny brush for defining the lips. It can be used for gloss, lipstick, and sometimes even concealer on small areas of concern.
- Angled Eye Brush – Firm, stiff-bristled brush, used for defining eyebrows and tracing eyeliner along the lashline. It works well with creams, gel, or powders dipped in water for precise application.
- Spoolie Brush or Brow/Lash Comb – Both can be used to separate eyelashes and remove clumps. Similarly, they can be used to brush through and tame brows before makeup application, as well as for blending/softening brows after they are filled in.
Once you have mastered the beginner brushes, you can start adding to your makeup brush arsenal. While these next brushes aren’t necessary, they are a few additional add-ons I think you will enjoy trying later.
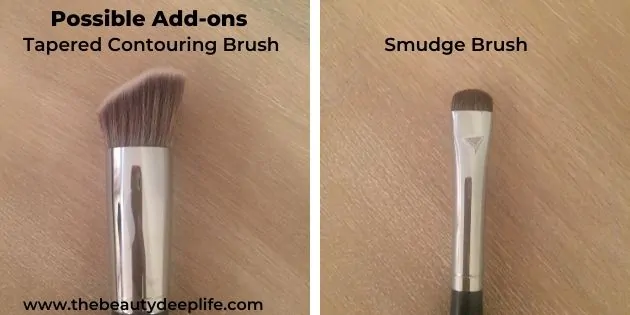
- Tapered Contouring Brush – This one is slightly slanted and angled.
- Smudge Brush – Look for a rounded, short and dense bristled brush. Using a sweeping back and forth motion, it can be used on eyeliner to soften, blur, and blend out or to create a smoky look.
- Fan Brush – This brush is ideal for sweeping away loose eyeshadow makeup that has fallen under your eyes. Also, it is great for applying highlighter to the cheekbones.
Beginner & Up: Must-Have Makeup Products
Beauties, I’m going to break these down for you based on your skills and experience.
While some of you may feel like beginners, it is possible that you are further along than you realize. And for those of you that are complete beginners, this will allow you to see what you need for your kits now, as well as, what you may want as you grow in your skills.
Minimalist, Beginner, & Makeup Newbies:
Best Starter Products…
- Foundation
- Concealer
- Loose Powder (translucent is the easiest option)
- Blush (powder form is the easiest to master)
- Eyeshadow Palette (natural/neutral colors are best for newbies)
- Eyeliner Pencil or Pot of Cream/Gel
- Brow Pencil, Powder, or Both (a cream or pomade could work too)
- Mascara
- Lipstick (suggested – at least a nude and a red)
- Lip Liner
- Primer (Optional)
Related: Best Makeup For Beginners: Makeup Must-Haves + Budget-Friendly Picks
Intermediate:
- All of the above… plus, add in a shimmer highlighter and a bronzer (matte or shimmer).
Advanced:
- All of the above… plus, add in a highlighter and a shading powder – these are always matte for contouring.
More Advanced:
- All of the above… plus, add a contouring cream and highlighter cream.
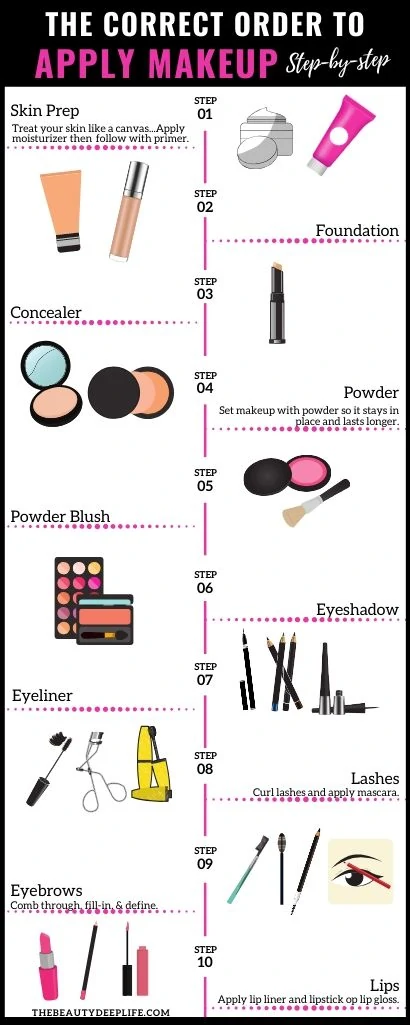
Beginner & Up: Basic Steps And Order For Makeup Application
You may be thinking, “ok so now that I know what makeup to use and I have my tools, which product goes first?”
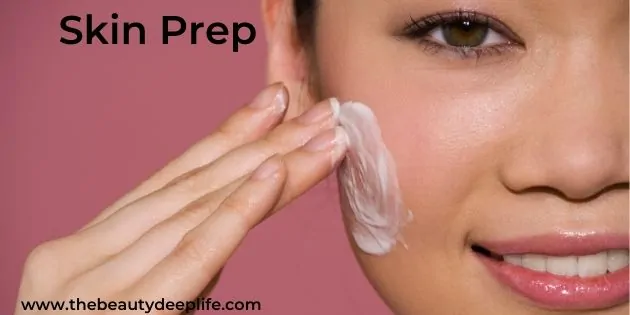
Well, before we can even get to the steps and order of application, we need to address what you put on your face before your makeup. First, we need to talk about the skin prepping process.
Skin Prepping Process
Think of your skin as your canvas. Makeup absolutely loves a moist, supple canvas! So, for a smooth application process, you want to start with a moisturizer on clean skin (this may require a quick face washing beforehand).
By contrast, when the skin is dry and flaky, makeup tends to stick to certain areas of the face and winds up looking splotchy. So, if you tend to get dry, flaky patches, it’s best to start doing a gentle exfoliation about once a week to cut down on those. And of course, moisturize, moisturize, moisturize, Beauties!!
Now daily, after using your moisturizer, if you decide to use a primer, you want to apply that second. Then you are good to go for the next makeup steps!!
Pro Tip: Always use a moisturizer made for your skin type (dry, normal, oily, sensitive, acne-prone, mature skin, etc.). Not sure what your skin type is? This will help!
Step By Step Makeup Application
Minimalist, Beginner, & Makeup Newbie Next Steps
- Foundation
- Concealer
- Set Makeup with Powder
- Use Powder Blush
- Eyeshadow (for most novices, I suggest starting with a natural/neutral colored palette and mastering that first)
- Eyeliner
- Curl Lashes and Apply Mascara
- Brush/Comb Through Brows, Fill-in, and Define
- Lips (Liner and Lipstick)
Intermediate Next Steps
- Foundation
- Concealer
- Set Makeup with Powder
- For Non-Ethnic Women, it is suggested that you start with a Bronzer, then Powder Blush, and lastly Shimmer Highlighter. Ethnic Women should start with Powder Blush, then Bronzer, and lastly Shimmer Highlighter.
- Eyeshadow
- Eyeliner
- Curl Lashes and Apply Mascara
- Brush/Comb Through Brows, Fill-in, and Define
- Lips (Liner and Lipstick)
Advanced Next Steps
- Foundation
- Concealer
- Set Makeup with Powder
- Contour with Shading Powder
- Powder Blush
- Shimmer Highlighter
- Eyeshadow
- Eyeliner
- Curl Lashes and Apply Mascara
- Brush/Comb Through Brows, Fill-in, and Define
- Lips (Liner and Lipstick)
Most Advanced Next Steps
- Foundation
- Concealer
- Contour with a Cream or Liquid
- Highlight with a Cream or Liquid
- Set Makeup with Powder
- Optional: Do Some Accent Contouring with Shading Powder
- Powder Blush
- Shimmer Highlighter
- Eyeshadow
- Eyeliner
- Curl Lashes and Apply Mascara
- Brush/Comb Through Brows, Fill-in, and Define
- Lips (Liner and Lipstick)
Beginner & Up: Tips And Techniques For Makeup Application
Pick Your Look
It’s essential to think about the look you want to achieve. Are you going for a natural everyday look? Or is it date night?
For a natural everyday look, you want to stick to neutral and earthy tones. For date night or to play it up a bit, you can go for more dramatic, brighter colors…you can even pull out that red lipstick! However, this is not to say that red lipstick can’t be a daytime look too.
Bottom line, knowing the look you want to achieve will help you to determine color choices for makeup and just how heavy your makeup can be. For example, for a daytime look, you might stick to a bronzer, whereas at night, you may want to take things up a notch and try some contouring.
Decide What Needs Hiding vs. Enhancing
The next task is to figure out if you are trying to hide anything… Enlarged Pores? Use a primer, for sure!
Want your face to look slimmer? Contouring should be your focus!
Have skin concerns that need some camouflaging? Acne, dark marks, dark undereye circles, or signs of aging? Most of these can be hidden with concealer and strategic product placement.
Trying to look younger? This can vary depending on age and how progressed your skin aging happens to be. I go into more detail on this topic in my makeup guide for women over 40, but generally, this can be achieved through specific product choice, product formulation/type, and application techniques.
It can involve everything from the type of foundation you use all the way down to what you do for your eyebrows & lips. In fact, each product listed below has particular ways it can be used to make you appear younger. Want to know how to look younger using concealer? Check out this post (Tip #12): How To Use Concealer The Right Ways: Game-Changing Tricks & Expert Makeup Tips!
Are there any features you want to enhance? Do you want to bring out your eyes or make your cheekbones pop?
Define your nose a little bit? Accentuate those beautiful eyebrows? These are all things to keep in mind for this next section as we discuss the application process.
So, let’s get to it, shall we? It’s time to pull it all together! Now, let’s focus on how to use some of your must-have products and tools together.
Primer
Again, you don’t have to use a primer, but they can be beneficial in providing a smoother makeup application and minimizing pores. Should you use a primer, remember to apply it right after applying your moisturizer.
Need a primer that helps with minimizing pores? Check out these top primers for pores that also help with fine lines & wrinkles!
Foundation
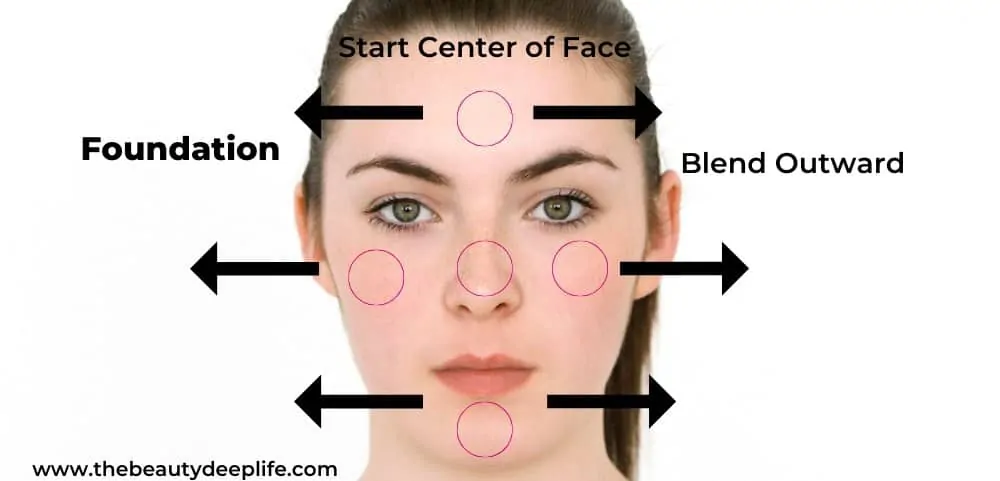
The purpose of makeup foundation is to even out your skin tone and give you some coverage that is both flawless and natural-looking.
- Using the foundation brush, you can take small amounts of the foundation and apply in a dot or tapping like fashion from the middle of the face and blend outward.
- Start with the forehead, then down to the nose, cheeks, and chin (don’t forget the neck and ears).
- Using the brush working downward will minimize the appearance of pores and peach fuzz on the face.
- If you are using a beauty blender, you’ll want to dampen with water, squeeze, and then apply your foundation.
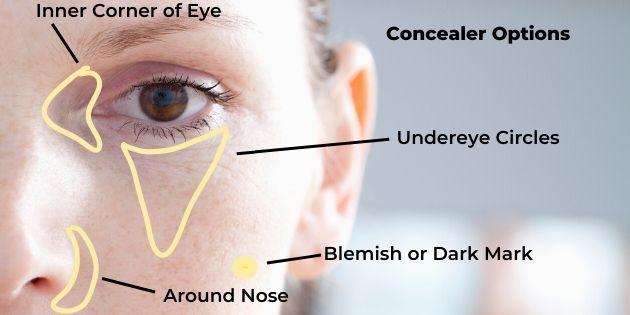
Concealer
Concealer is necessary for hiding imperfections like blemishes, dark marks, dark eye circles, scars, redness, discoloration, etc. Concealers give you a heavier coverage than foundation. In fact, anything your foundation doesn’t cover, your concealer should.
- Using the concealer brush you want to apply the concealer, I find it best to sort of tap or pat the concealer on.
- A concealer that works great on redness or a new pimple will usually have a slight undertone color like olive (very subtle greenish tone) or subtle yellowish tone to counter the red. Additionally, a full coverage concealer that matches your skin tone can work.
- For very stubborn dark spots, marks, and discoloration, a concealer with a subtle peach or orange undertone could be most effective if you have a darker skin tone. You could opt for a concealer that matches your skin tone for minor issues so long as the coverage is heavy enough.
- For women with dark circles, you will likely need to use a different concealer color for under the eyes than you use for the rest of your face.
- If your eye circles have a sort of bluish color, you want a concealer with a subtle orange or peach undertone. But contrast, you don’t want to use a concealer with a yellow undertone. Placing a concealer like that on top of dark circles that have a blue hint to them will create a greenish halo under the eyes (not a cute look). 😉
- Additionally, for under-eye circles, you will likely want to apply your concealer in an upside-down triangle shape (called the triangle of light). You may also want to apply to the inner corners of the eyes. Don’t forget to blend!!
- Makeup Tricks to Hide & Cover Dark Circles Under the Eyes
- How To Use Concealer The Right Ways: Game-Changing Tricks & Expert Makeup Tips
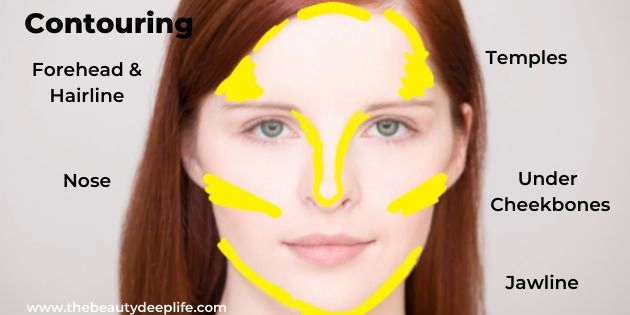
Contour/Shading Cream Or Liquid
Contouring is meant to create an illusion for the face, giving more definition and symmetry where there is not. Dark colors take away, reduce, and can make things appear smaller. Thus, contouring provides a shadowing effect that sculpts the face (structure and features) and makes things recede.
- Generally, you want to go with a color that is around 2-3 shades darker than your skin.
- Consider using a tapered brush, sponge, or synthetic brush similar to your concealer brush for application.
- You can apply it just below the cheekbones (for a slimmer face), to the jawline (for a slimmer face), along the sides of the nose (for a thinner-looking nose), along the sides of the forehead or temple areas, and along the hairline (works great for minimizing foreheads too).
- Be sure to blend out harsh lines.
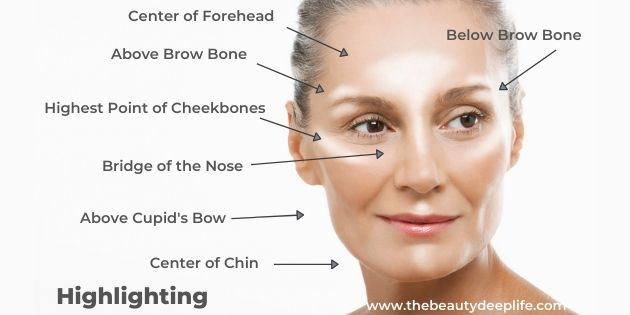
Highlighter Cream Or Liquid
The general rule for makeup and colors is that light colors add to and bring attention to something, they can make things appear closer, larger, or more prominent. Highlighter is therefore meant to enhance parts of the face.
- You should look for one that is a shade or 2 lighter than your skin tone.
- Using your concealer brush or one slighter larger than it, you can apply cream highlighter along the bridge of the nose, slightly above the cheekbones (highest point of cheekbones), the center of the chin, the center of the forehead, under the eyebrow arch, above the eyebrow arch, and/or above the cupid’s bow.
Powder
Your powder’s purpose is to set your cream/ liquid makeup, provide staying power, and prevent smearing. It is also essential for controlling shine.
I tend to prefer translucent powders since it goes on colorless and can be used on all skin tones. But if you want to use a pigmented powder, just be sure that it is a shade lighter than your foundation because powders with pigment can end up looking darker when applied over foundation.
For application, you want to ever so lightly, using the powder brush, dust your powder onto the face.
Bronzer
A bronzer is meant to give you a sun-kissed look and glow. So, when using one, you want to focus on the areas where the sun naturally hits your face (chin, nose, forehead, hairline, cheeks-but not under cheekbones). You can use your powder brush for bronzer application.
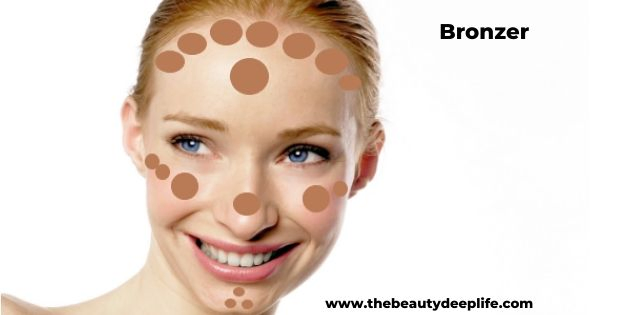
While some people suggest using a bronzer to contour, I advise against this.
Contouring is meant to manipulate light and shadows. For example, to define your cheekbones, make a nose slimmer, give a chiseled jawline, etc. When you look at the natural shadows cast on your face from light beaming down or towards it, those shadowy areas appear darker (not brighter or shimmery), certainly not warm, and will have a slightly cool, almost grey undertone.
Therefore, contouring products tend to work best if they have a slightly cooler undertone and are matte. You basically want to avoid anything that veers too far in the direction of orange or red (particularly for fair and lighter skin tones).
Most bronzers have a very warm undertone to their color. Which is why using a bronzer to contour will often make those areas of the face look a little muddy and unnatural instead of defining them.
Contour/Shading Powder
As mentioned before, contouring is meant to define and sculpt the face. You can use an angled or tapered brush to gently sweep your shading powder just below the cheekbones, along the jawline, along the sides of the nose, along the sides of the forehead or temple areas, and along the hairline. Blend Beauties!
Blush
Newbies, stick to powder, it’s the easiest to apply and correct.
- After adding blush to your brush, gently tap off any excess powder. Always do this to avoid applying too much.
- Next, look in the mirror and smile. Notice the “apples of your cheeks” (roundness that forms on cheeks).
- Using the brush, you will want to apply, sweeping from the outer part of the “apples” back along your cheekbones towards your hairline. But first, picture an imaginary line extending down your face from the outer part of your iris, past the apples and then stopping in line with the end of your nose. This line should divide the apple into two parts. Focus on the outer section. This is the part that goes from the line towards the hairline. Blush shouldn’t go any closer in towards the center of your face than the outer iris.

Shimmer Highlighter
Shimmer highlighters work well on the bridge of the nose, the cheekbones (highest point of cheekbones), the center of the forehead, above and below the eyebrow arch, the inner corners of the eyes, and a tiny bit above the cupid’s bow.
Although, quite obviously, you don’t need to apply it to all of these areas. These are just some places where it can look nice.
For larger areas, you can use a fan brush. The key with shimmer is to go super light and build…sometimes less is more.
Eyeshadow
Eyeshadow is a great way to enhance your eyes and bring attention to them. For beginners, I suggest a neutral eyeshadow palette for mastering a natural look first. When applying eyeshadow with your basic eyeshadow brush, for more intensity it helps to tap on the color. For more of a color wash, it helps if you swipe the brush left to right over the lid.
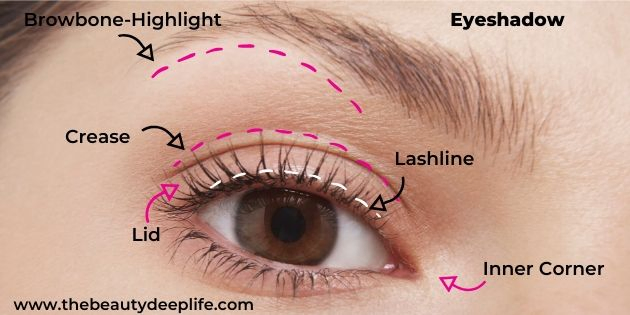
An Easy Method Of Eyeshadow Application & Color Placement
Here is one method (of application placement) you can try as a beginner with some basics to keep in mind when using several shadows from a neutral palette. Use the diagram below for help determining the mentioned locations on the eye.
- Generally, you’ll want to apply a mid-range shade from your palette onto the lid to act as your base.
- The lightest shade, you’ll use to highlight the browbone area. It should fall above the crease and below the eyebrow. Apply a tiny bit at the inner corner of the eye as well.
- You’ll use a darker shade in the crease of your eye.
- Don’t forget to blend out hard lines and create smooth transitions between your colors!!
For More Eyeshadow Tips for Beginners like selecting formulas, more brush options, and picking the best colors based on your eye color!!
Ready to move beyond a neutral eyeshadow palette?? Check out these Pro Eyeshadow Tips
Eyeliner
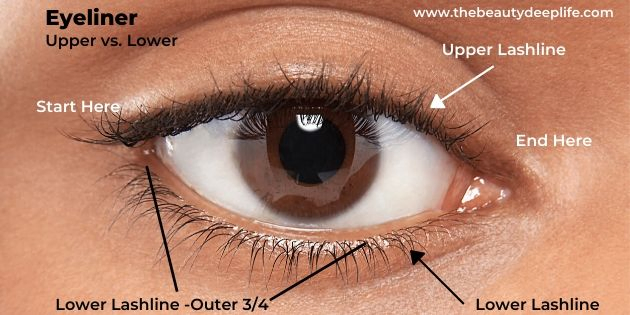
Applying eyeliner to both the upper and lower lash lines is optional. You do not have to apply eyeliner to both areas; in fact, doing so can sometimes mean you run the risk of making your eyes appear smaller. So, if that is a concern of yours, opt for just the upper instead.
Eyeliner Pencils (easiest option for creating eye definition) Upper Lash Line Tips:
- If used along the upper lash line, you can create the look of fuller lashes. To do so, be sure to stay as close as possible to the base of the lash hairs.
- Make sure as you apply eyeliner, the thickness of the line is thinnest at the inner part of the eye. It can get thicker the closer you get to the outer corner of your eye.
- For a softer look (or if you struggle with a steady hand), after lining, you can take a q-tip to blend and smudge the line a bit gently.
Eyeliner Pencils Lower Lash Line Tips:
- With makeup beginners, the safest option for lining the lower lash line is to line only the outer 3/4 (or 2/3) of the eye. This way, you avoid enclosing the eye too much and thus prevent them from looking too small.
- Rather than holding the pencil firmly and create a hard line, I often suggest holding the pencil lightly in your hand. Then gently sweep it across and under your lashes. Again, don’t use a lot of pressure; you want the line to stay soft.
- However, if you make it too strong, you can always just smudge it out a bit with a q-tip.
Related: Different Types Of Eyeliner: The Perfect Guide To Formula & Styles
Eyeliner Using An Angled Brush Upper Lash Line Tips:
- If you use an angled brush, first dip it into the cream or gel.
- What I find works best is to start with the flick on each eye first. That way, you can make sure they are symmetrical and match before moving on.
- Looking at the brush, you should notice that on one side, the bristles are longer.
- Place the brush so that the longest bristles are on the outer part of the eye, tight and close to the base of your lashes.
- Starting at this top outer corner, move inward. If you plan on lining the full upper lash line along the entire lash line, what helps is as you move inward, you then stop around the middle of the lash line.
- Next, you want to work from the inner eye back to this middle section of your lash line. So, take your brush and go in really tight and close to the lash line at the inner part of your eye. Start at this innermost part of the upper lash line and move outward until you connect this line to the middle section.
Eyeliner Using An Angled Brush Lower Lash Line Tips:
- For a more defined line at your lower lash line, one option is to take the brush and dip it into water. Then dip the brush into a powder eyeshadow.
- Blot the brush on a towel and then apply it to the lower lash line.
- Start from the outer and work inward. The easiest way to apply it is to sort of press it lightly along the lash line. However, only apply it to the outer 3/4 (or 2/3) of the eye and stay as close as possible to the base of the lashes if you want to avoid making your eyes look small.
Eyelashes
First, curl your lashes, secondly apply your mascara. With your mascara wand, you want to start at the base of your lashes then wiggle the brush and move upward, going through the lashes from root to the tips. Let it dry and then apply your next coat. Look for waterproof mascara if you have trouble with your mascara smudging.
Eyebrows
- First, using your brow brush (spoolie brush) comb through the brows, up and outward.
- Next, fill them starting at the bottom middle (right below the arch). Pencil works well as you can draw small, short strokes in the direction of your hair growth (like drawing in individual hairs). Move along the brow upward and outward, ending at the tail.
- Then you can go back to the front of the brow and fill in there. Be sure to apply the product lightly to avoid a harsh or angry-looking brow.
- You can next go in with a brow powder and your angled brush to create a fuller brow and to set the brows if you need to. Setting the brows helps for preventing smudging throughout the day.
- Lastly, take your spoolie or brow brush and brush through your eyebrows again to soften them up a bit for a more natural look.
With brows, it can take some practice but, the more you practice, the better you will get. In school, we learned by taking a piece of paper and drawing brow after brow after brow. Doing this can help you to experience holding the brush and to learn how to only apply light pressure for fine, small hair-like strokes.
- Ready to take your brows to the next level? Here are fabulous beauty tips for your eyebrows to get those brows on point ladies!
Lips
The purpose of a liner is to help define your lips and prevent bleeding of your lipstick color.
- Using your lip liner pencil, line and fill in your lips fully.
- Next using a lip brush apply your lipstick starting from the center of your lips and moving outward.
- If you are using a gloss, then you don’t necessarily need to use a liner, but you can if you want more definition. Simply line and fill the lip with a pencil that is a close match to the gloss shade. Then apply your gloss with either a brush or the wand it comes with.
- Discover How to Look Younger: Makeup Tips for Your Eyebrows and Lips!
Common Questions/FAQ About Beginner Makeup
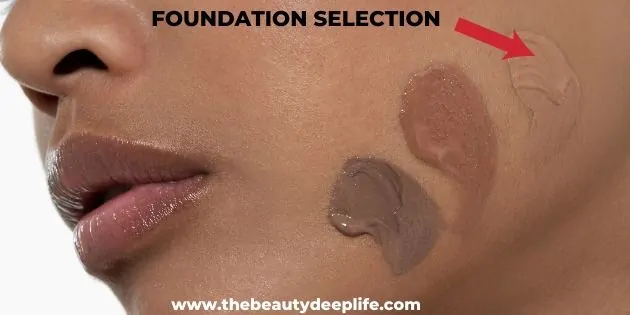
How can I pick the right color of foundation?
When it comes to picking the right shade of foundation, you want to always try it out first which is why I don’t really suggest drugstore brands.
So, assuming you are in a Sephora, Ulta, or department store, what you want to do is grab 3 colors that look the closest to your skin coloring. Apply all 3 to your jawline.
The jawline is the best area to test on because it represents that halfway mark between the face and the neck. For most people, their neck is a bit lighter than the face since it tends to get less sun.
The one that disappears into your skin is the perfect match!
Which is better cream, gel, or powder blush?
This all depends on your skin type…
- Cream blush works well for mature skin and dry skin. It blends well and draws less attention to dryness and fine lines.
- By contrast, gel blush is great for oily skin or normal skin as long as it is well moisturized.
- Powder blush is the most universal option and works on the majority of skin types.
How do you clean makeup brushes?
Check out the best ways to clean your makeup brushes, how often, and what exactly to use here!!
What undertone should my concealer have?
This depends on what you are using the concealer for, the area you are trying to conceal, and how much hiding may be needed, but here are some general guidelines…
- When hiding redness which can sometimes occur with a new inflamed pimple, you want your concealer to have an olive (very slight green) or yellow undertone to counter the redness.
- For undereye circles, if they have a purple undertone or tint to them, you want a concealer with a yellow undertone. If they have a blue or brown tint to them, you want a peach or orange undertone to your concealer.
- For dark marks, the result of excess melanin production, and often post-acne scarring for darker skin tones, you want a concealer with a peach or orange undertone.

How do I know what blush color to choose?
Generally, you want your blush color to be something that resembles the flushed look you get to your cheeks naturally after working out or being out in cold weather.
- Fair skin looks good in light pinks, light peaches, and a very soft or sheer rose.
- The more olive in your skin, the more you want to move away from true pinks and into the corals and peaches.
- Medium skin looks good in medium to deep pinks, roses, peaches, warm golden browns, and apricots.
- Darker skin tones look great in dark bronzes, deep pinks, deep apricots, and reds (on very dark skin).
Are You Tired Of Trying To Figure Makeup Out All On Your Own?
No longer feel confused, overwhelmed, or intimidated about your makeup products, brushes, and application!! Get started on your makeup journey with The Ultimate Makeup Beginners & Beyond Bundle!!
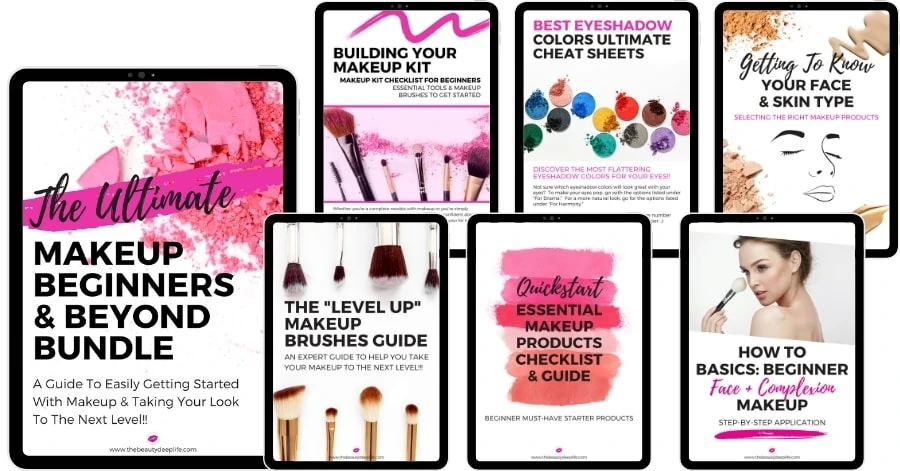
Jam-packed and full of makeup tips, how-to’s, step-by-steps, checklists, cheat sheets, guides & more!! Ready to step into the world of makeup and confidently take your look to the next level??
- Learn all the fundamentals of makeup, including building your own makeup kit and selecting the right tools and products for a simple daily routine.
- Discover which products you need to enhance different features or hide your flaws.
- Get a comprehensive brush guide with PRO application tips for each & every type of makeup brush!
- Step-by-step directions on how to achieve a flawless complexion.
- And so much more!
The Last Thing You Need to Know about Beginner Makeup
Above all, the best way to learn about makeup when you’re a beginner is to experiment. Play with different tools, try different shades, and don’t be afraid to make mistakes. The more you practice, the easier it will get and the better at it you will become.
Always start light and build. And if it doesn’t look just right the first few times, don’t beat yourself up about it. You can always wash it off and try again.
Even with my trained experience, I’m always learning, growing, and trying new things. So, have fun with it!
Once you have become comfortable creating your everyday look and your everyday makeup routine, then it’s time to try new things and take things up a notch.
Ladies, now that you know some of the overall beginner makeup basics, it’s time to move into more specifics. My suggestion is to move on to one of these next three articles with step-by-step tips and tricks to help you take your skills from makeup beginner to the next level.
Thank you for sharing all your knowledge about beauty products! I’m all about less can be so much better for our health. Thanks again!
glad to help 🙂